As many readers are aware, the field of German WWII camouflage is overpopulated with countless experts (Wizards) who pump out facts on social media with little or no experience with originals much less actually making this stuff.
One of the oldest fairy tales is that caps and helmet covers were made from scraps and leftovers from cutting smocks and shelter quarters. This is highly unlikely, to the point I’m comfortable putting it in the total fantasy category.
When one cuts smocks and shelter quarters (which I have personally done), there is little left aside from slivers. First off, factories do not cut garments one by one with scissors. The cutter determines how long a stretch of cloth they need for what they are cutting, then the fabric is rolled out and stacked in multiple layers. The pattern is laid or drawn on the top layer, and cutting is done with a power knife. Small parts are sometimes cut with dies on a press. With this cotton poplin camo fabric, it’s possible to cut up to 50 layers comfortably.
As a side note, regarding the shading of most camouflage items. The cutting tables in factories are often dozens or hundreds of feet long. Fabric typically comes on rolls of no more than 100 yards (to keep it manageable) which means each roll may only yield a few layers in a spread. Thus, one spread could be made up of 5-10 different rolls, possibly in multiple shades or patterns of cloth. Hence the mix-match on WWII items.
Keeping how cutting is done in mind, with regards to shelter quarters, if one has had second grade geometry it’s not too difficult to envision how two triangles, joined at the hypotenuse, make a rectangle. That takes up almost the entire width of the cloth (the Germans had a about 5cm extra on each side). All that remains from cutting Zelts is narrow strips or slivers on the side. This explains why the borders and neck flaps are so often different from the Zeltbahn– they were cut separately.
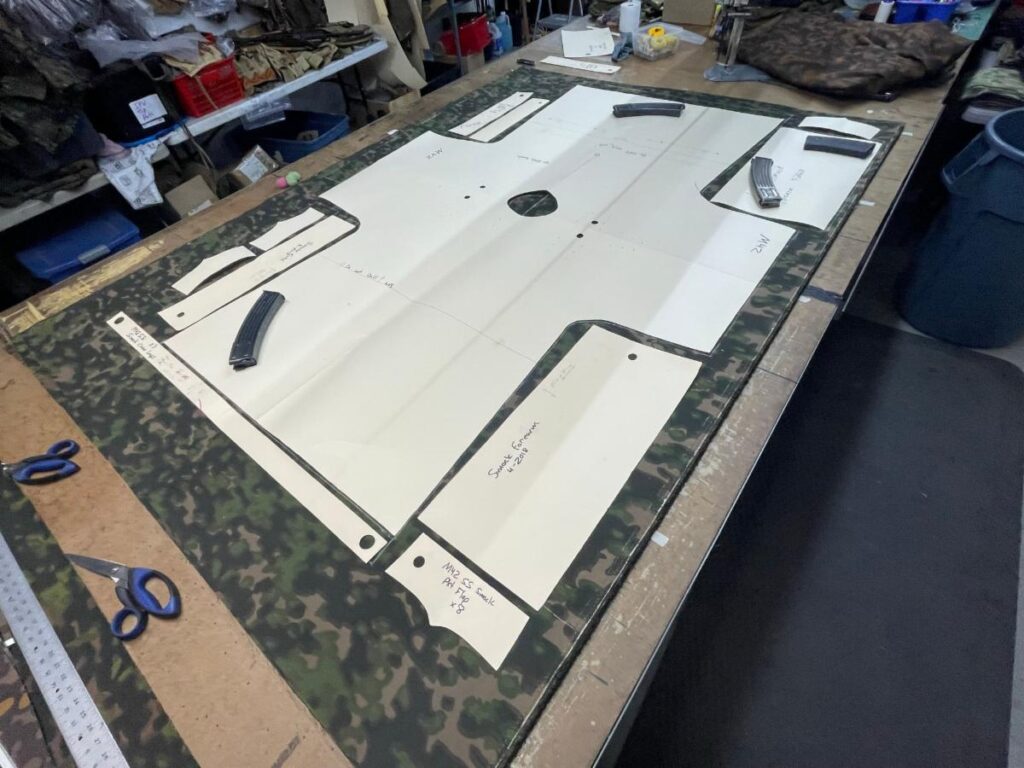
But smocks?? Pretty much the same situation. Above is a photo of the cutting of the “Long” sizes we just did. Note that original fabric is about 6 inches narrower than ours is, so the ends of the smock sleeves go all the went to the edge, leaving even less than what one sees here.
With the smock body being a large cross shape, there remains space in the four corners of the cutting block, giving just enough space to yield the sleeves, cuffs, and plackets. Camo loops and waist bands would have been cut separately in long strips for efficiency which is why they typically don’t match the smocks at all on originals. The leftovers are typically odd shaped and too short to be useful for much of anything.
And yes, of late we really have been using MP44 mags for pattern weights simply because they work well.
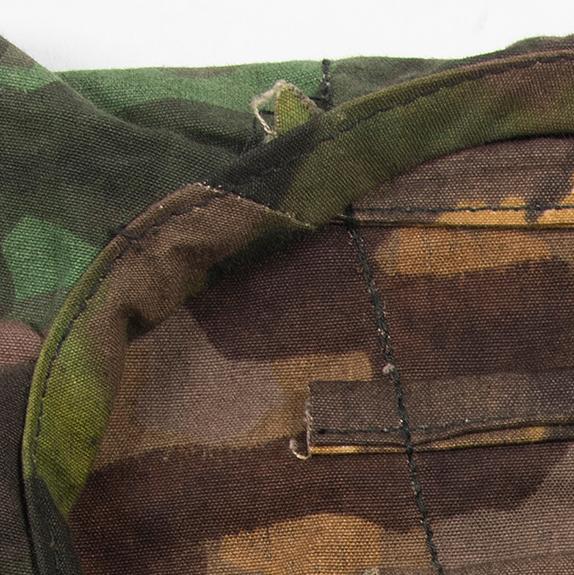
Neck bands: This is one piece that cannot be efficiently cut with the smocks at all. How can I know such a thing? Simple. Just like sleeve binding and collars, neck bands are cut on the bias (diagonally). Otherwise, they will bind and end up puckered and wrinkled when the workers try to sew them around the neck hole. They are not cut in a “C” shape. This is basic garment sewing 101.
For incredulous types, the photo above is of an original smock- one can actually see that the grain of the fabric of the band is running diagonally. Moreover, note that it has been made from two pieces of fabric and that the seam joining them is also diagonal. Why? Again, simple geometry. I’ve had original smocks with neck bands made from as many as 3 pieces.
I’ve learned this both from making the things as well as fondling and loving on original smocks for the past 30 years. It’s basically forensics, not something I pulled out of my rear or determined by zooming in on photos online.