Category Archives: WW2 German helmets

Waffen-SS Helmet Covers

This is the last installment on the ins and outs of the most expensive helmet decorations in the universe.

Made from scraps: Over the years, I have read and heard much yammering about covers and caps being made from scraps left over from smock production, attempting to explain the tendency for the use of parts in multiple shades and patterns on most Waffen-SS camo items. There are two reasons this is not likely nor even feasible.

First, most garment manufacturers specialize in one or two types of garments. Cap companies make caps, tent companies make tents (and shelter quarters) and garment companies often make just one thing- such as shirts or jackets or trousers- a few make multiple items, but it’s very common for it to be one. This is for reasons of efficiency as they literally count every second of production time when computing their costs. Thus it’s very probable that these items were not made in the same places.

Second, and more importantly, efficient cutting is one of the most important aspects to garment manufacture. The scraps remaining from cutting smocks and Zeltbahns are minimal- typically just slivers. I know because I’ve personally laid out the patterns and cut them.

Shading: It’s extremely rare to find original covers (or any WWII German camo) on which all parts are the identical shade or even pattern. The logical explanation for the mixed shades is quite simple.

In factories, fabric is cut many layers deep (up to 100) with a power knife or dies. To do a spread on a cutting table typically requires multiple rolls of fabric, and even the same run of fabric will have shade changes. When one has thousands of parts, in multiple shades, from multiple cuts, keeping them in matching color order is a nightmare and was obviously not a requirement.

Markings: Occasionally, one does find legitimate markings on original covers. These are exclusively related to the size of the cover. I have never, ever seen a maker mark, a year nor the much sought after Buffalo Wings stamp.

If marked, one usually finds an Arabic 1, 2 or 3 stamped in black or violet ink, typically toward the rear of the cover. Others have the size range of the liner, such as 56-59. The handful of those I have encountered were stamped on the lower front. Most covers are unmarked.

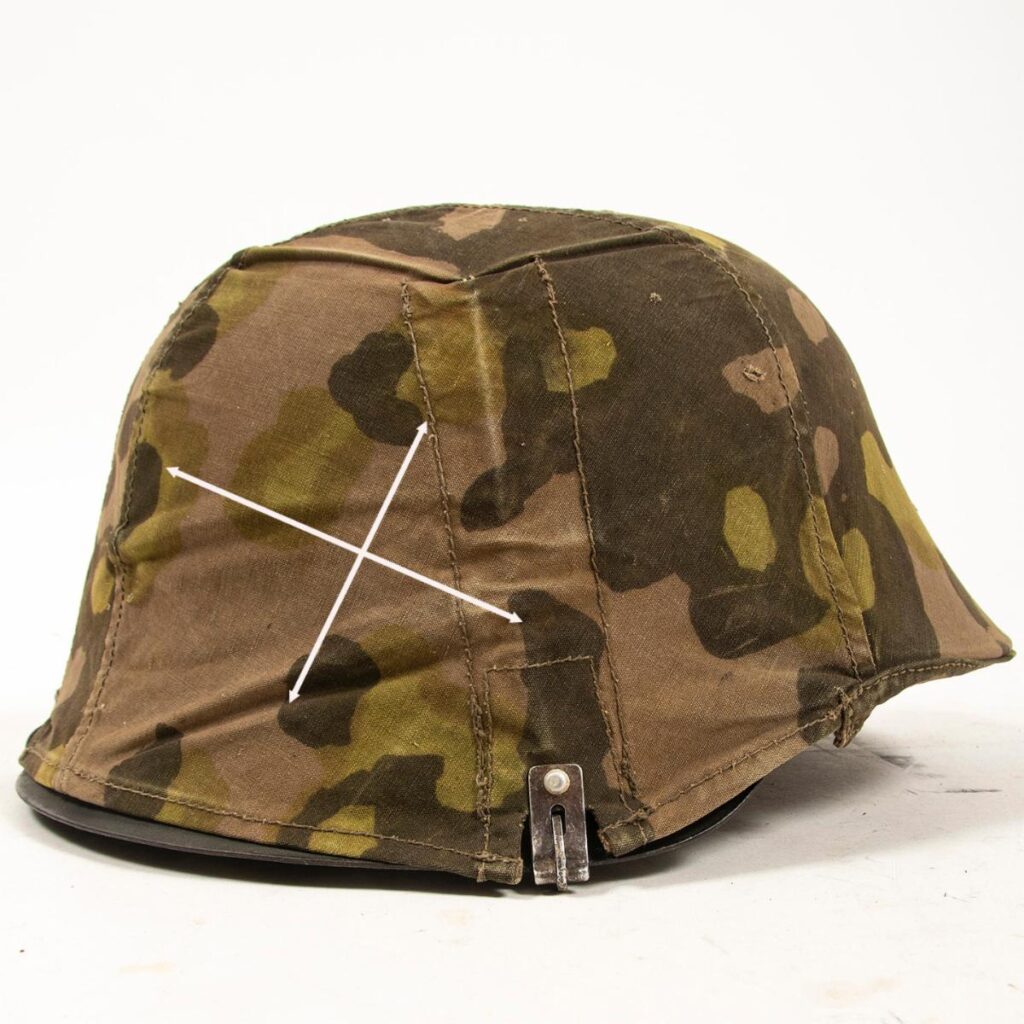
Profile: Some ado has been made about how the cover follows the profile of the helmet- namely along the lower edge of the sides. This is more a reenactor argument than one among collectors.

There is no one and only here. Some covers follow the lower edge of the helmet nicely (bottom cover), while others are practically “flat” (top cover). This trait is dependent upon how the parts were cut as well as how the worker folded the bottom seam.

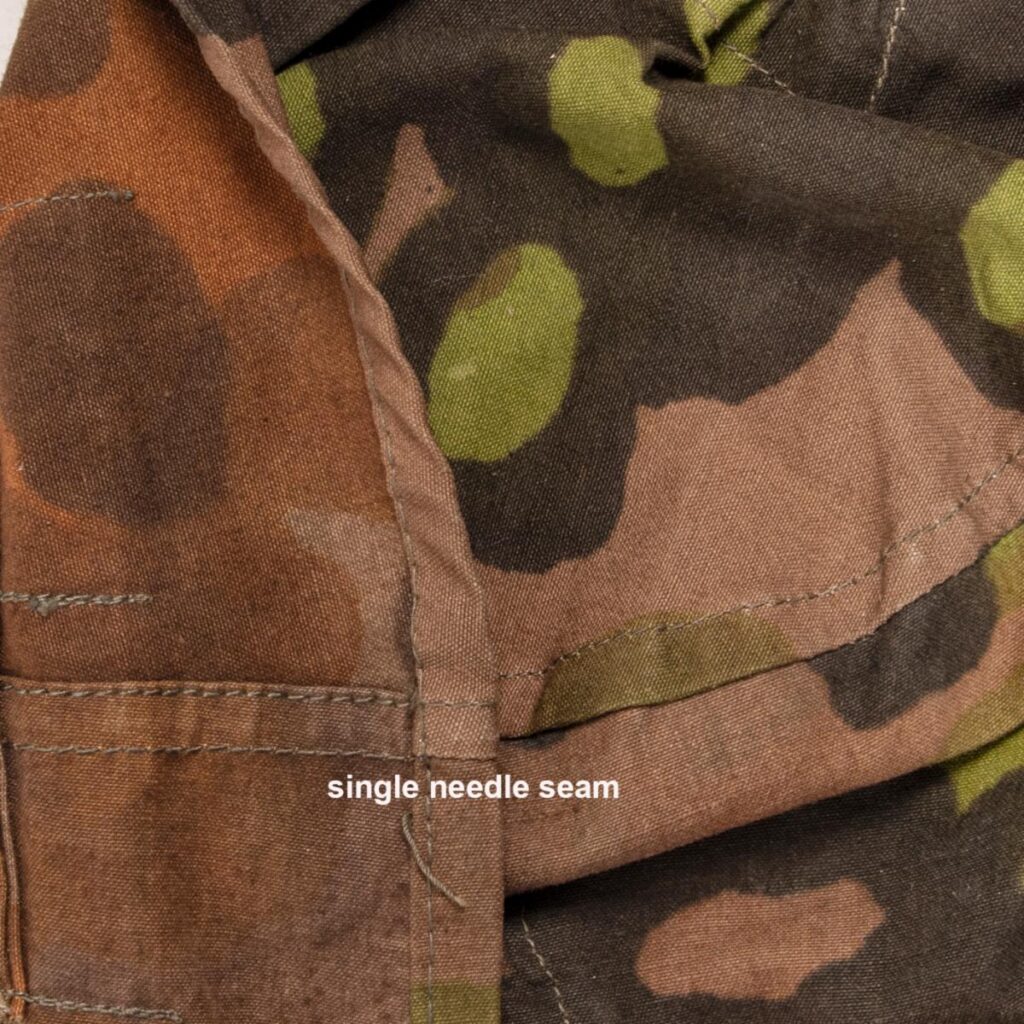
Double needle seams: Some WWII covers are made using a two-needle machine. One will see two perfectly parallel rows of stitches on both sides of the fabric on the two seams that join the center panel to the sides. Many covers were also made with normal single need machines which produce one visible row of stitching on one side and two imperfectly parallel rows on the other.

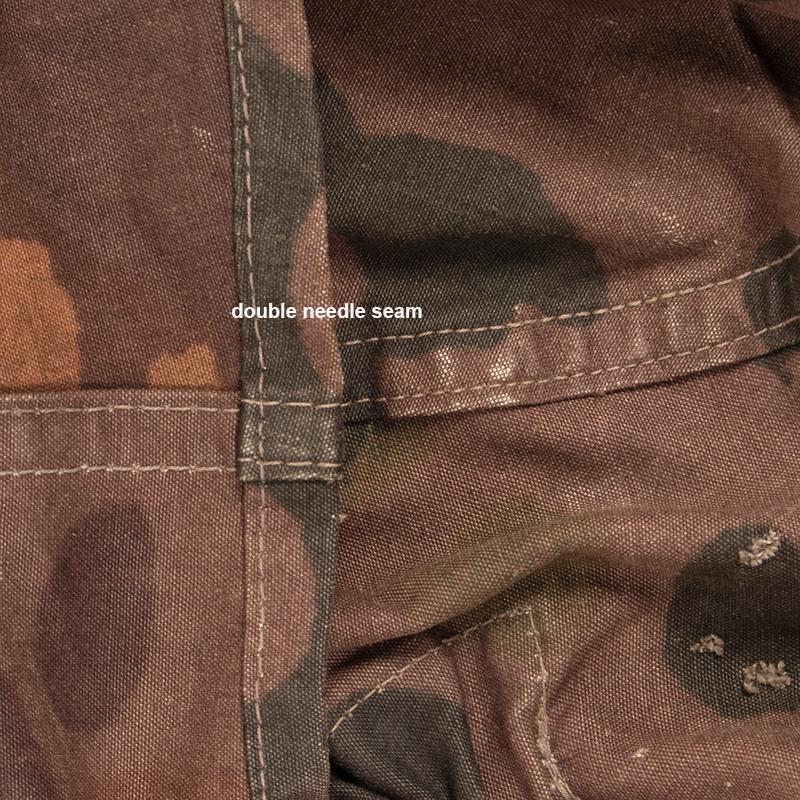
I have never seen true double needle stitching on a reproduction. Not yet anyway.

Note that at least one faker has attempted to recreate the two-needle stitch with a single needle machine. This produces two visible rows on both sides, but it’s impossible to keep them perfectly parallel. Look for railroad tracks- even when they curve, they stay evenly spaced. If one finds an imitation double needle stitch, the item is fake. Period.

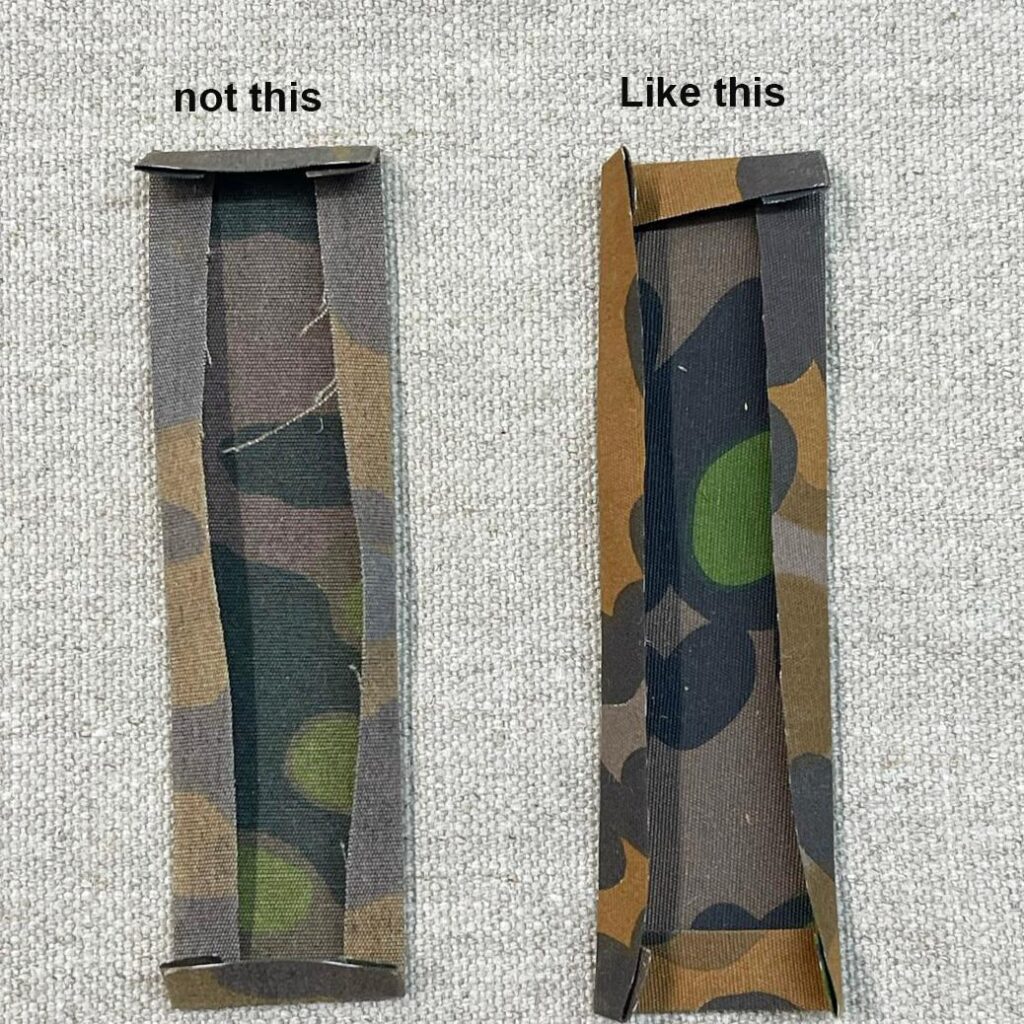
Original spring covers are typically folded by rotating the piece rather than sides and ends together. Why? It may be a few seconds faster.

Spring Covers: The rectangular covers that encase the rocker clips vary in width and length and are frequently a different shade or pattern than the main panels. On a few helmet covers I have seen, one or more of the spring covers was flipped green side out.

On early helmet covers, the top of the top of the spring is secured with hand stitched heavy cord to the top of the spring cover, and only the sides are sewn down. On later covers, a sliver of fabric is threaded through the top of the spring, and this is then stitched down along with the top of the spring cover.
One small revelation here- on nearly every original I have fondled, the spring covers are folded by being rotated- side, end, side, end as opposed to doing both ends and both sides. (photo above)This may have been an attempt to save a few seconds of production time.

.

A very well made fake, but the maker cut the fabric on the bias (diagonally to the grain.)

Direction of grain: The weave of a fabric creates a “grain”. In the case of helmet covers, the fibers of the cotton poplin run horizontally and vertically. Standard practice is to cut parts either perpendicularly or parallel to the sides of the cloth. If cut diagonally, the parts tend to stretch and deform when sewn making the ends not meet evenly and so forth. Cutting parts diagonally to the grain is referred to as “on the bias”. Parts that do need to stretch, such as sleeve binding and neck bands are cut this way.

If one sees the grain of the fabric running diagonally on an “original” cover, it’s a bad sign. Although I have seen this on one or two originals, I consider legitimate, only one of their three main panels was cut this way. (This isn’t relevant on the visors.) This is a red flag, but not a complete panacea.
Why would anyone cut a cover on the bias? Either they failed sewing 101, or, most likely they have limited fabric and are trying to fit the pattern to the piece they have. This can happen if one is say working along the edge of a triangle…or when they wanted to utilize a smaller piece of cloth- such as the leftover end of a roll or the good portion cut from an area of damaged fabric. Thus, it’s not impossible to have happened in 1943, but it’s atypical.

This is hard! Sadly, if someone is skillful, has real fabric (a Zeltbahn), and excellent repro clips (or original) it can be very difficult to discern a fake. There is no easy-one-and-only-magic bullet. The determination of yay or nay is made by observing multiple details. I remain undecided on probably 10-20% of the covers I handle.

Summation: As with many things, your first warning is always “too good to be true”. A real cover for $1500 that’s been on ebay for 6 months is not real. (In 25 years I’ve seen a grand total of ONE real cover on ebay- and that was in the last year.)

If it’s oddball (brass clips, drawstring, 44 dot) walk away no matter how good the story. Speaking of stories, never base authenticity on the seller’s yarn. I recommend sticking with reputable sellers with right of return policies even though one will not get a steal deal.
Conversely, if it’s $10 at a yard sale, go for it. Simple.

German Helmet Cover Fit

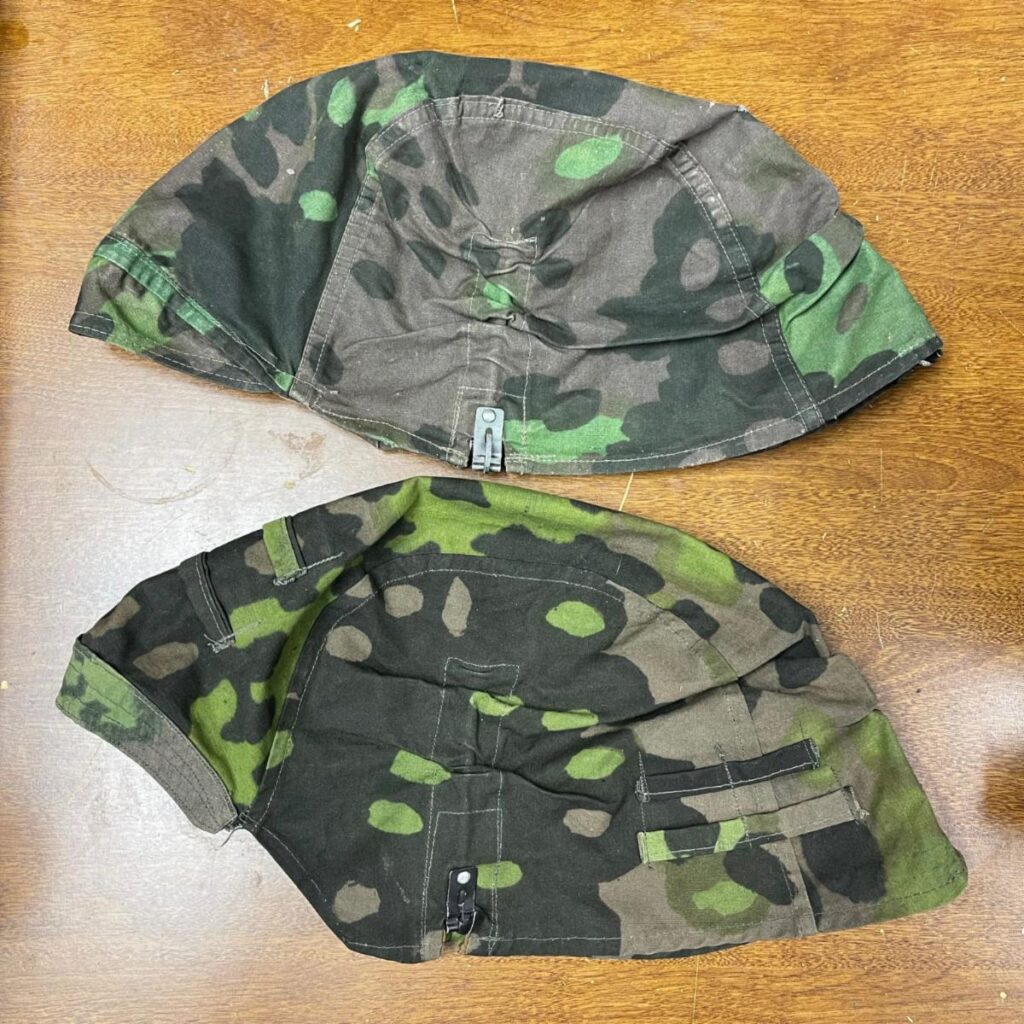
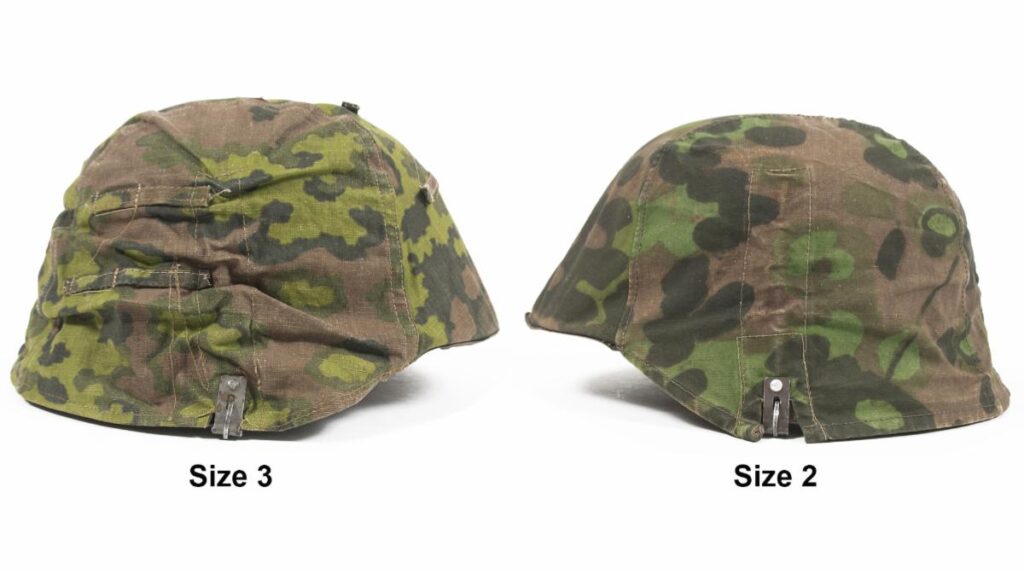
The two original covers used for our patterns.

German camouflage is one of the most popular categories of militaria both in the collector market as well as among reenactors/ living historians. With originals being some of the most expensive clothing in the universe, knowing what’s what can potentially mean thousands of dollars made or squandered for those attempting to hoard it. It also means that many people don’t have access to the authentic examples aside from images on the internet and in reference books.

Naturally, this has led to much expertise posted online being based on such photos or, amusingly, examination of reproductions that were supposedly copied directly from originals. When one has actual WWII examples in hand, it’s often obvious that there might have been some exaggeration somewhere along the line.

Due to some enthusiasts being loyal fans of particular brands of reproductions, we occasionally get lectured on the shortcomings of ours due to them not matching up to this or that other reproduction.

This is easily refuted by showing the old junk I copied, something rarely seen elsewhere- which actually surprises me a bit. As a bonus, I know that many others enjoy these displays and keeps the spam less boring than simply “here’s our stuff- please buy it.” Ugh.

OK, helmet cover details. WWII Waffen-SS covers have a somewhat distinct fit. Unless one has made helmet covers (or hats) it’s probably not obvious how a very small difference (like 1cm) in the size of a panel or a minute change in a radius can make a night and day difference in the end result. In other words, it’s much harder to get this right than it appears.

The photo above shows the two original covers used for our penultimate patterns we now use. The size 3 is a late War type with every time saving change possible used in its construction. The size 2 is a typical early example.

I made my first helmet cover in 1988, using a reproduction I cut up for the pattern- one that, luckily, turned out not to be not too far off of the originals. Years later when I became a militaria merchant, I tweaked that pattern down a bit to create a size 2.

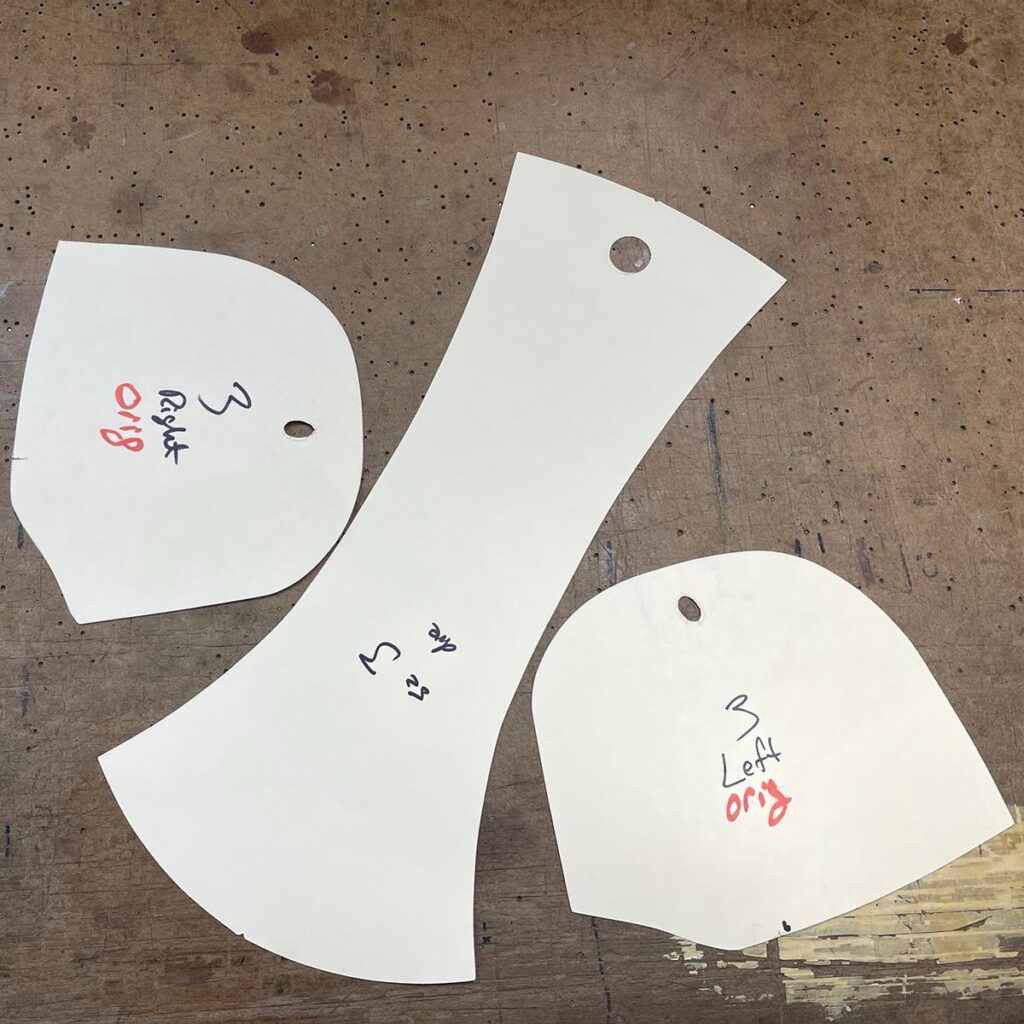
The three main panels of a cover

As time went by and I began to acquire original covers, I noticed that they had a better fit than ours. I could see that the center panel was narrower and more flared at the ends than mine. So, I set out to perfect the pattern based on actual WWII covers.

My pattern-making training is largely by experience- decades later I’m still only a novice. This, combined with originals being too expensive to disassemble meant endless trial and error. It turned out to be be far more difficult to reverse engineer the curves of the center panel and particularly the forward faces of the sides than I dreamed. At one point I was seriously contemplating disassembly of a damaged size 2 that I had. (Not pictured).

Would anyone notice? Probably not. Would we sell more if I got the curve right? Doubtful. It just triggered my side of the spectrum and drove me nuts. Luckily for the damaged cover, after a dozen or more tweaks and test covers, we got it right.

The center panel is notably flared at the ends. On WWII covers, the center panel is about 9-10cm wide at the top of the helmet and it broadens out to 19-22cm (depending on the size) where it meets the visor. The side panels are far more squarish than one might expect.

As stated above, a small change can wreck the cover- if the seam allowance isn’t observed (1.5cm) or the cutter slices off too much of a panel the cover will instantly become one size (or more) smaller than intended.

This is why we sew the blasted things here- the overseas contractors can make a nice tunic, but they jack up helmet covers every try.

Yes, originals do vary some but not as much as one might assume considering the circumstances under which these were likely made. Despite WWII covers, particularly the late ones, having rather erratic visors, spring covers and camo loops, with stitching that often looks like chit, the manufacturing tolerances where it counted appear to have been adhered to pretty closely.

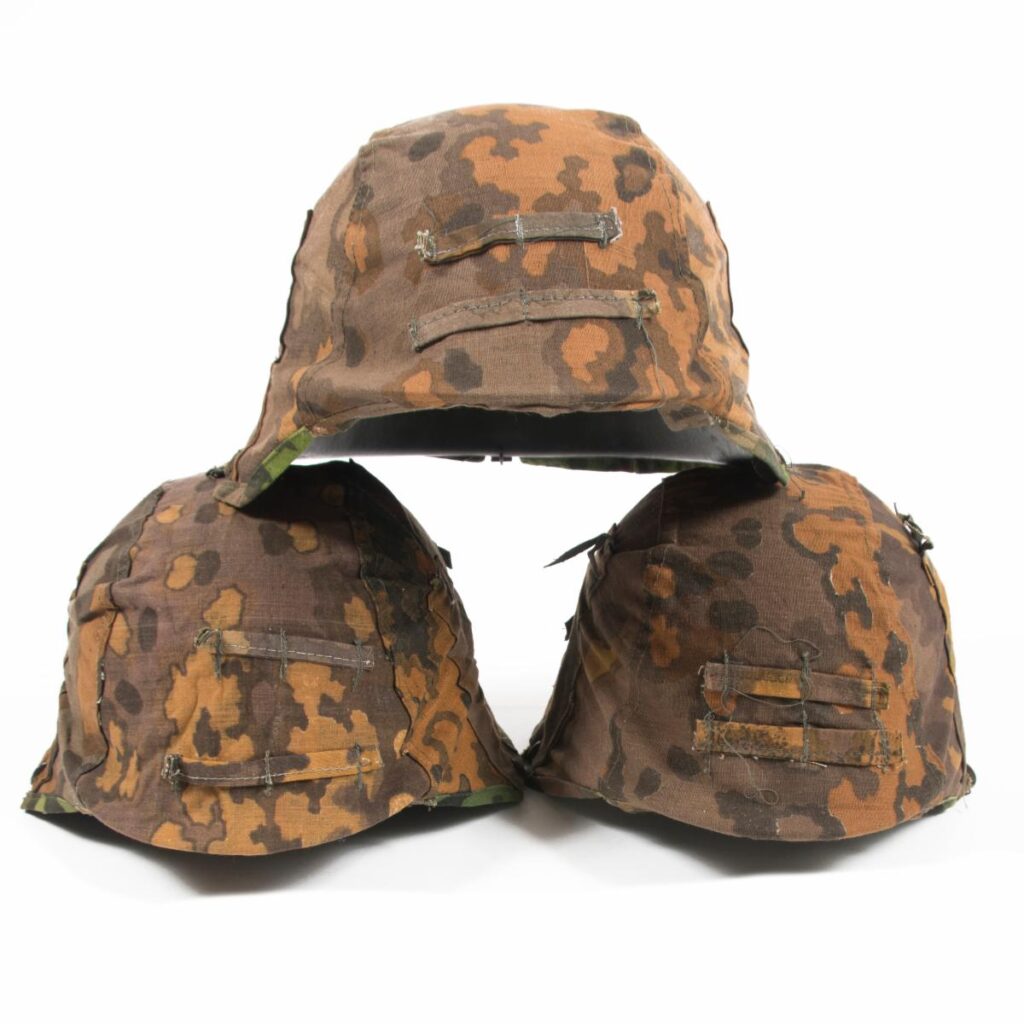
One punch = 30 panels

For more insurance, we went the extra mile and had cutting dies made for helmet covers (and camo caps.) This prevents any cutting errors and keeps the parts totally consistent year after year.

Was this done in WWII? There’s no way to know, but it’s been fairly common practice at sewing factories for over a century so I consider it likely. It can save several minutes per item which is an eternity for a garment contractor.