Category Archives: Uncategorized

Early MP44 Pouches

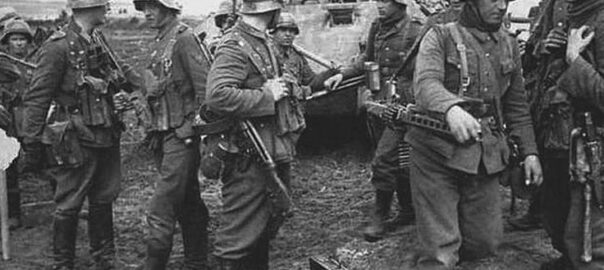
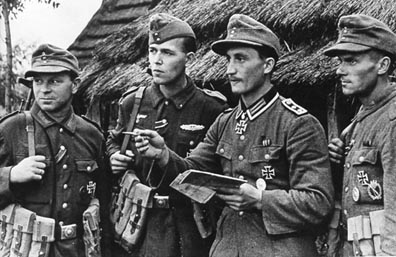
For some years as a kid, I struggled to decipher what kind of pouches the troops in the well known photos of the relief of Kovel (above) were wearing. In the 90’s I even ended up with one of these pouches and wasn’t sure what it was- luckily I kept it.

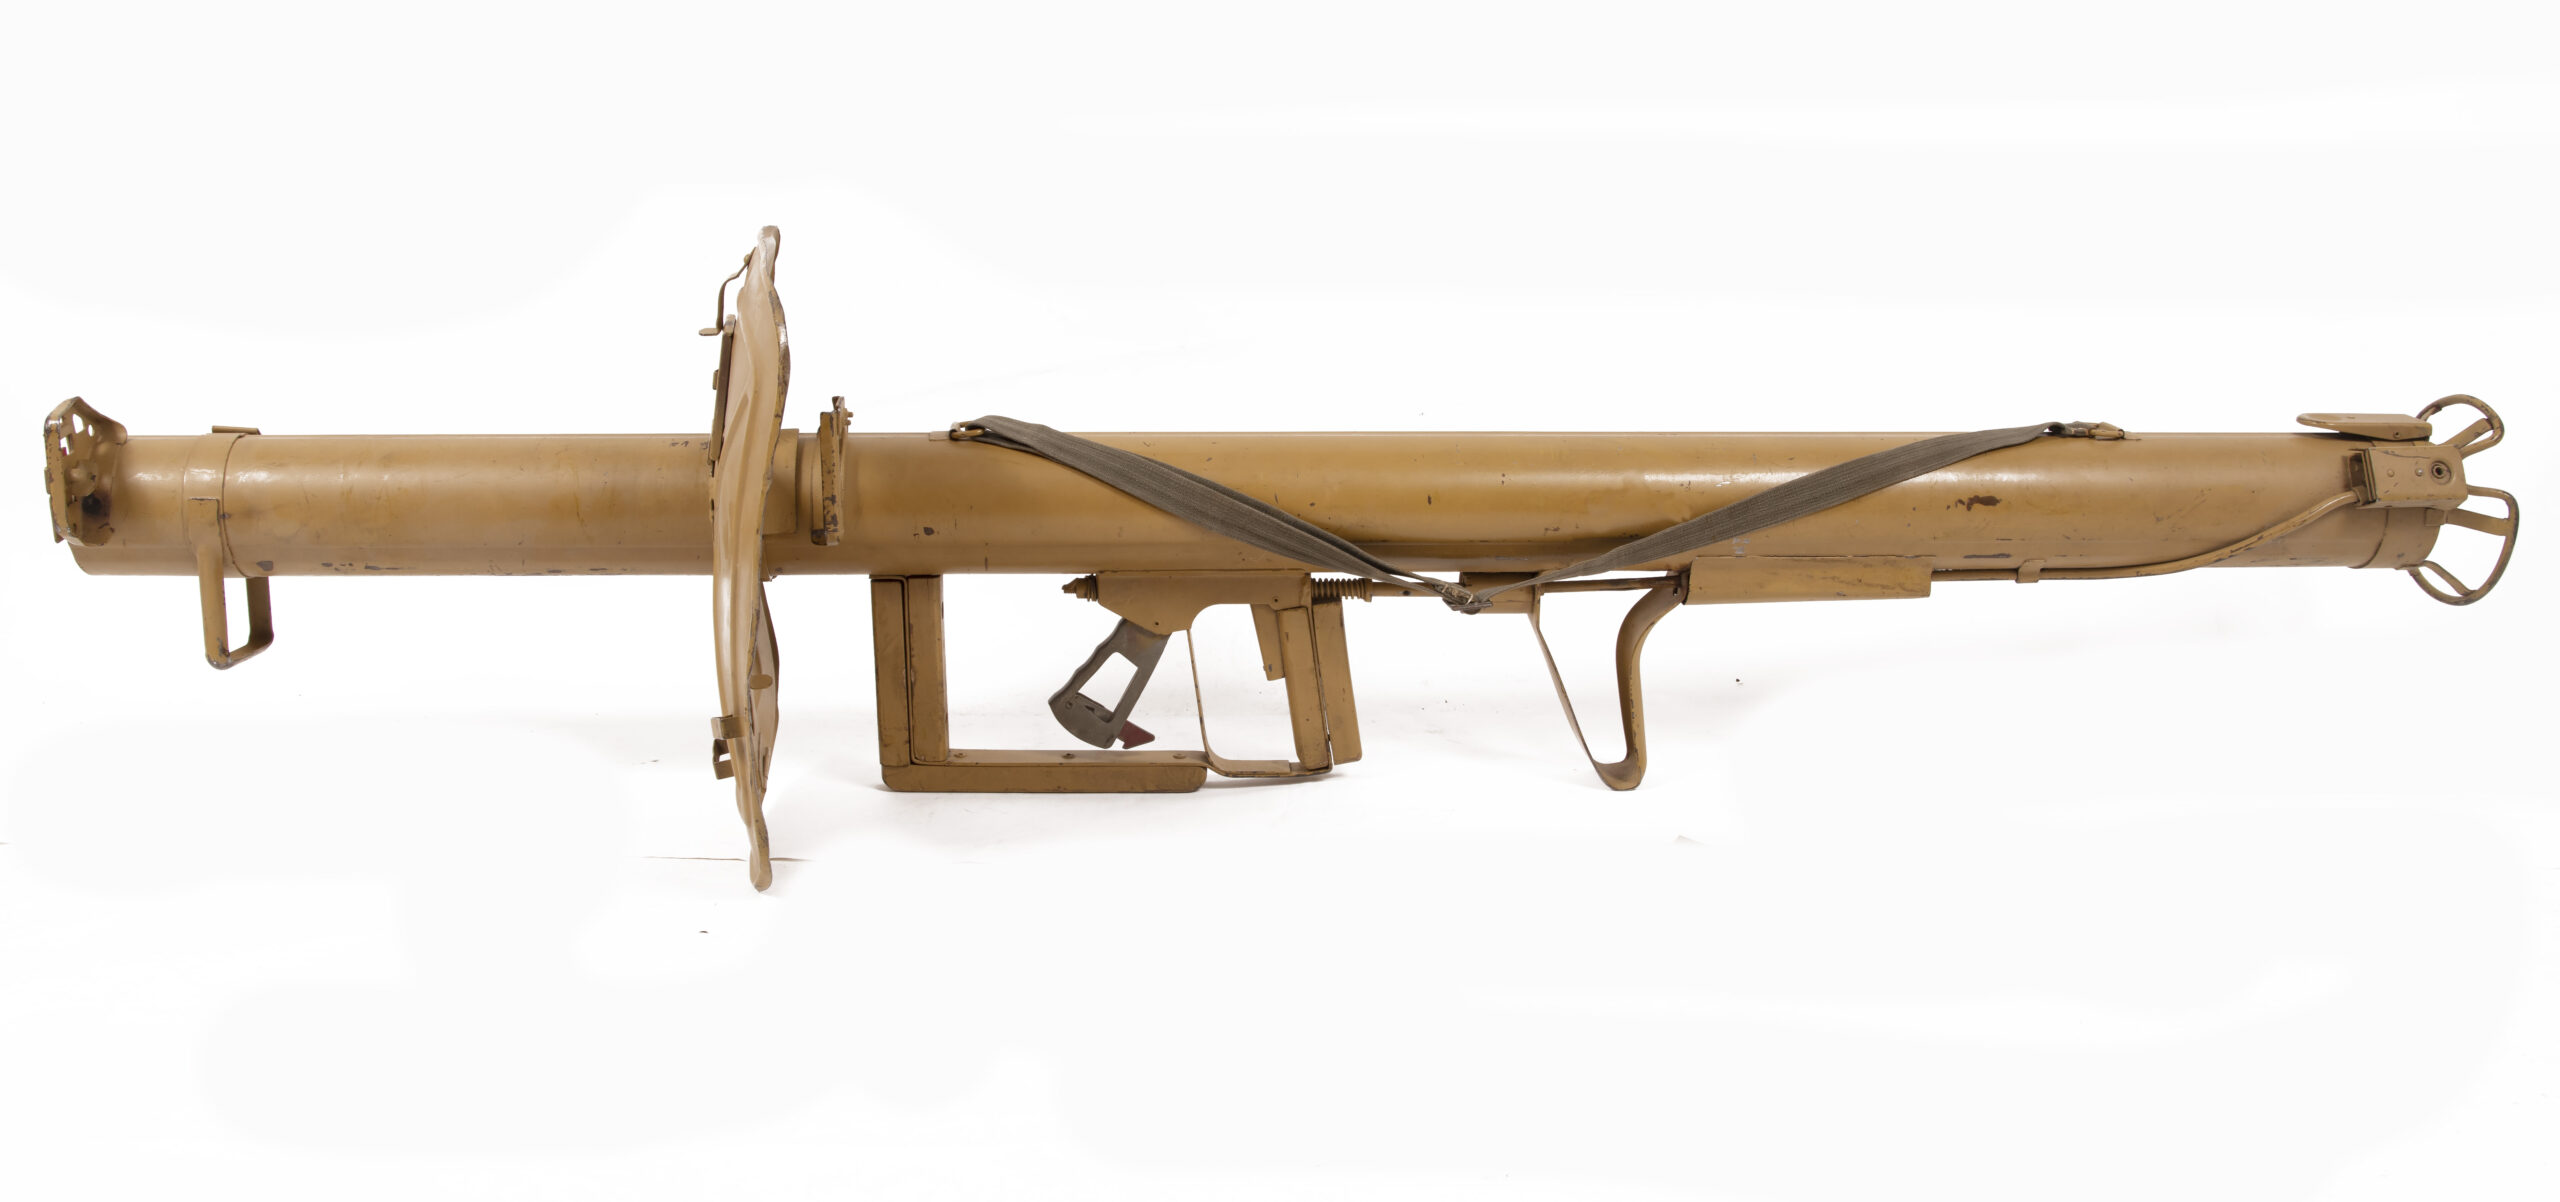
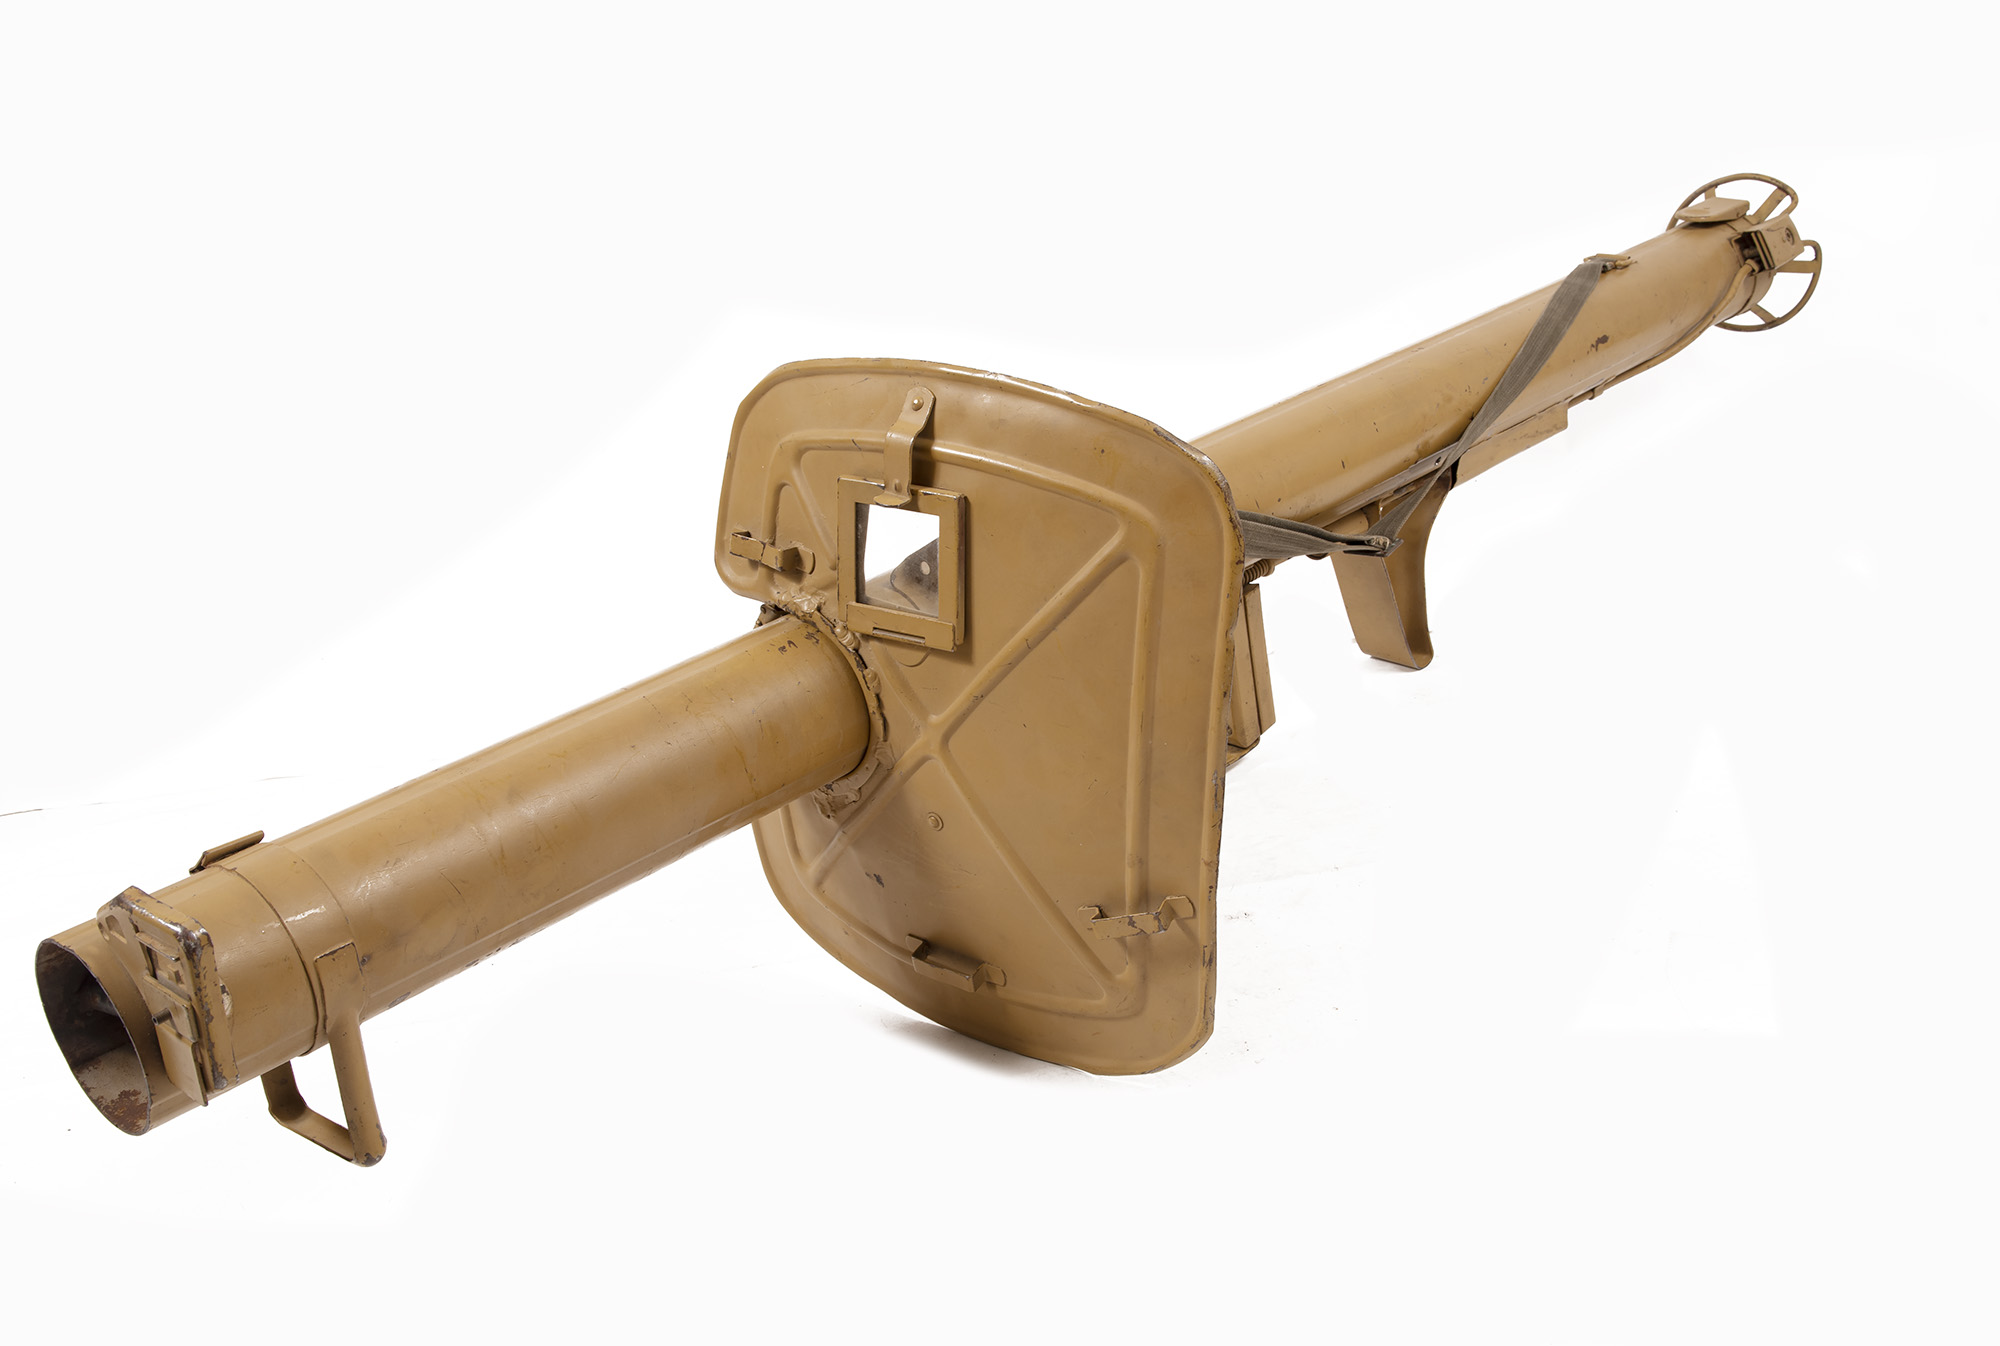
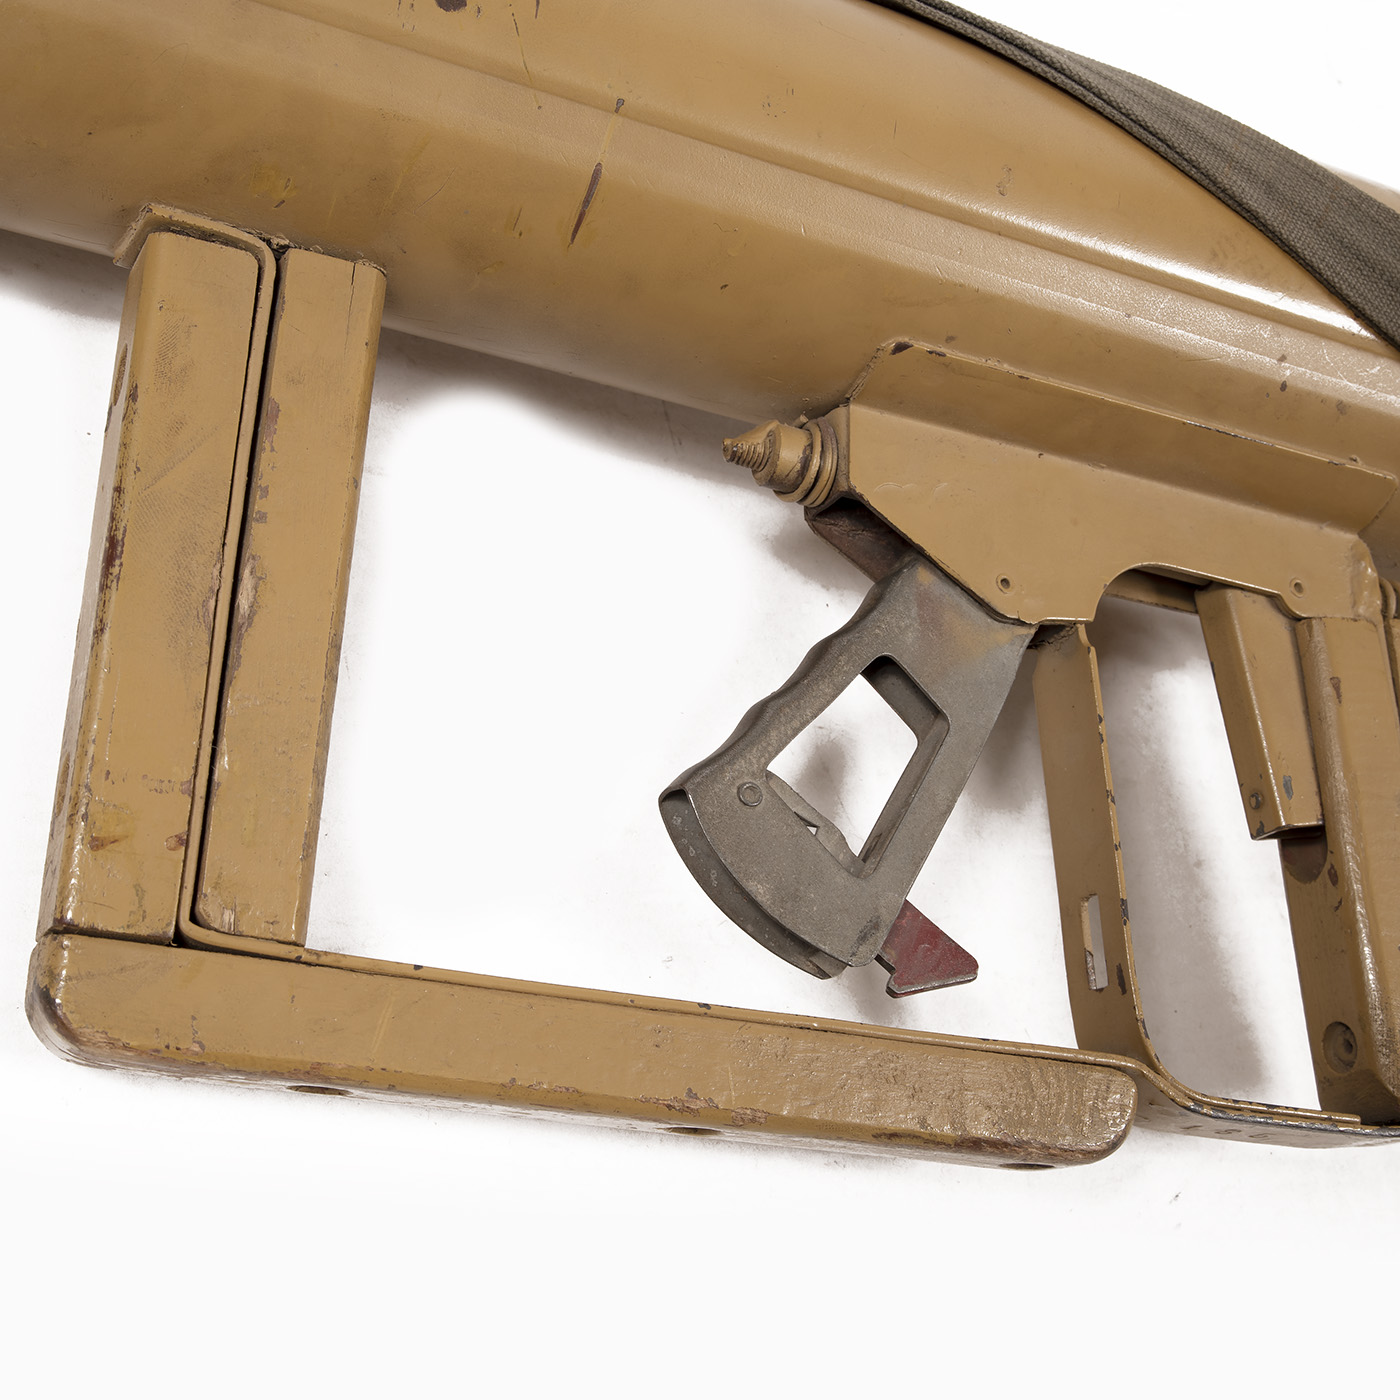
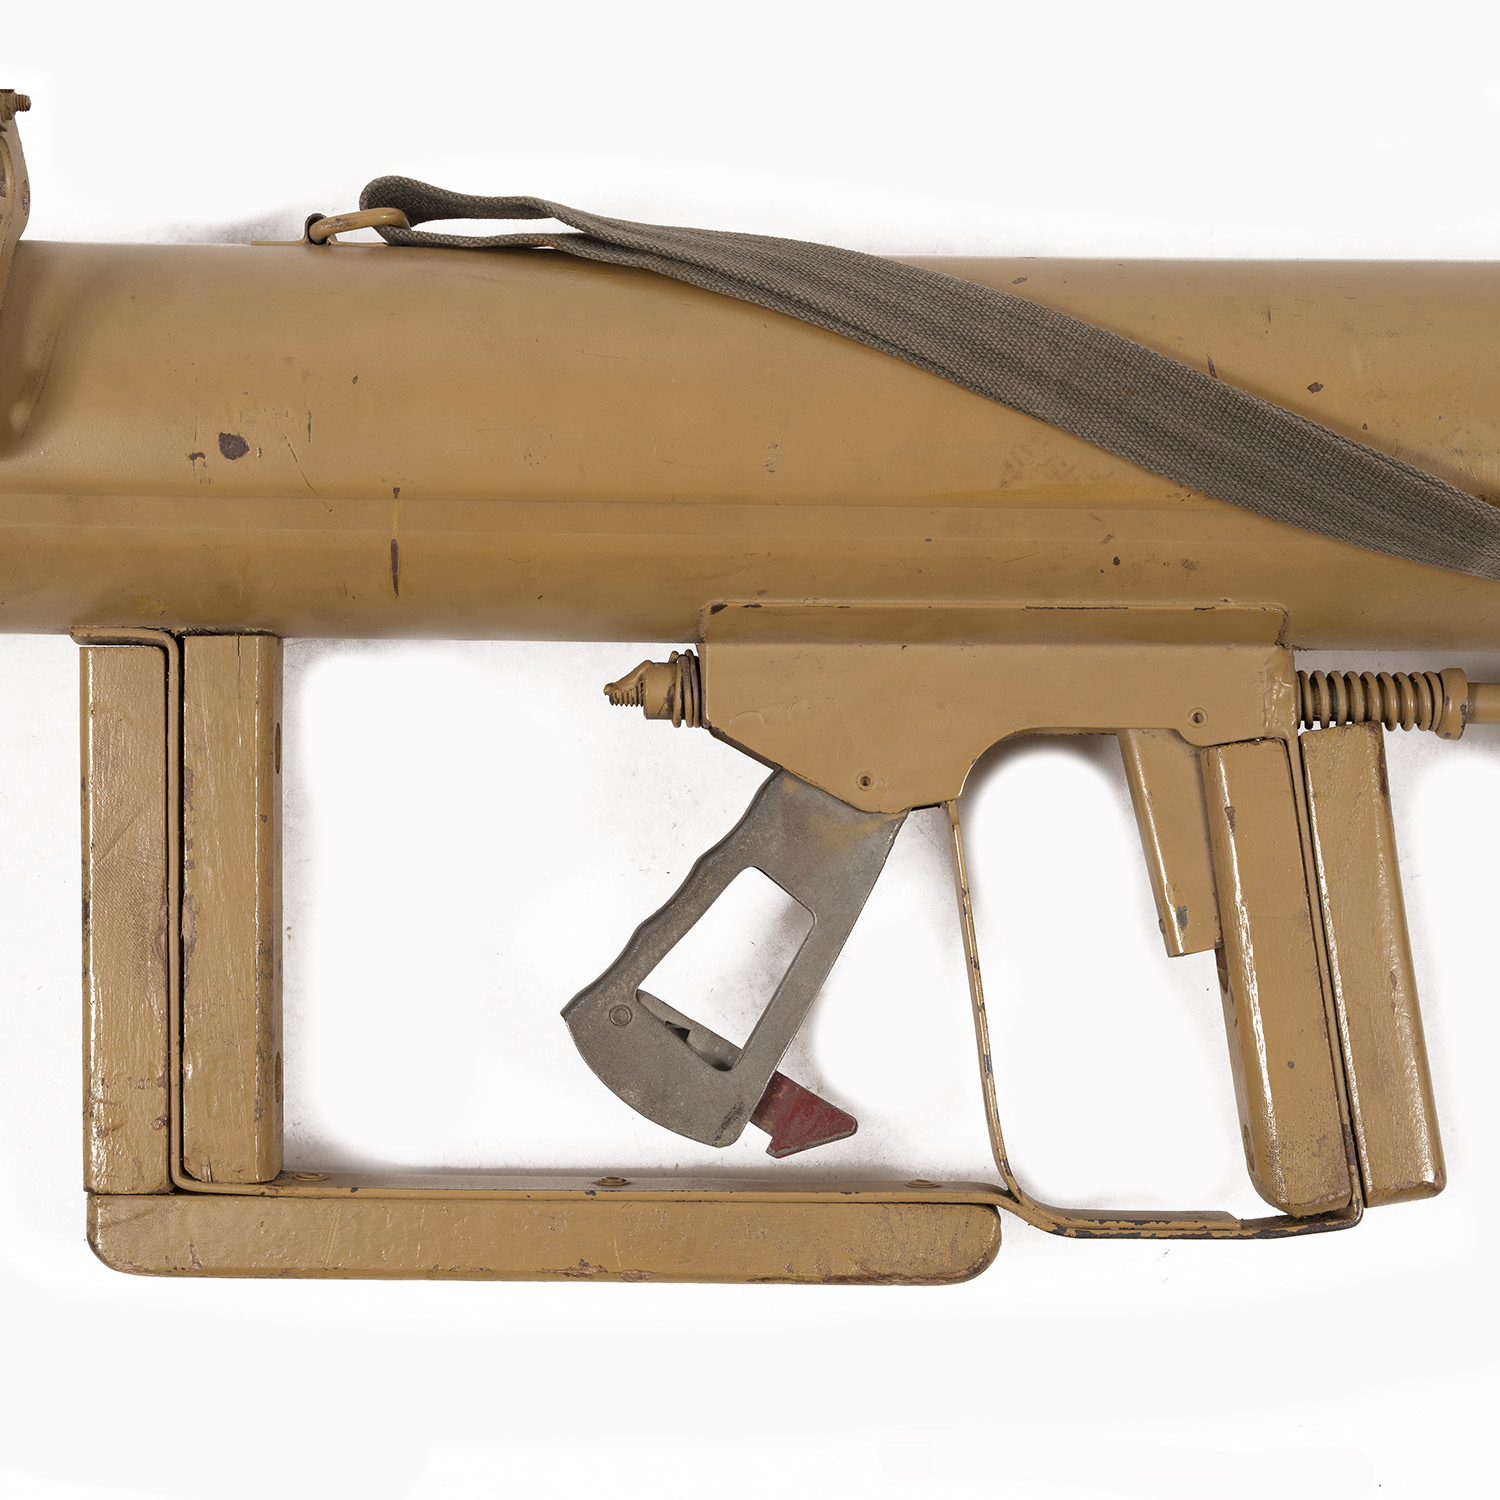
Before going any further, let me clarify one thing. Mkb, MP43, MP44, STG44 and STG45 all refer to the same series of select fire rifles, all but the first one being essentially the same weapon.

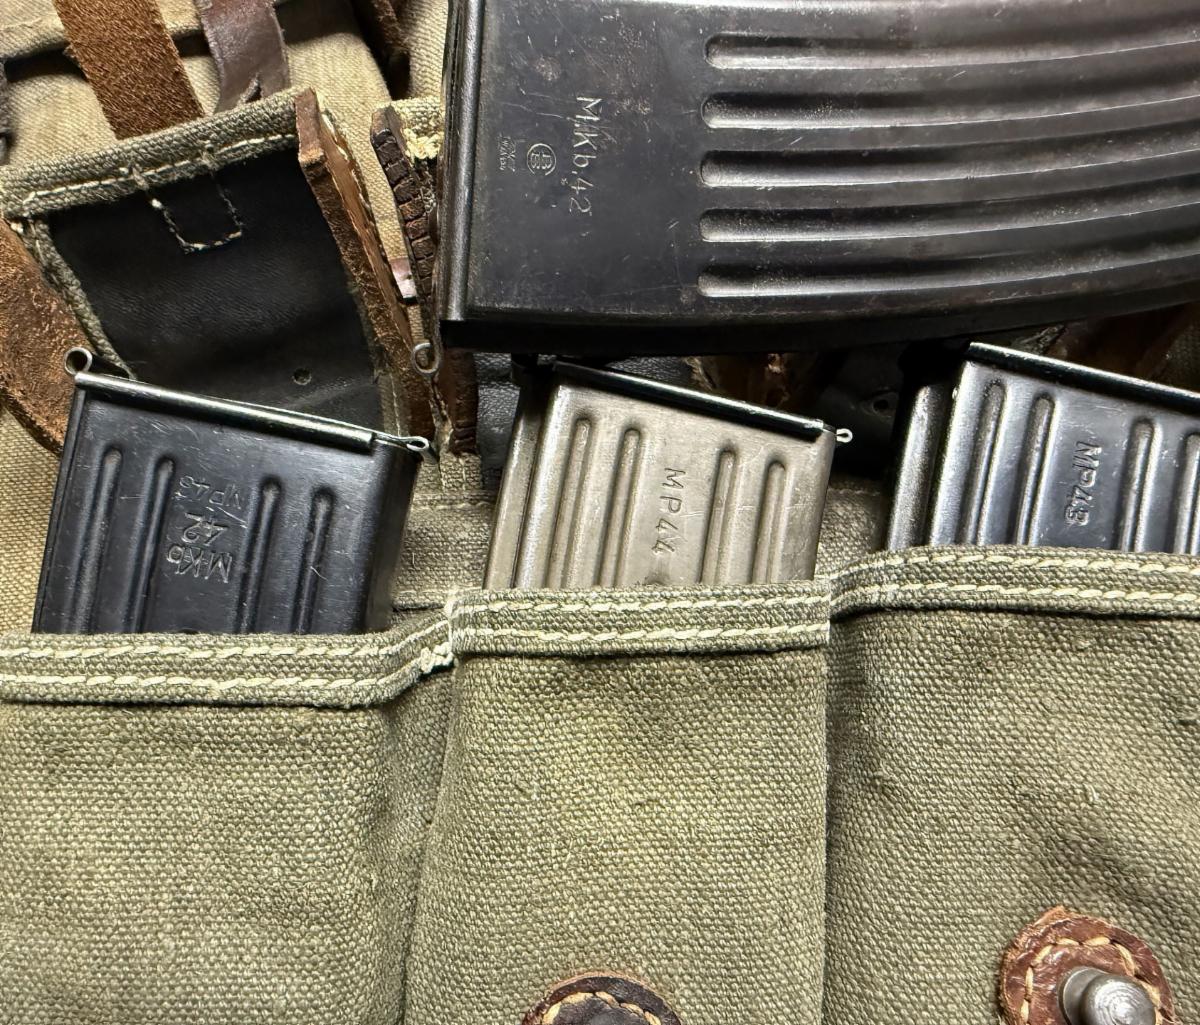
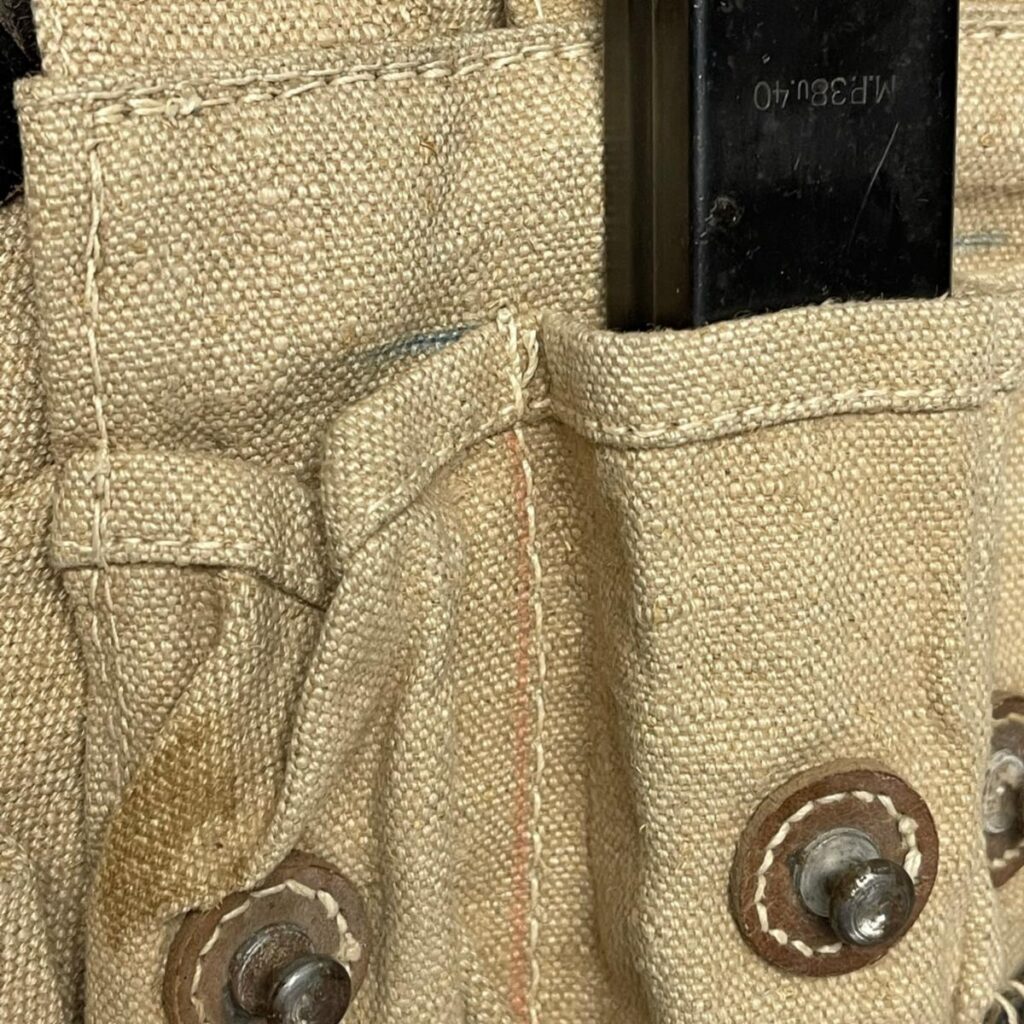
Most original mags are marked something other than “STG”.

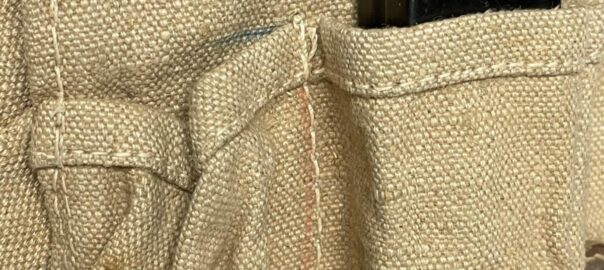
All variations of them used the same magazines. As for the magazines themselves, they have a variety of markings, but any the differences are miniscule.

It’s exhausting being “corrected” by teenage social media wizards who insist that any original rifle (or magazine) stamped MP43 or MP44 is mis-marked as “everyone knows the correct term is Sturmgewehr which means ASSAULT rifle in Dutch!”

The mere mention, much less sight, of MP44’s (and MG42’s) really brings the weenies out of the their lairs for some annoying comedy.

Anyway, as with most militaria that was made in a number of variations, quite a bit of silliness (mis-information) persists regarding these mag bags.

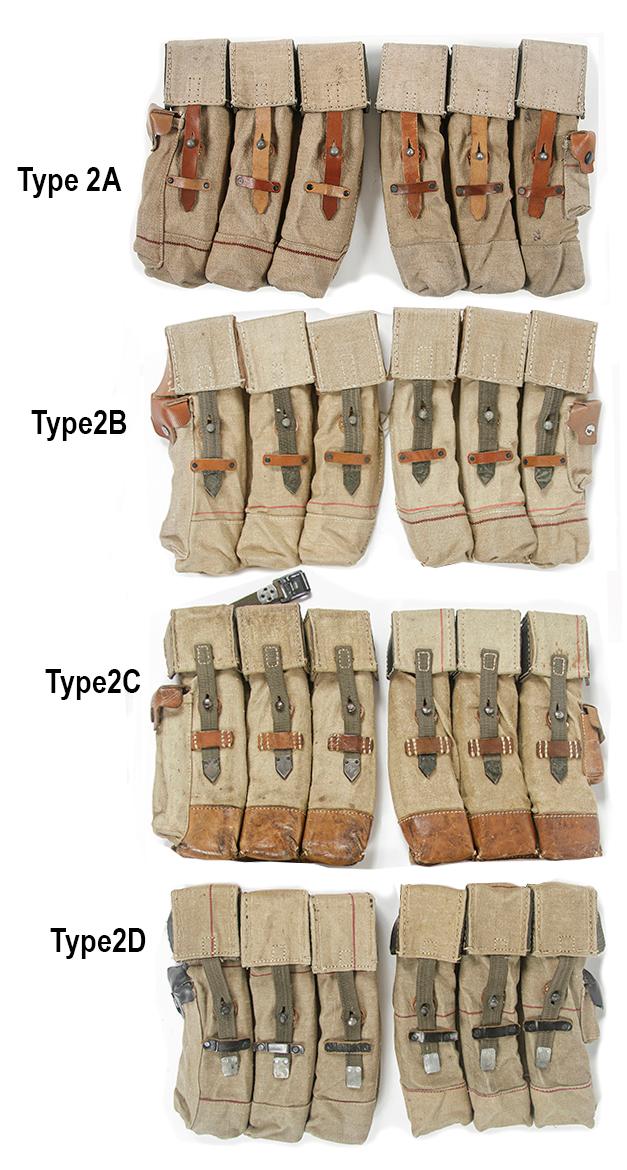
Here they are, in approximate order, shown below.

Note that the names “Type 1A” and “Type 1B” are my own inventions used to identify the variations of similar pouches. I don’t give a shit about bring credited, but I stress that the terms are not in any way official WWII German or even accepted collector terms. I just made them up for illustration purposes.

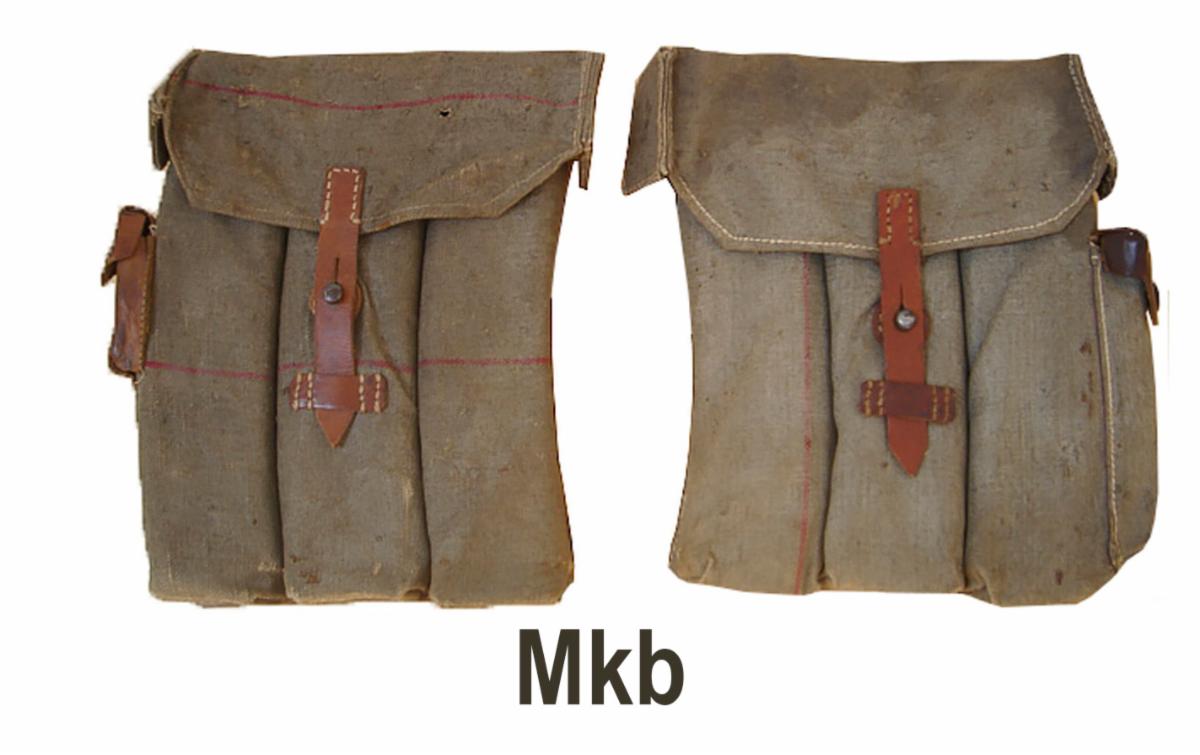
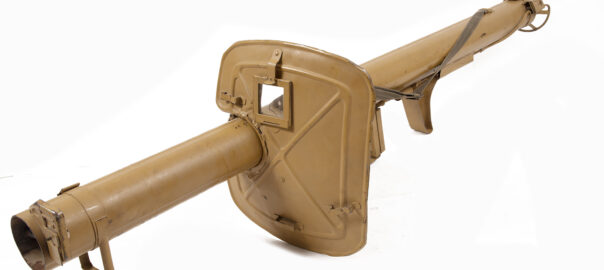
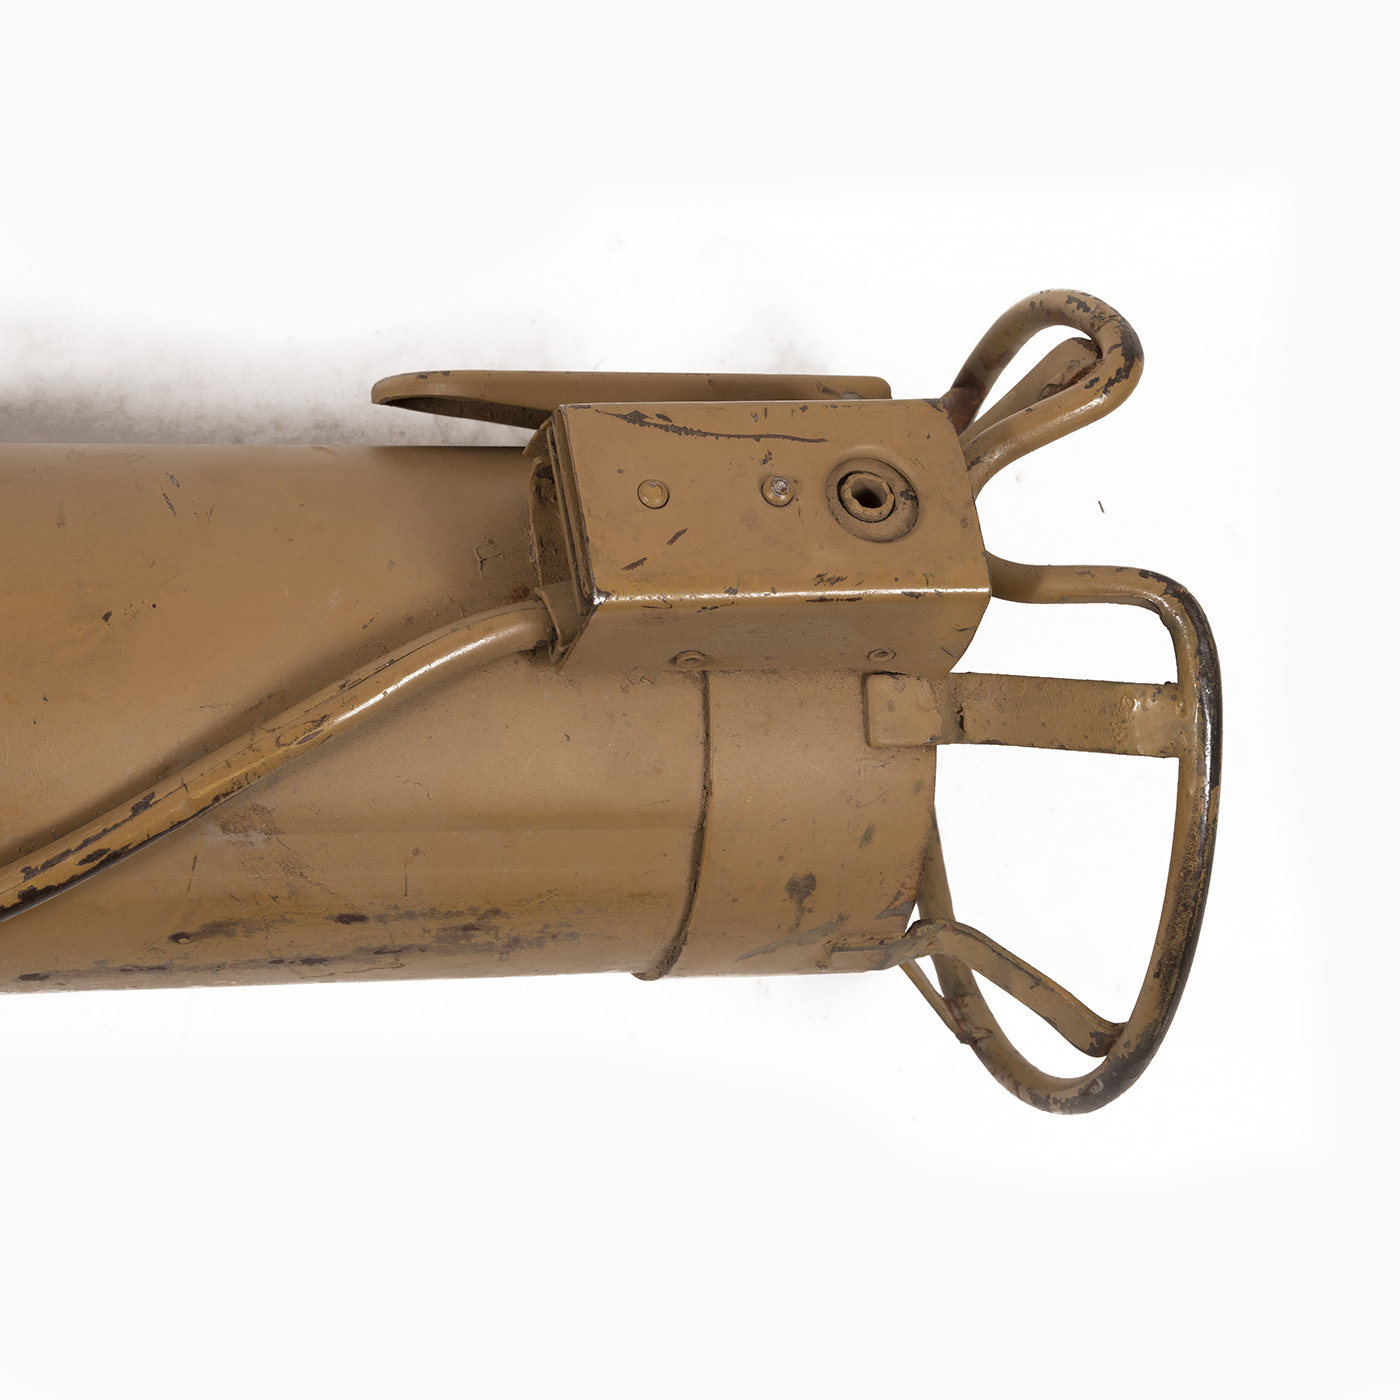
These are the first type of pouches issued with the Mkb series of rifles.

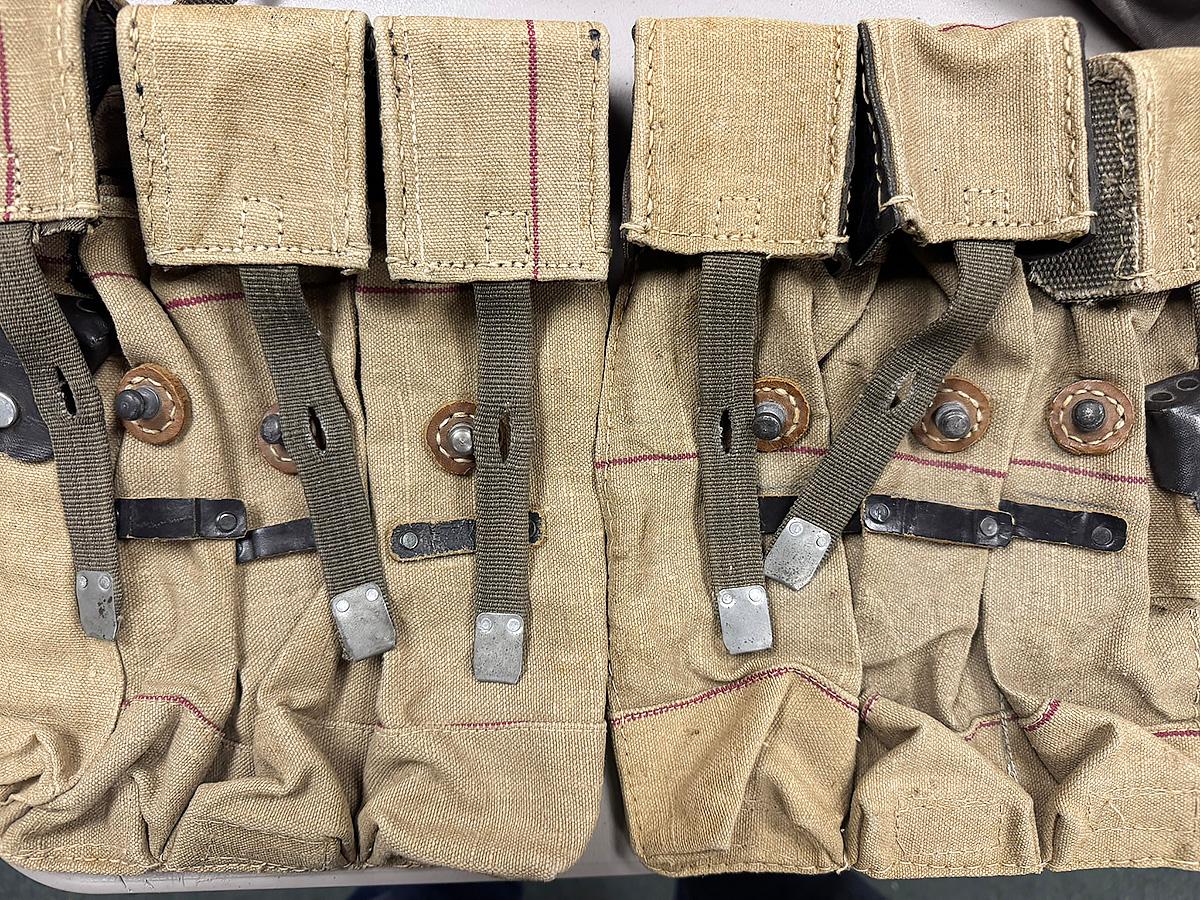
The design is very simple, with a single flap covering all 3 magazine cells, two belt loops on the rear and a D-ring for the Y-straps or rucksack to attach.

And they’re some of the worst mag pouches ever made.

The single flap allows the two outer mags to slide out when the soldier is prone or running, and the lack internal reinforcements led to them wear out quickly. Used originals often have holes worn in the flaps and at the bottoms from the corners of the mags, with the belt loops and D-rings pulling through the fabric.

Despite their poor design and quality issues, these appear to have been widely issued and are the variant one most often sees in the few wartime photos where pouches are visible.

The Mkb pouches were typically made in shades of gray or fieldgray canvas, sometimes with woven red or burgundy lines with brown leather fittings. One or two originals in blue gray canvas are known to exist, but none made from the tan linen canvas with red lines.

This style has no backstrap.

Some sources (usually dealers hawking fakes) claim these are “late War”, when the opposite is actually the case. If you encounter a 1945 dated pair, no matter how “aged” they appear- they’re fake.

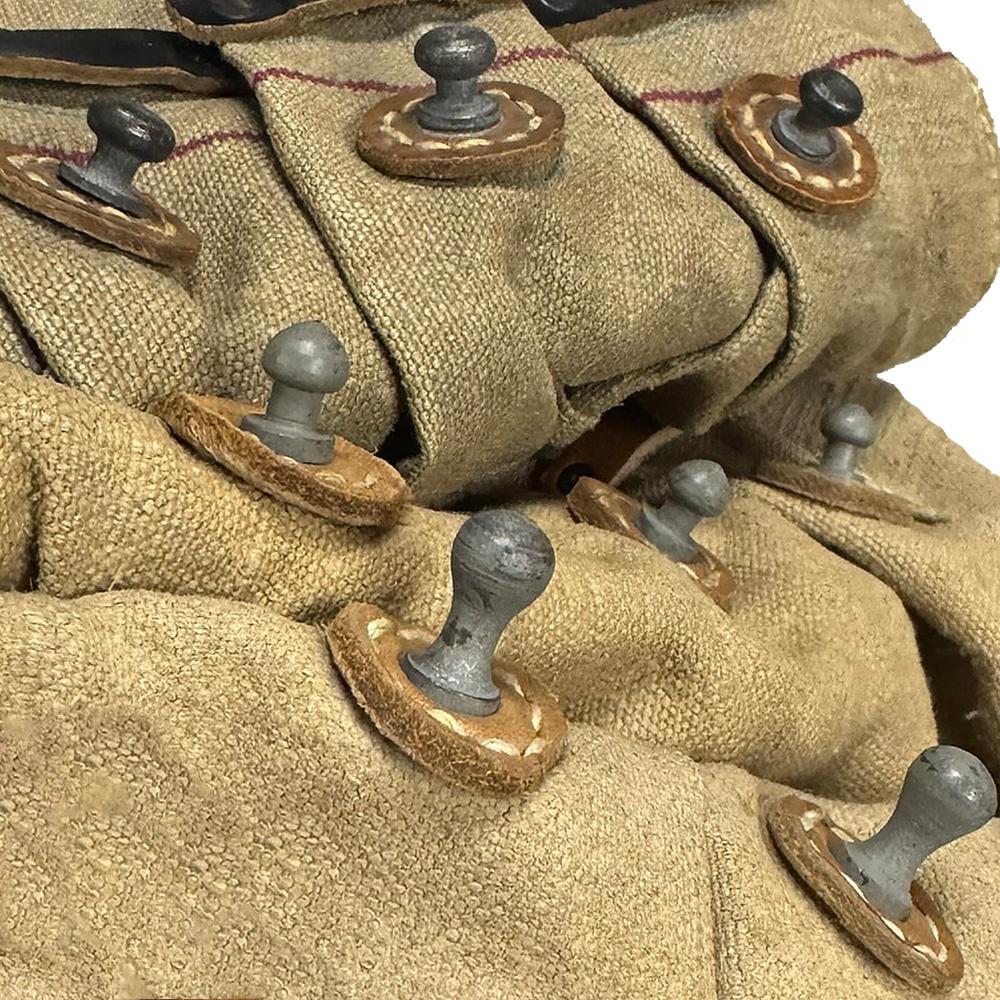
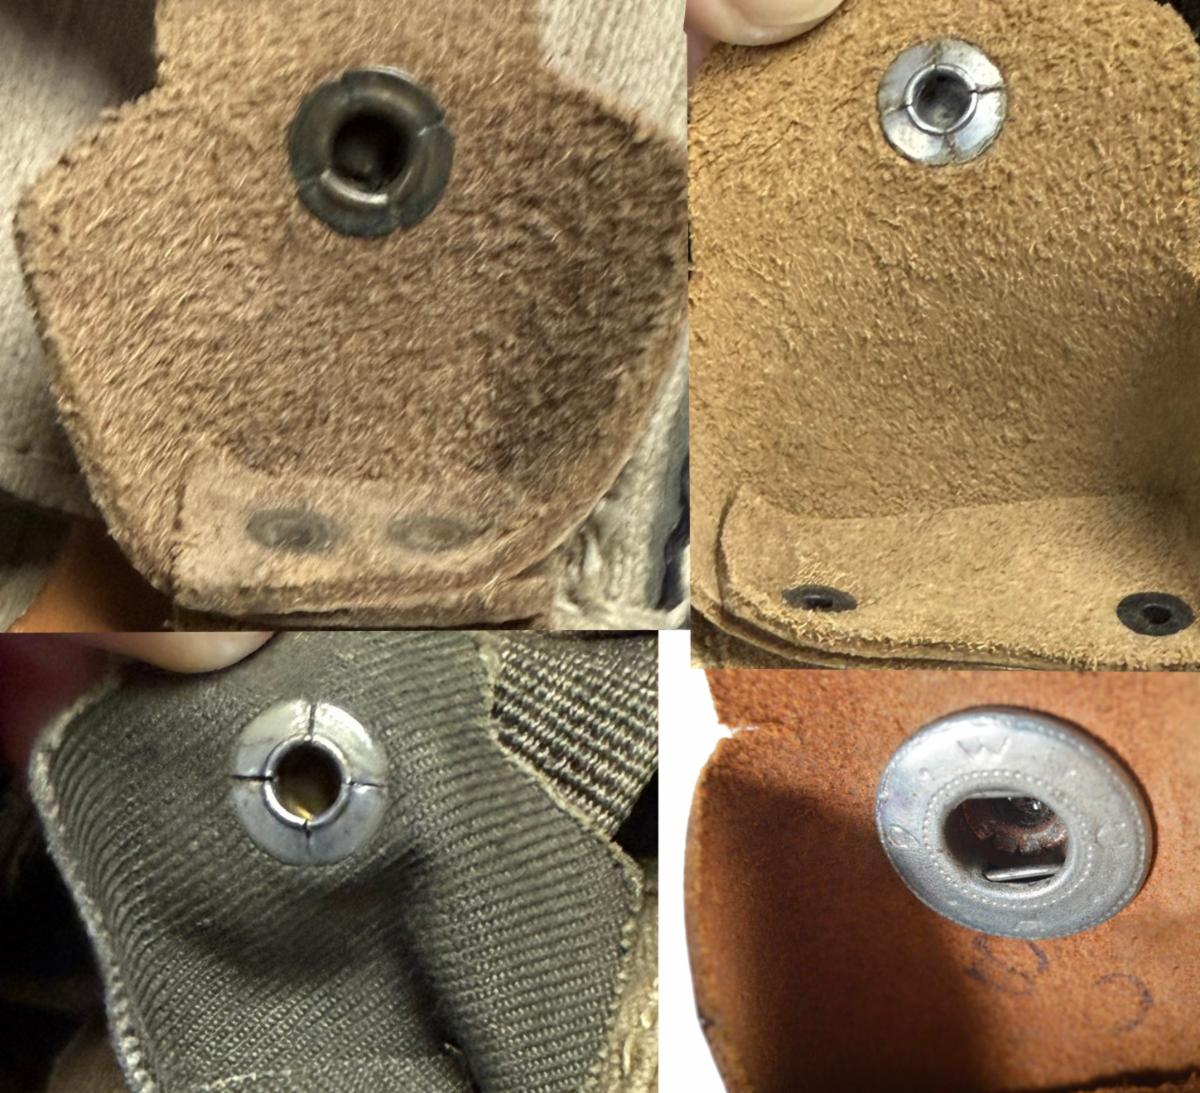
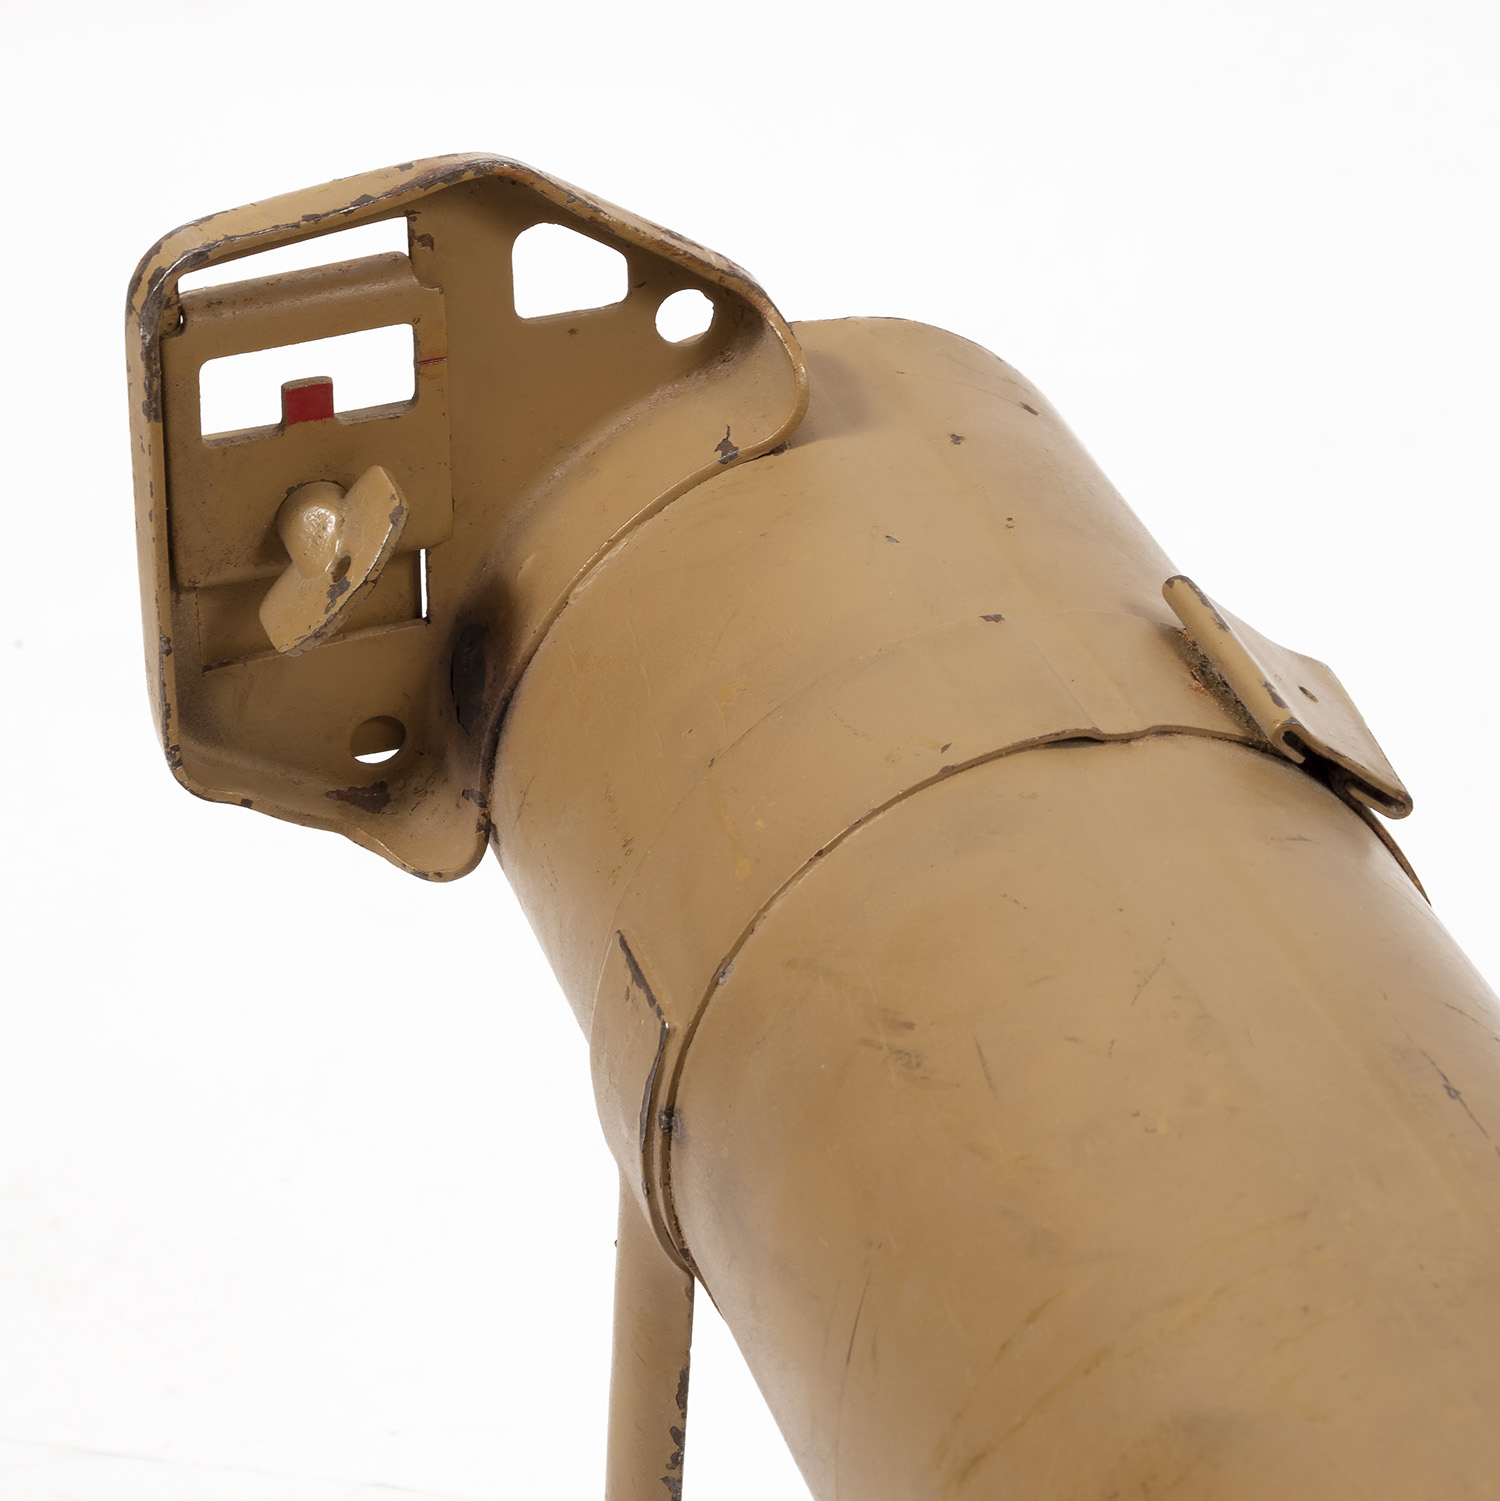
Both segma and double wire style (like Pryms) snaps can be found on all versions of Mkb/ MP44 pouches.

Note that these hold the magazines oriented with them curving away from the center.

Known makers are jsd, jmb, and jwa, usually dated 1943. Many are marked Mkb42 on one belt loop.

Surviving original examples of these are few and far between, with matching pairs being almost unheard of. In decent shape, single pouches start around $5,000. Nice ones can run far more.

There is one other version of this that retains the single flap, but with 3 closure straps. This is visible in one wartime photo that I have seen and one collector I know claims to have handled an original example.

Photo above came from WAF forum- I think. It’s dated 2006.

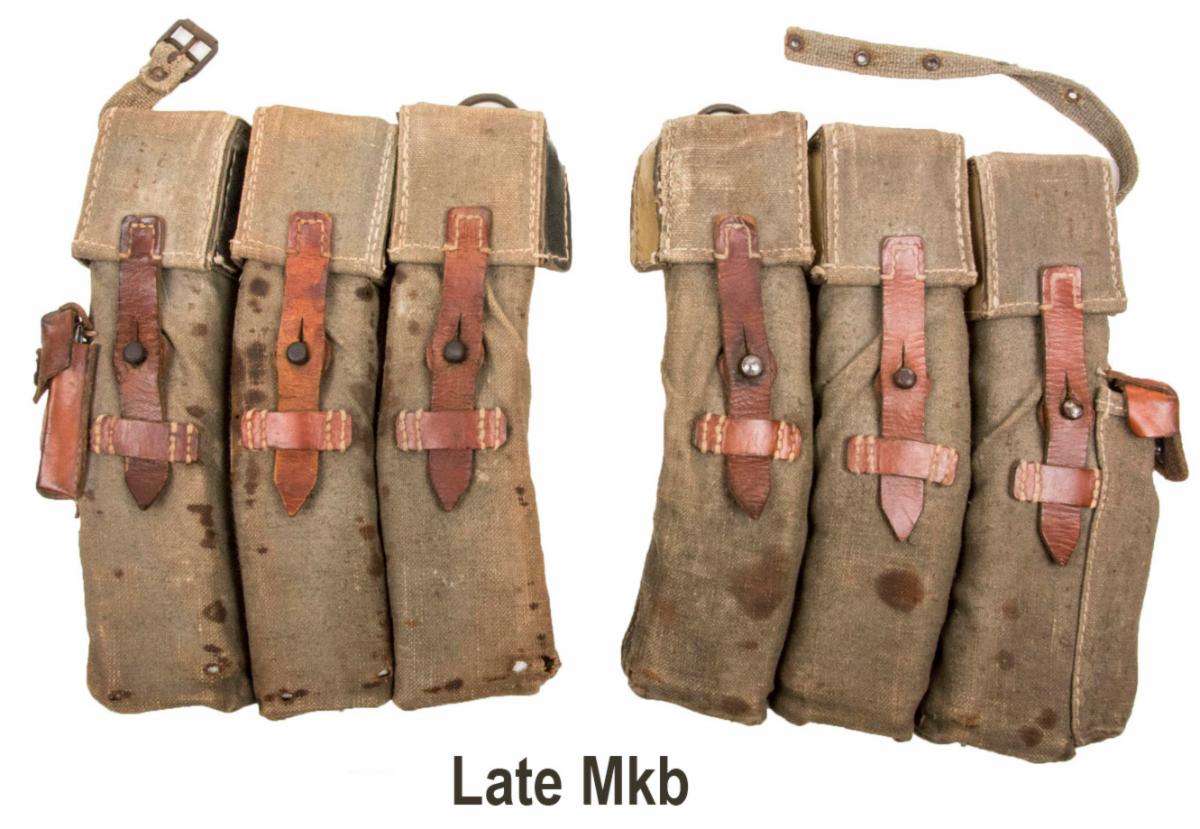
This is the first version with individual flaps for each magazine and the back strap has appeared. Some sources call them Mkb others early MP44- the Germans likely used the former as they stamped that on all versions.

These are essentially the same as the later Type 1’s, except that the magazine orientation from the Mkb pouch is retained. Thus they straddle the two designs.

This type is one of rarest of all Mkb/ MP44 pouches with only a handful being known. Those that exist are made with the same materials- gray or fieldgray canvas with brown leather fittings.


Photo stolen from from FJM44. More pics in the link.

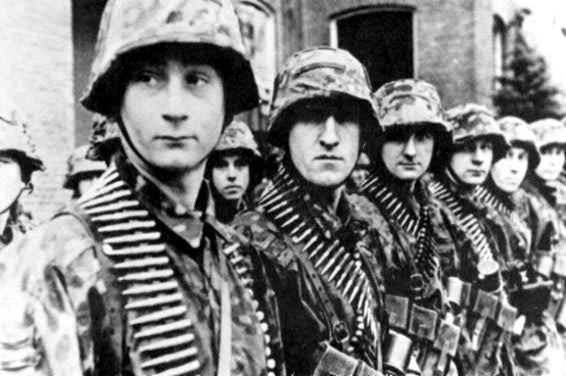
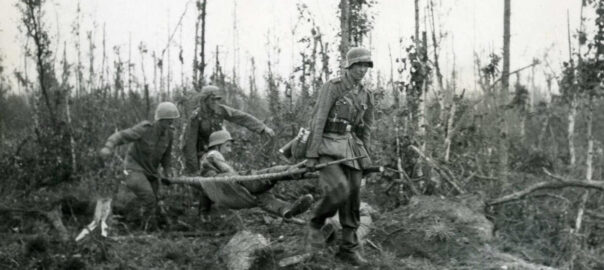
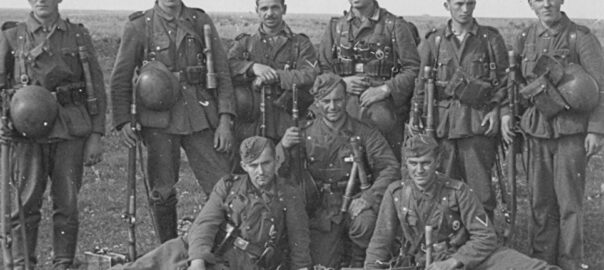
The famous photo of troops from GvB. 
These appear to be Type 1 pouches.

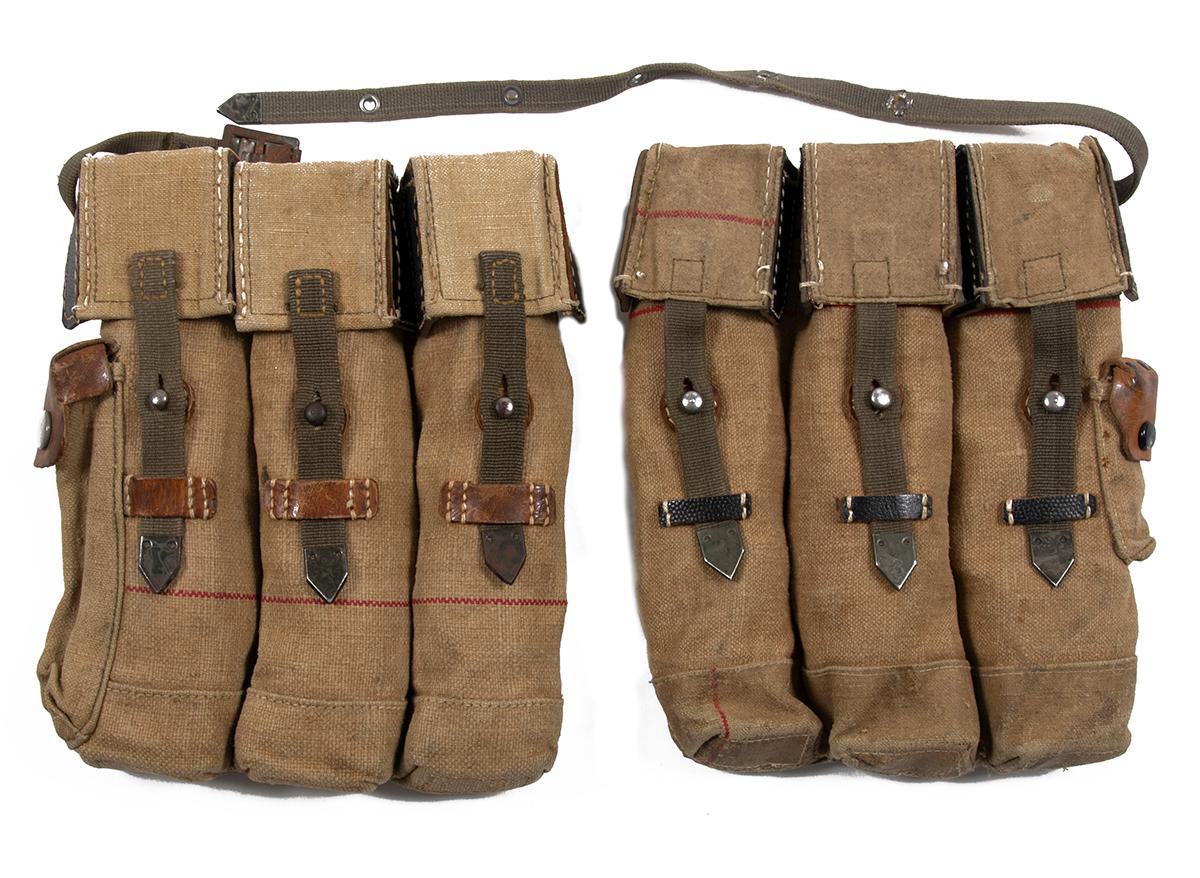
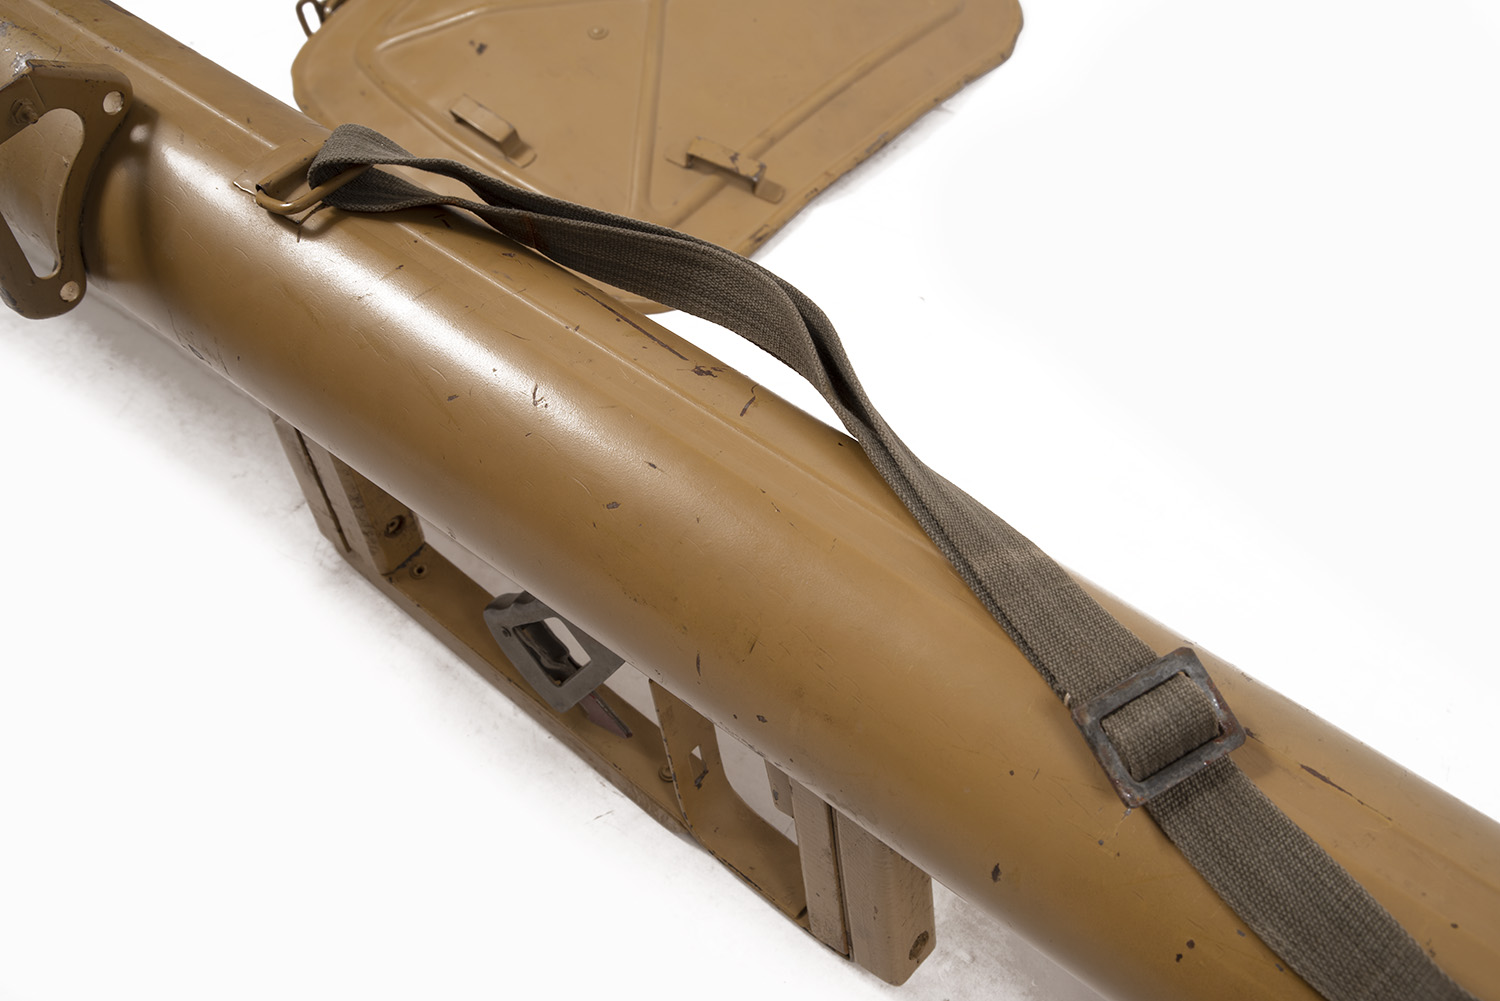
Now we get to the “classic” styles of MP44 pouch. The magazines are now oriented curving inward, there’s a flap for each magazine, and a rear strap to prevent them from sliding together.

The strap was added because if the pouches are worn on the front of the body, it can be tough to kneel down. It’s far more comfortable to keep them more on your sides.

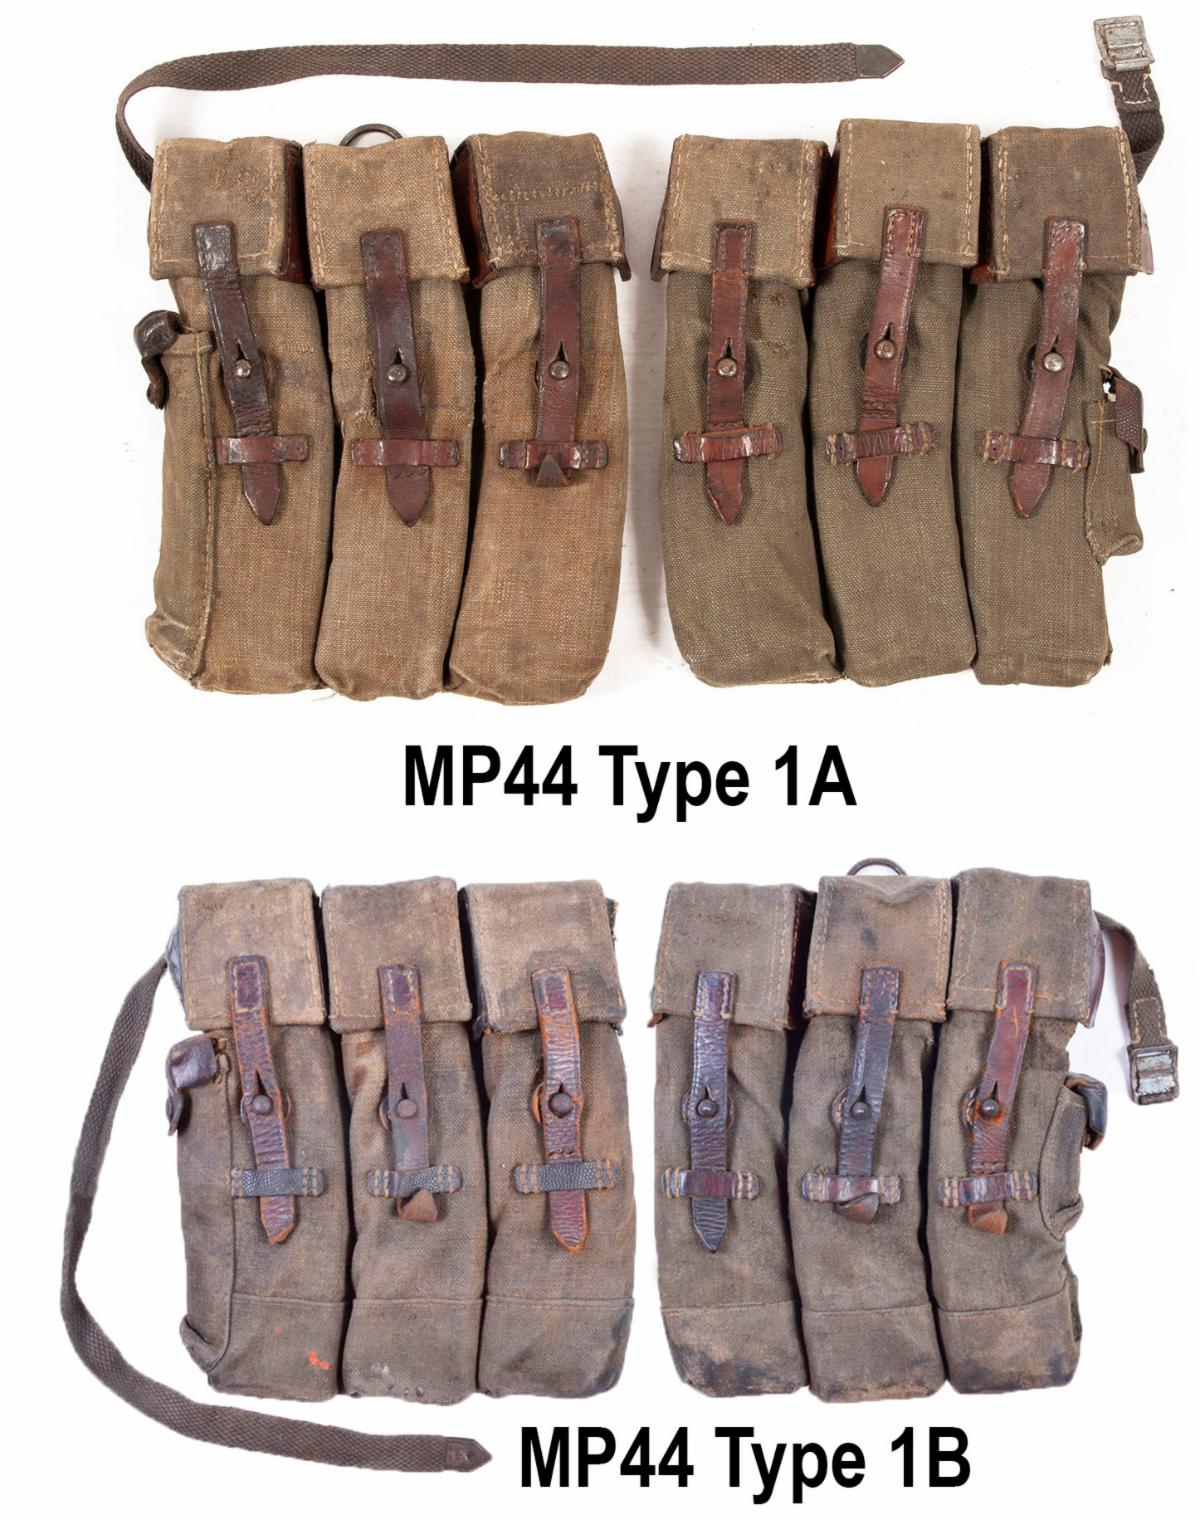
Photos: top pouches are mine, the bottom one 
came from LUX militaria about 10(?) years ago.

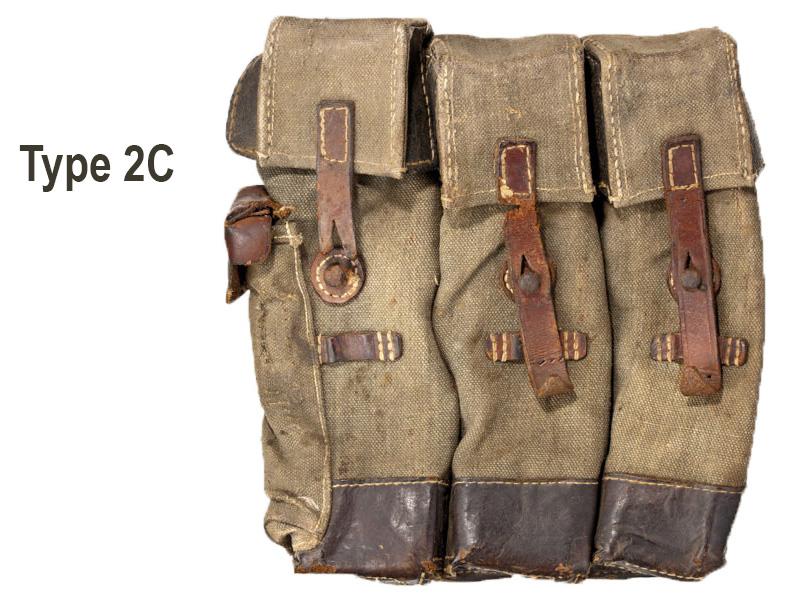
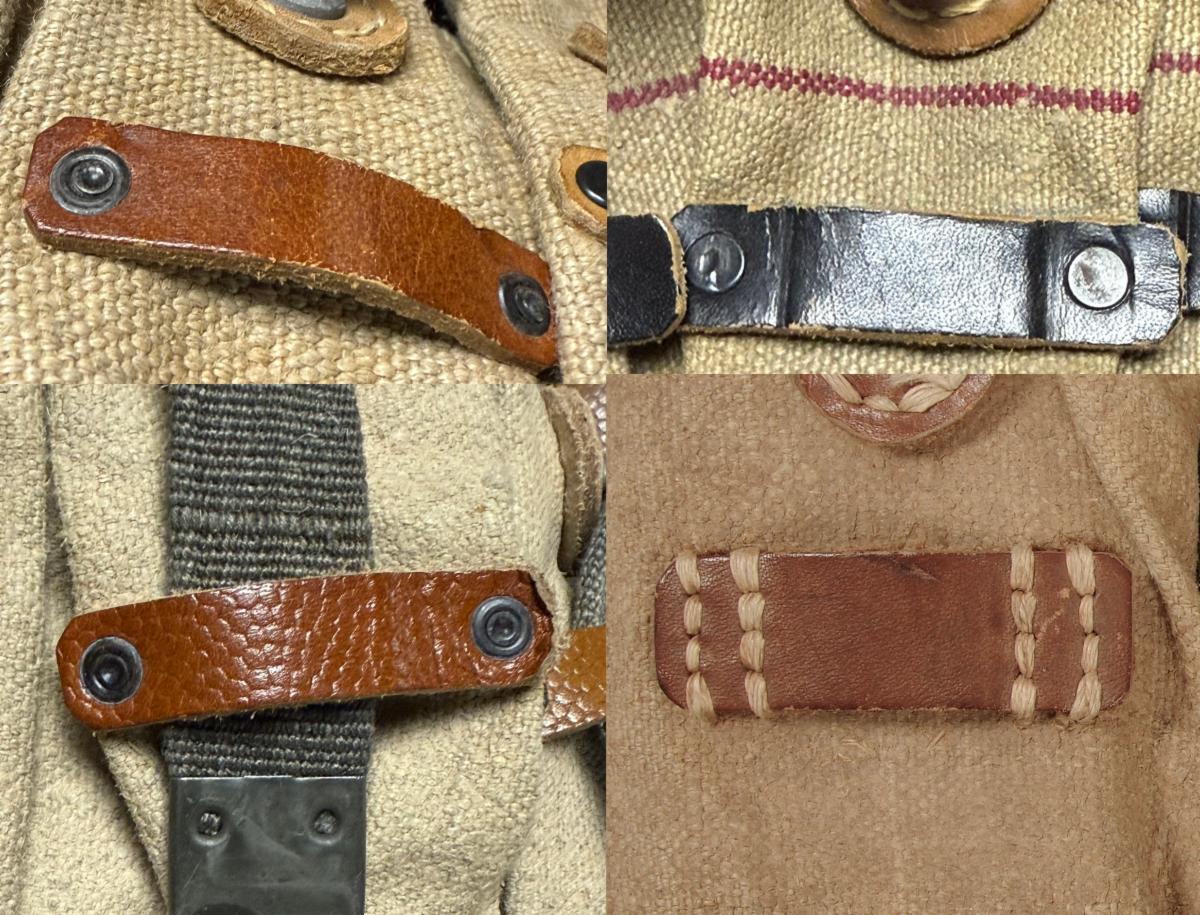
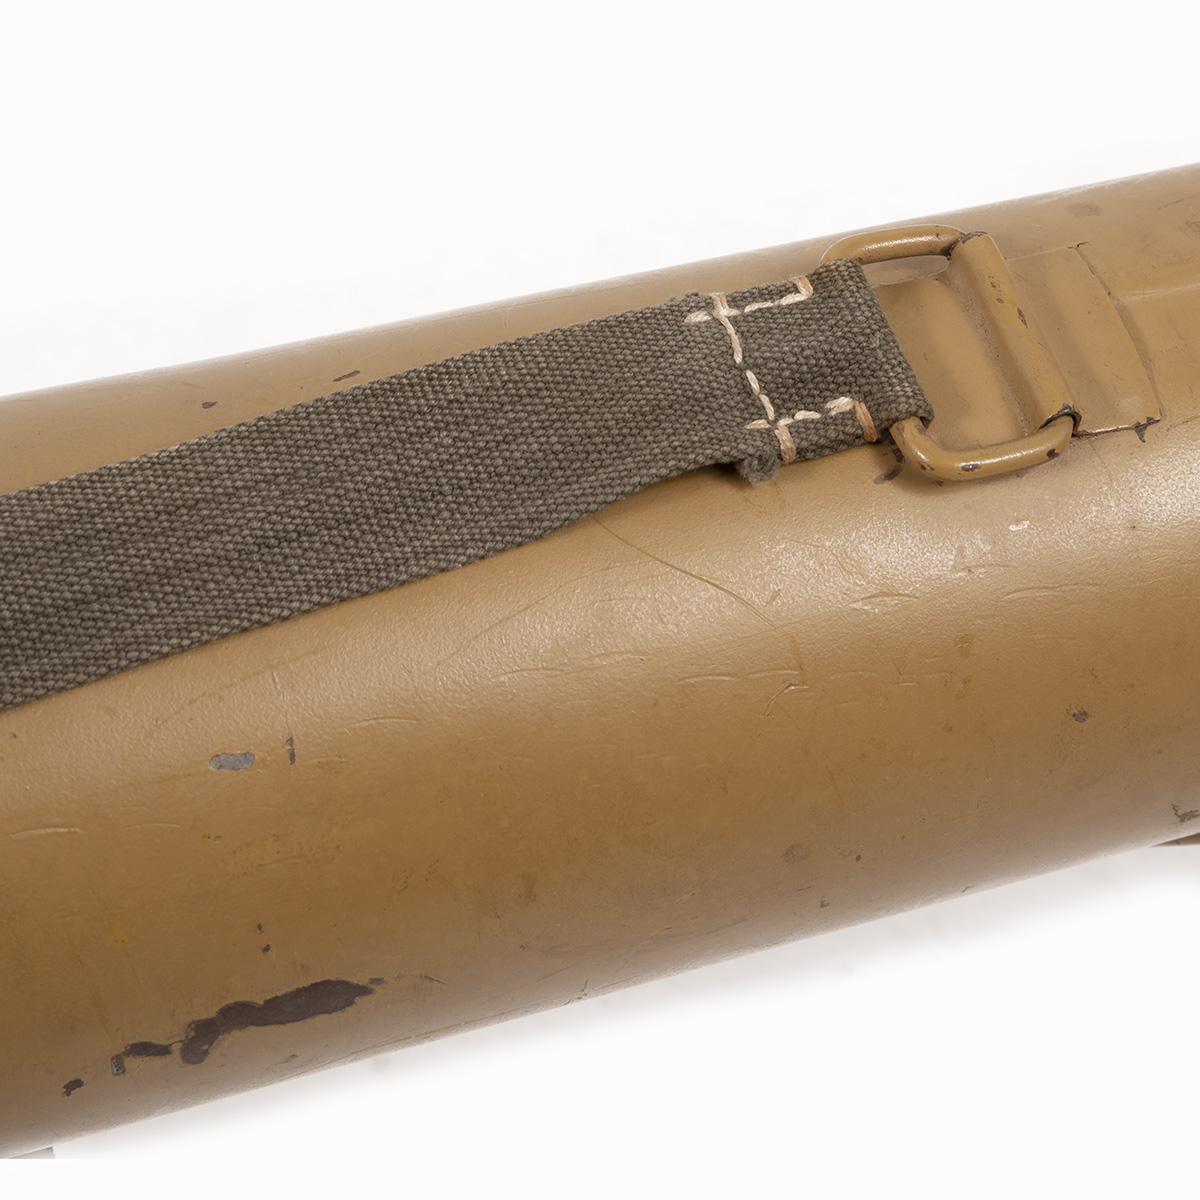
The only difference between the A and B styles is that the latter one has an extra layer of canvas at the bottom for reinforcement. The C has leather instead of canvas reinforcing.

Note that the photo above (from WAF in 2015) is the only Type 1 pouch I have ever seen with leather on the bottom. It is clearly original, and appears to be made by “fuq” (Curt Vogel leather company) due to the way the closure straps are sewn in a box stitch.

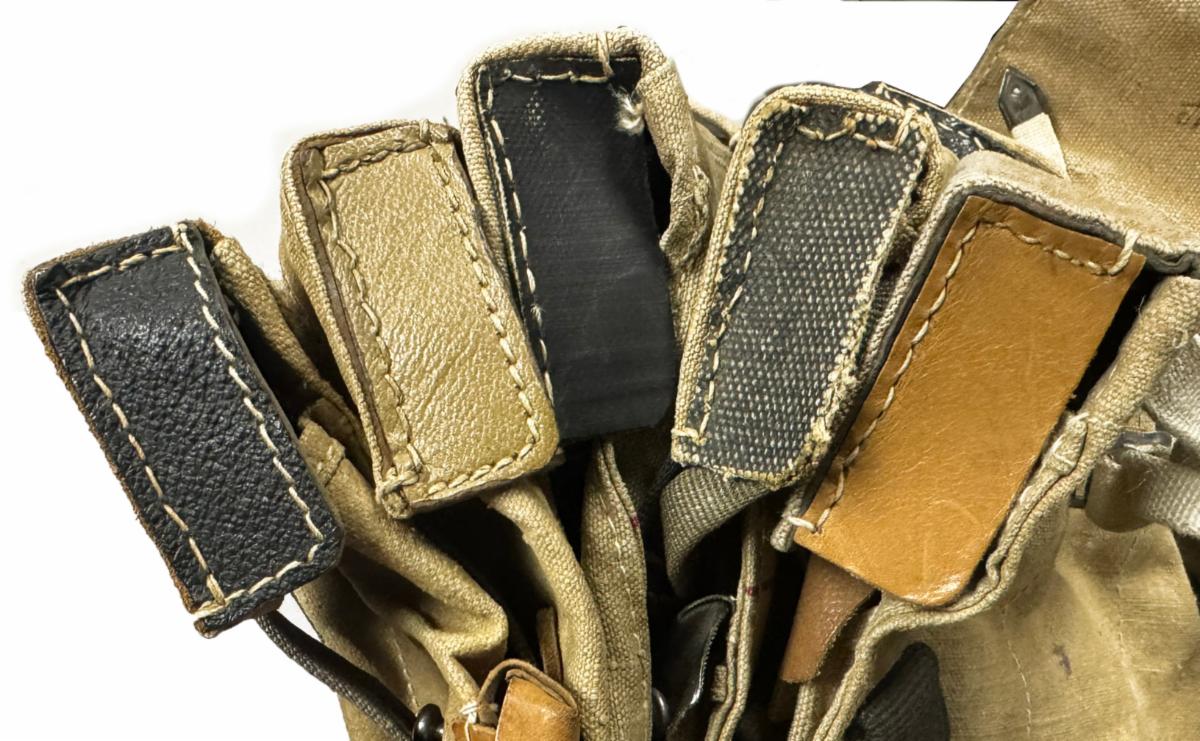
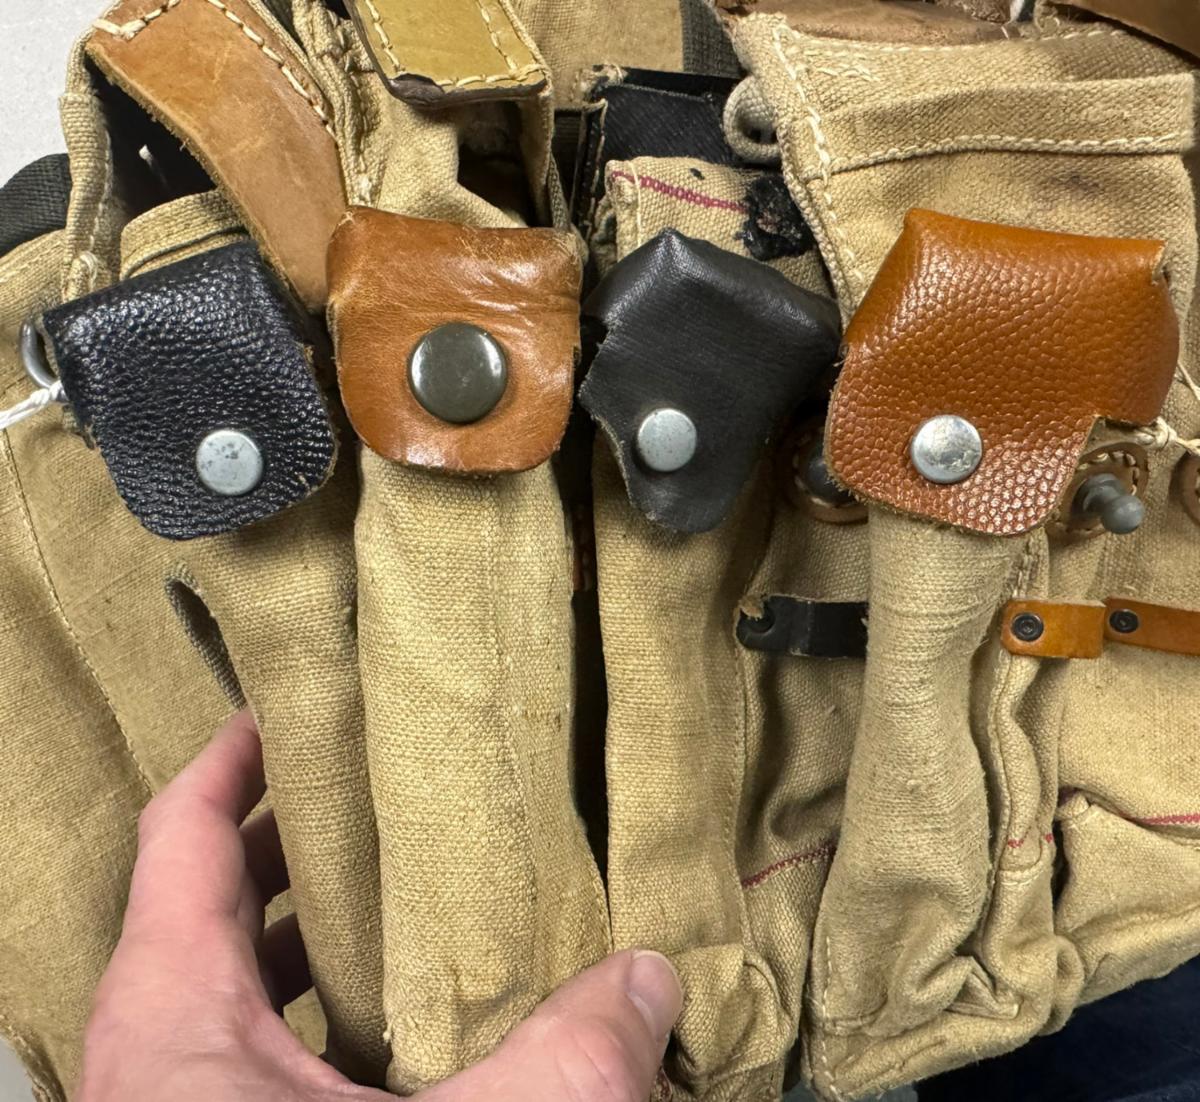
Type 1’s are made from gray canvas with brown leather fittings. Occasionally one finds black leather used for the side compartment flaps or the loops for the closure straps. I have never seen black used for the belt loops or closures themselves.

The flap sides are either Pressstoff or brown, recycled leather, and the interior of the flaps is usually reinforced with leather, pigskin, bookcloth or simply another layer of canvas.

Every original Type 1 I have seen, regardless of maker, has been made from recycled materials. The canvas and leather both show numerous stitch holes, glue marks, creases and fade lines from whatever they were in their “previous life”.

Notes: 
-The original Feldblau pouches I consider Type 2’s so they’re not included here. 
-Might there have been some that weren’t made with recycled materials? Sure. Just have never seen one.

Known makers are fuq, kkd, and qkv. Some pouches are stamped “Mkb 42” on one belt loop. (I’ve never seen any original pouches marked MP44 or STG44).

When these have dates, it’s always 1944. I suspect they were made concurrently with the better known tan linen pouches which are made by other manufacturers.

Mkb Pouches

What style was worn by the men of the 69th Panzeraufklärungs Battalion during the siege of Breslau??? Or LSSAH at Falaise? Or is correct for Fallschirmjäger?

Any of these or none of these. Like everything else, these are just manufacturing variations and they were not slated for any specific unit.

I know, it’s a painful fact, but there is no correct one.

Worse still for the OCD undead historians is that it was quite common for troops with MP44’s to have no magazine pouches.

Contemporary documents reveal a dearth of both spare magazines and a means to carry them for the entire period the rifles were in service.

Production was so far behind that most troops only received 2-4 magazines. By early 1945 the Inspectorate of the Infantry (In2) estimated a shortage of at least 250,000 magazines at the front and demanded a one-off rush delivery of 300,000 pieces. Hard to swallow? Get the book.

The output of pouches was similarly inadequate which is why many wartime photos of troops armed with these rifles don’t appear to have had any.

I suspect this is why it’s more common to see the single flap Mkb pouches in PK photos- most were taken in early 1944 when few troops had the rifles. Assumedly, the makers of pouches were initially able to keep up, but once rifle production took off…they had problems.

That’s it. These are my findings, observations and assumptions from 20 years of perving on these pouches. In the future I’ll post an article on the tan (the ones I call “Type 2”) pouches and another on how much fun it can be to make the little bastards.

Original MP44 Pouches

Type 2 MP44 Pouches
For most collectors and enthusiasts, these are considered the iconic MP44 pouches, thus being the most sought after. I’m referring to those made from tan linen canvas which I call “Type 2’s”. Again, note that this is my made up term, not an official German or collector designation.

As with the Type 1’s, I assigned letters to identify the most noticeable manufacturing variations.

A’s use leather closure straps, B’s use web ones, C’s have leather reinforced bottoms, and D’s use web closures with square rather than pointed metal tips. All except A’s use web closure straps.

The tan canvas: The fabric is linen canvas, likely from Belgium as that was and still is the primary supplier of such cloth. It’s been used for feed sacks, clothing and furniture for over a century.

When we contracted our fabric, the rep we dealt with remembered one of the “old timers” mentioning to him when he started at the company in the 1980’s that the German military had been very good customers who would periodically show up and buy out their entire inventory.

Most, if not all original pouches I have handled or viewed were made using several different weaves and shades of this canvas, with the flaps often being a notably lighter weight fabric. Note the 3 clearly different cloths in the photo above.

The lines: Many collectors obsess over the colored lines. These were woven at various intervals into the cloth, typically in shades of red or burgundy, with the width, number of colored yarns and pattern varying. The fabric was often made to be used for sacks of one sort or another and the lines helped the people sewing the items together to keep the seams aligned. They had zero military significance.

Unique Webbing: The other next distinctive feature of most original pouches are the web closure straps. It’s usually a shade of gray, 16mm wide with holes for the studs woven in the fabric rather than sewn like buttonholes.

When examining any pouch, woven holes are a near guarantee that it is original.

We’re the only repro company that I have ever encountered that made these- however, as I was unable to leave an original with the mill, the weave of ours isn’t quite identical to the authentic ones and it’s not hard to distinguish.

Most manufacturers used the pointed metal tips, often made by LUX, while occasionally one encounters the rectangular, riveted type.

Of interest, MP40 pouches with web straps have stitched holes- in total contrast to the straps on MP44’s.

Flap Sides: The material used on the sides of the flaps could be made from leather, Pressstoff (artifical leather), heavy canvas or….American rubber. See below.

Note that only Pressstoff is stitched all the way around the 4 sides- this was due to it’s tendency for the layers to separate otherwise.

There are a few very late models with flaps sides made from the same canvas as the pouches. The flaps were cut in 2 layers, more or less in a “T” shape, then folded and sewn to create the box top.

The über thrifty Germans- last year we were able to determine that the rubber typically found on Type 2 D pouches came from the resealable fuel tanks recycled from downed Allied aircraft.

A shovel carrier was found with enough of the nomenclature to determine this. Thus, “CON” is not for “Continental” (the German rubber firm) but rather it’s “CONTRACT”.

Flap Lining: The inside of the flaps was reinforced with a veritable cornucopia of materials. One may find leather, split leather, pigskin, heavy canvas, book cloth or even more “airplane rubber”.

Studs: The the height and shape of the heads on the metal studs used to secure the flaps varied as well. Even on matching pairs or sometimes even a single pouch, one can find studs with very different shapes.

The leather disc used to attach the studs was usually brown leather, made from one thick piece (or occasionally 2 thinner layers) of leather.

Closure Loops: Another identifying feature of certain manufacturers is the width and means of attachment of the closure loops. Some firms like cea and ros used narrow, 12mm loops while others like jwa used the same 16mm width like the closure straps.

Rivets were used by cea, while ros and jwa stitched theirs on. The firm fuq stitched some and riveted others.

Black or brown leather in both smooth and pebbled finishes were used.

Accessory Pouch Flaps & Snaps Caps: The flaps on the side pockets for the loader tool and spare parts vary widely. The were made from leather or coated canvas, in black or brown, in both pebbled and smooth finish.

I wouldn’t be the least surprised if other materials or colors turn up.

The caps on the snap sockets can be painted black or gray, or simply left unfinished. Likewise, the size of snap varied.

Snaps: Not surprisingly, the Germans appear to have used just about any type of press snap they had on hand for these pouches. Both segma and double wire snaps can be found, in steel, zinc and even brass.

Makers & Markings: The markings on MP44 pouches can be very difficult to see, and it’s not uncommon for them to be devoid of any marks. As shown above, both ink and steel stamps were used, and if one is lucky to find marks it’s typically a 3 letter code and year.

Note that I have never, ever seen an original pouch (of any model) marked with any weapon designation other than “Mkb42”- but it’s very unusual on Type 2’s. The only ones I’ve encountered with MP44 or STG44 on them were fakes.

As for who made what: A’s appear to have been made by “cea” (H. Thiel, Dresden), and D’s by an unknown manufacturer as to date, I have never seen any with maker marks.

In contrast, B’s were made by a number of firms, including bla, cea, jwa, ros, and likely others. As for D’s I’ve seen them made by bcb and jwa (shown).

Note that most makers have their own specific quirks that allows one to identify them even if no markings are visible.

History Fail! One thing that would send some living historians to therapy is the fact that some troops ended up with mis-matched pairs of magazine pouches or other times just one. There is a clear photo of an LAH Flak NCO in Russia (can’t find it off hand) wearing one leather and one canvas MP40 pouch, and many other WWII photos show troops wearing with singles.

Photos of MP44 pouches in use are incredibly rare, but I have encountered 2-3 pairs of vet-bring back MP44 pouches that are from two different makers, but where clearly worn together.

That’s most of what I think I’ve figured out over 20 years of hoarding, perving on and making MP44 pouches. Like many expensive items of militaria, fakes abound, but it’s not usually that difficult to determine which is which.

Frogskin Shenanigans


Non-Reversible Par: Last week we sent out an original parka and trousers (the ones above) as guides for reproductions. We only plan to make these in Marsh- don’t get excited about the pattern on this parka- it was my only non-reversible example. When Mister when? Who the hell knows. Maybe
2037.
Frogskin F–kery

Originals- which shade is correct?Since the 1980’s an immortal myth has been making the rounds claiming that the shade of the base color on Frogskin camouflage holds great meaning.
Like all myths, there’s no exact consensus on how to interpret it so the squabbles amongst the “experts” are endless:“If it looks khaki that means it was made for the Marines-“”No! That means it’s early! You’re a fool. Everyone knows that means it’s Army.” “Green base tone = Korean War.””Screw you dumbass- the greenish color pallet was specifically designed for the ETO! Get your facts straight!”
And on it goes….


If this BS was true then how in hell does this P42 jacket have “khaki” body and one “green” sleeve? It was repaired for the Korean War?What this bickering most often boils down to is historians yearning for the uniforms of their preferred service to be the khakier shade. Shocking.
Just as with the different shades of OD on all the other garments, there is ZERO meaning to the various shades on the US WWII camouflage- it’s simply another illustration of the lack of precision in dye
mixing. That’s it. Nothing else.

Army vs. Marine Corps. They both used the same stuff.Tied into that BS is the insistence in some corners that there are different versions of frogskin for the Marine Corps and the Army.
Although each service had slightly different weave HBT fabrics for their green fatigues, all frogskin was printed on the same “Army pattern” cloth. Above is a close up.
Those who have spent time at NARA researching this topic say it appears quite likely that there was only one production run of frogskin HBT made. The Army was in charge of it, rapidly decided the camo sucked, declared it “limited standard” in September 1943 and moved on to other things. How the Marine Corps got involved is not known.
Thus, the identical fabric and camo print was used on all Frogskin HBT garments in WWII, and the shades of the colors are nothing other than dye /printing variations.
This isn’t privileged or new information- I was told all of this 40 years ago by the older guys. Stop trying to compete with the Flat Earthers. There are better hills to die on.

Tailor to Millions

Copied from the Quartermaster Foundation Page

Harold P. Godwin
The Quartermaster Review
May-June 1945

Looking at today’s trim, well-fitted GIs, a soldier of World War I must wonder, when he remembers the day he was bundled into his serviceable but none-too-snappy uniform, with its peasant brogans and its wind-up puttees, how it is possible to turn out the well-dressed soldier of today, especially in view of the many more millions now being clothed and equipped. In his day there were said to be only two sizes of Army clothing-too large and too small. What makes the difference?

The answer lies in the meticulous care and great lengths to which the Office of The Quartermaster General has gone in this war to make our troops the best-dressed Army in the world, not only sartorially but from the standpoint of comfort and protection.

The new soldier wears new clothes in a new way. What’s more, they fit. Today, when the incoming soldier appears at the clothing counter of a reception center, his measurements are carefully taken, his proper clothing is drawn to those measurements (sixty-six items in all), and a professional tailor then sets to work to give an almost custom-made trimness to an issue uniform. But thanks to the careful compilation of measurements and other research, there are usually sizes on hand to fit most inductees with little, if any, additional tailoring. Today approximately 6,000 different sizes of various items of clothing and footwear are stocked and issued by the Quartermaster Corps in ratios arrived at by experience.

The task confronting the OQMG in clothing and equipping the prospective Army on October 16, 1940, when the first registrations under Selective Service began, was one for which there were no precedents or adequate schedules. The only information available was in an Army Regulation published in 1937, but that had been compiled from the size requirements of our small peace-time Army and was in no way applicable to the needs of the rapidly growing Army which was being inducted from civilian life. Records from World War I were useless because of the differences in the basic garments.

The first registration embraced men between the ages of twenty-one and thirty-five. As the rigid requirements of the Army had to be lowered considerably for Selective Service, the Office of The Quartermaster General had to look to civilian sources for information as to the sizes which would be required for men in the twenty-one to thirty-five age brackets. Such information was obtained from the nation’s chain store organizations and mail order houses, whose volume of country-wide distribution would, it was thought, provide a fair representation of the sizes of clothing being sold throughout the United States. From this information size tariffs were prepared, and they proved exceedingly helpful as a starter.

The draft picture in 1941 upset the apple-cart. It meant that new and more explicit information was needed to provide effective tariffs. This was obtained by a procedure requiring that a copy of the initial clothing size form for each inductee be sent to the Office of The Quartermaster General.

January, 1942, brought still another change in the draft ages, but one which was not to be effective from a clothing size standpoint until early in 1943. Legislation was enacted requiring the induction of youths from eighteen years up, and simultaneously rescinding the order for taking men over thirty-eight. The effect of this upon the existing size tariffs was immediately anticipated, and the OQMG sent letters to approximately seventy-five leading educational institutions having ROTC units for information on the sizes of clothing required by college youths within the age group of eighteen to twenty years. This information resulted in further revised tariffs, which showed an increase in the smaller sizes and a comparable scaling down of the larger sizes.

By September 1943 the sizes of more than 6,000,000 individuals had been tabulated, studied, and again made into new tariff lists. At this time the procedure requiring that a copy of the individual measurements be sent to the OQMG was discontinued because maintenance requirements had then grown larger than initial issue requirements.

However, even now, the tariffs thus tabulated do not remain static. Semi-monthly reports from points where clothing is issued are constantly checked against the tariff lists. In this way tariffs are kept up-to-date and in conformance with any changes which might appear in size trends.

One of the problems which presented some difficulty at first was that, in many instances, men had to be held at reception centers because their unusual stature required special-measurement clothing not provided for in the regular tariffs. To meet this situation a group of sizes, known to the commercial trade as “extra size” garments, were provided, but were designated as “supplemental” sizes. Experience has proved that only small quantities of these sizes need be placed at the reception centers to eliminate delays. Reports from the Philadelphia Quartermaster Depot show that the provision of these “extra sizes” has reduced the necessity for providing special made-to-measure clothing by more than seventy-five per cent.

But even with these provisions exceptions will crop up and special clothing must be made. A cook in the 102nd Cavalry required trousers with a 48″ waist and a 31″ length. A boy at Fort Knox had to have a 5-EE shoe for one foot and a size 8-E for the other, and there was a trainee at Fort Jackson, South Carolina, whose bull neck required a shirt with a 19″ neckband. The periodical check on the tariffs as new inductees came into the Army revealed that they were not working uniformly in all sections of the country. An immediate analysis was made and it was found that a difference in average stature prevailed in different geographical sections. Men along the northeastern Atlantic seaboard run to stocky builds and short height, while those inducted in the southern area are taller and more slender. The middle west inductees are men of medium stature, generally requiring more of the medium-to-large sizes, while on the west coast are found a combination of all sizes on an equal basis.

In view of these findings a procedure was established in May 1944 whereby camps, posts, and stations were authorized to establish stock levels of sizes and maintain inventories based on their individual experiences. This procedure has worked very well. A recent poll, taken among thousands of service men, revealed that nearly eighty per cent of all the clothing, and eighty-six per cent of the shoes, fitted perfectly, even by rigid Army standards. The accuracy of the size ratios is proved by the fact that no surplus of either the standard or the unusual sizes is piling up.

In order to achieve this balance and have adequate stocks to equip all inductees without delays, an infinite variety of sizes must be kept on hand. Ninety different shoe sizes are stocked in proportions indicated by the tariff ratios. Thirty different sizes of trousers are carried in regular stock, and twenty-two different sizes of shirts.

Data compiled for millions of inductees shows the following to be the actual measurements of the “average” newcomer to the Army as he appears at the clothing counter of a reception center: 5′ 8″ tall; 144 pounds in weight; 33 ¼” chest measurement; 31″ waist measurement. From the tariff tables showing the frequency of size issues it is found that the sizes most frequently issued are a 7 to 7½ hat, number 9 gloves, a 15 shirt with a 33″ sleeve, a 36 regular jacket, a pair of trousers with a 32″ waist and a 32″ leg length, size 11 socks, and size 9-D shoes. These figures may be taken to indicate the size of the “average American young man.

Up until recently there had been no Army regulations developed specifically for the fitting of clothes for women. However, data has been compiled for women through the same procedure followed in the case of male inductees-the tabulation of the initial measurements at the time of enlistment. This information, however, could not be used as conclusive because it was found that most women gained weight after enlistment and training. In order to obtain workable tariffs on women’s sizes, data is now being compiled from a canvass of approximately 12,000 Army nurses on duty throughout the United States. Similar action was recently taken with 30,000 Wacs.

As in the case of men, the information on women’s sizes obtained from the clothing trade did not apply to Army uniforms. Commercial size tables were geared to one-piece dresses, for the most part, and were not applicable. The tariffs set up from the recent surveys revealed that size variations among women were much greater than in the male group. The smallest woman soldier is 4′ 7 ½’ tall and weighs 77 pounds. Her contrasting colleague is 6 feet tall, weighing 224 pounds. Though the minimum height and weight for Wacs is 5 feet and 100 pounds, an exception has been made for women of Oriental descent, whose normal height is usually below the minimum.

The predominant size of the typical woman soldier, as shown by the tariffs, is 5′ 4″ in height and 128 pounds in weight. She has a waist circumference of 26 1/2 inches, wears a 22 hat size, and a 6-B shoe. Instead of being the traditional “perfect thirty-six” she takes a size 14 jacket. The collar of her O.D. shirt is 13 inches, and her ankles are neatly encased in size 9 1/2 rayon stockings.

Feldbluse Sizing

The German tunic (Feldbluse) of the Second World War was a well-engineered garment, designed look sharp, be comfortable and functional. However, it was overly complex, requiring an inordinate amount of labor time to manufacture which certainly caused manufacturing difficulties both in WWII and for today’s reproductions.

Despite claims by many manufacturers of reproduction uniforms, very few, if any, have actually managed to duplicate the pattern and sizing system. Aside from the complexity of the garment itself, there are three main reasons for these failings- lack of original examples, a minimal understanding of the sizing system, and the tendency to associate the tunic with a suit coat.

Original Heer uniforms are not particularly difficult to find- but they are relatively expensive, with examples in good condition costing about $1,500-$5,000 at the time of this writing. To accumulate a wide range of sizes and styles can cost tens of thousands of dollars. Further complicating this is the fact that many tunics were altered during the War, which often ruins any patterning value they may have had.

The “secrets” of German uniform sizing are stamped right in the tunics themselves. Unlike the US Army, which simply used the chest size and length, the ever-anal-retentive Germans include the chest, neck, sleeve, waist and back dimensions in the size stamps. Later tunics also give the height range of the soldier the tunic is intended to fit.

The biggest mistake made by most reproductions is their application of suit coat patterning standards to the German tunic. These have been around for years and it’s an understandable error. The grading rules (how the parts of the garment “grow” or “shrink” as the size changes) are readily available in books and online. Even the most expensive reproductions, those considered to be the best of the best, sometimes used these standards. All one needs is a tape measure to figure that out.

What’s my documentation? My favorite social media reenacting celebrity who has a vast collection of reproductions says otherwise!

Well, we’ve been making German uniforms for nearly 30 years, we have several dozen originals on hand to check, plus WWII tailoring standards and tunic specifications, the hdv 337 German Army sizing guide, and we’ve dis-assembled numerous originals to verify our patterns. That’s about all.

How did the Germans size their Tunics?

The Wehrmacht’s sizing system was typically German; entirely systematic and logical, yet in practice it could be a supply sergeant’s nightmare. The WWII German tunic sizing allowed a very exacting fit to be ordered for each soldier. Like most uniforms, tunics were sized by chest measurement and length, the latter being indicated by the torso length (Rückenlänge).

If all chest (32-50) and length combinations are considered, there are over 128 possible sizes (as compared with about 50 sizes for US Service Coats.) Each chest size also could be ordered with 3 different neck sizes and each torso length had 3 possible sleeve lengths…once those are figured in, 128 becomes over 1100 possible unique size combinations. Typical German.

What size is it? If one is shopping for an original tunic, learning the numbers will enable you to determine the size of a uniform simply by seeing the size stamp. Once one knows them well, it also helps spot fakes due to outrageous “sizes” sometimes stamped in them. Helping to identify legitimate SS tunics is also possible as they had slightly different proportions than Heer Feldblusen.

The Numbers: The numbers stamped inside the tunics tells most of the story. Here we break them down to help you understand what they mean. Most tunics have a block of with 5 measurements stamped inside the placket. A few have additional sizes and measurements- this will be addressed below.

Size = the size of the chest or neck as measured on the soldier. The actual measurement of the garment will be larger to enable freedom of movement.
Measure = actual measurement in centimeters of the uniform part

This is the most common format of the number blocks indicating the size of the tunic

Chest sizes: Tunics are first sized by the soldier’s chest. The number stamped in the tunic represents the size chest it will fit, not the actual measurement of the tunic. The garment typically measures 8-10cm larger than marked to allow for undergarments and freedom of movement. Thus, a “size 100″ will measure about 110cm. Original uniforms were made in essentially .75” (2cm increments) starting at 82cm.

Length: Next, the length must be determined. Instead of “shorts”, “regulars”, etc, the Germans indicated the length by the Rückenlänge translated as “torso length”.

Torso Length: The length of a German tunic is determined by the upper left-hand number on the size stamp. This is the Rückenlänge or torso length, sometimes translated as “back waist” or “belt line”. It’s measured from the base of the collar to the level of the center belt hook hole. In theory, this places the belt at the wearer’s natural waist, the narrowest part of the torso. It is not based on the height of the soldier’s elbow, his shoe size, or any other nonsense.

German tunics came in no less than 8 back waist lengths, each of which is designed to fit a soldier of a certain height. Heer uniforms use back waist lengths of 37, 39, 41, 43, 45, 47, and 49. Those cover soldiers from 145cm (under 5ft.) to 200cm (6ft. 6in) in height.

SS and Luftwaffe tunics use even or odd numbers 38-49 so they have at least 12 possible lengths. The reason for this difference is unknown. Hdv 337 notes that Heer Feldblusen only come in odd number lengths as the belt hooks offer 1cm of adjustment longer or shorter. Thus, a tunic with a length of 45, can be adjusted to 44 or 46 by using the upper or lower belt hook holes. (Paragraph 3, page 39. See below.)

This length system remains constant throughout all chest sizes.

Documentation

For those who demand documentation…here it is. Heeres Druckvorschriften 337: “Regulations for the sizing of the most important uniform items”.

Total Back: (Ganze Länge) The distance from the base of the collar to the hem of the skirt. This was dispensed with on some late War number blocks. By taking the difference of the Back length and total back, one can arrive at the skirt length. This can matter when checking for SS tunics, which usually have shorter skirts than comparable length Heer tunics.

Sleeve Lengths: There is more variation here than with the torso lengths. Although it would seem reasonable to have a stock sleeve length for each Rückenlänge, I have found this not to be the case. Each length of tunic (for example, “43”) can have a range of sleeves lengths, typically varying by 3-4 cm. Say 62, 63 or 64 on a Rückenlängen of 43. So, some tunics will have cuffs that end below the skirt, and other will be higher. Why or how this was determined is unknown.

Neck Size: The circumference of the collar is associated with the chest size. Each chest size will normally have one of two possible collar sizes. A 96 typically has a 42 or 43, a 104 has a 44 or 45 and so forth. Again, anomalies exist, but there is a distinct average.

Size Block Variations
One will encounter a number of variations when looking at authentic Feldblusen. Below are two of the more common ones. On some later War examples with the height range, the total back and sleeve lengths are dropped, some Panzer jackets dispense with the total back length, and occasionally DAK tunics lack a neck size.

Errors: Lastly, yes, the size stamps are sometimes found to be incorrect. At times the chest is off by a few cm’s, while others the size is wildly incorrect. Many large size Feldblusen can be found today that were tailored to a smaller size, but those often have the original numbers struck out and the new ones stamped below them. If the uniform is unissued and has the paper tag from the factory still attached, the tag is typically correct if it does not match the stamp inside. This is especially the case when the tags are hand written.

What are “Pattern B” M43 Field Jackets?

The M43 Field Jacket entered production in the Summer of 1943 with the first contracts being the specification 370B. Several minor improvements were made by October, at which point the specification number was updated to 370C.

At some point late that Fall, it was decided to enlarge the circumference of the chest and upper arms to permit a better fit when the pile liner was worn underneath.

The QMC referred to the the enlarged design as “Pattern B”. Why didn’t they call this a “370D”? Likely so that quartermasters could easily identify which cut of jacket they had on hand rather than expecting them to remember specification numbers.

When compared, Pattern B jackets are clearly larger than their earlier counterparts. The photo above shows two 370C jackets, both size 42. The top one is a Pattern B and the bottom one is the earlier cut.
As first designed, the M43 Field Jacket had a chest circumference that was 8″ larger than the stated size. (Typically, the chests of men’s jackets are 6″-8″ larger than marked.) Thus, a size 40 had a chest measure of 48″.

For pattern B Jackets, this was increased to 10″, so a size 40 will now measure 50″. (Of note, HBT jackets are also 10″ oversized.)

In addition, the circumference of the upper arm was increased by 2″ compared to the initial design.

Today one finds a roughly equal number of authentic 370C jackets in both the initial cut and the Pattern B.

All subsequent WWII M43 Field Jackets types, the 370D and 370E, are Pattern B. Likewise, the later M50, M51, and M65 Field Jackets retain this same overly large cut.

For collectors this isn’t much of an issue, but with reenactors and modern wearers of these jackets there can be some controversy. Since the vast majority of people do not wear a pile liner with the jacket, complaints of them being too large, “effing yuge”, totally cut wrong, fitting like a garbage bag, and so forth are common. The earlier jackets are notably less baggy and thus have a preferable fit to many people.

370B Markings

Of minor interest, some manufacturers, usually on 370C’s, added the “Pattern B” to the labels in their jackets with hand stamps rather than printing it with the rest of the information. This was likely due to the labels having already been made prior to the change. The one above is stamped at the top.

This one is stamped at the bottom….

Or, take the lazy way out and just whack a large “B” on it. The B was also stamped next to the size mark below the neck. Occasionally, one can find this done on the regular spec labels as well.

All 370D and 370E Jackets were Pattern B’s. A 370D label shown above. Contracts for 370D’s were issued from April 1944 until early February 1945.

On jackets made from the Fall of 1944, one often sees “Pattern B dated 1 August, 1944”. I have been unable to find any further alterations to the pattern on these compared to those made earlier.

Label for a 370E from the first contract of this model. If any of these jackets reached troops before VE Day it would have to have been only a handful. As with the 370D’s, all of these were Pattern B.

US Facts

The unexpected controversy over the “US” markings has been a total surprise to me. Even photos of piles of original gear, showing a wide range of variations of the markings, has simply prompted more questions. Why this year (2023) has seen a sudden fixation on them is a mystery.

So, here are more photos as well as WWII documents to show and explain how and why they really were.

The photo: These are some of our originals. Most of the gear shown above is in unissued condition- therefore the markings are not faded nor redone, retouched or enhanced. This is how it looked when it was new and handed to the soldiers.

Points of interest:

-There are hardly any two fonts that are truly identical. Fonts with serifs are most common, but several without are present.

-Some are bold, some are not. Letter spacing, thickness and shape varies. Note the “S” on the pistol belt that looks like a “Z”.

-Maybe half are truly black and solid, others not, and it’s not terribly uncommon for part of the marking to darker than the others.

-Some aren’t perfectly centered and a few might even be crooked.

-Note that two are upside down, and one was forgotten entirely. (The pistol belt isn’t upside down, the stencil is.)

-In other words, perfection is not the rule.

All of the above original characteristics have prompted the following comments:

“This cannot be to “spec”! How could this have been allowed to happen?”

“I would expect more from American made!”

“Too light/ dark/ thin/ thick/ uneven (insert adjective)!”

“The military is all about precision!” (Yup. Lowest bidder.)

Ultimately, just about everything enthusiasts claim to be wrong about the U.S. markings- isn’t. At least not historically speaking.

“Specs”

Much is often bandied about “original specs” for this or that. Luckily, the QMC specifications for most items of WWII gear are available.

Here are a few examples from the US Army Quartermaster Corps specifications from the early 1940’s regarding the markings applied to the field gear issued to American soldiers.

The specification sheets vary a bit, but follow the same general format. Typically, one will find this information in a paragraph titled “Marking for Identification” which covers the “U. S.” marking as well as that for the manufacturer’s information.

However, on a few items, it’s not addressed at all- yet the items still have markings.

In contrast to today’s rigidly formatted “gubmant speak”, the wording and amount of detail in the WWII specs varies widely. Here are a few examples.

First up, least pleasing for regulation maniacs, we have the paragraph used on M1 Carbine Pouches, spec 98, dated April 3, 1942. (The identical paragraph appears in the spec for the M1923 Cartridge Belts as well.) Not exactly detailed is it?

The next example is for Canteen covers, Spec. 1B, January 23, 1942. At least they give the size of the letters this time- but the color of the ink or paint is no longer mentioned…

The final example is for M1943 Intrenching Shovels (folding shovels) and this one is on the more detailed end of the spectrum. In addition to the height of the letters, it also specifies that they be in “solid” face. (Sheets for some items say “bold face”.) This is about as fancy as it gets, even though again, they forgot to tell us that the markings should be black.

This is a typical drawing attached to the spec sheets. It does helpfully gives the location, size and color of the letters. Some drawings simply show the letters but have no other details about them. Most of the drawings do show them in a font with serifs, but the font style is never mentioned in any of the specs.

Proofreader needed! The first spec I looked at was for the Musette Bag- imagine if we followed this spec to the letter- or shall I say the lack of the second period. But there it is, in black and white from Spec. No. 20A, March 1944.

The Facts are thus:

Fonts were not specified: As stated, the letter style is never mentioned in any of these specs. Although most drawings show letters with serifs, a quick look at originals will show that there was a lot of flexibility. At no point are is any mention made of the spacing of the characters either.

Saturation was not specified: The closest one comes to finding out how thick or dark the marking should be is some of the sheets specifying “bold” or “solid” face letters.

At no point do any specs describe how thick, dark, light or evenly distributed the ink should be. Simply “waterproof ink or stencil paint.”

Many don’t even mention the color.

The Specs weren’t always adhered to: Outrageous as it may be, it’s not difficult to find originals with letters not sized or located in accordance with the drawings in the specs. The horror!

Defective: Nowhere does it state that an imperfect marking is grounds for declaring an item ineligible for combat duty.

Ultimately, the obvious fact is that military simply wasn’t that worried about how pretty or perfect the two letters stenciled on their backpacks and shovel carriers were. They had other priorities.

This stuff has marks all over it!

From time to time we do get some fussing about marks, spots or other unwanted “blemishes”, typically on US fieldgear. This post is to show that many of these markings are necessary and intentional as they are part of the production process, not a flaw or error.

Nearly all gear and garments are marked after they’re cut to show the workers exactly where to place pockets, make folds, straps, sew button and eyelet holes, or to indicate layers and shades. Others appear to be lot or inspector numbers so any flaws can be traced back to their origin and fixed.

The markings are applied in a number of ways. Chalk, colored pencil, ink stamps or stencils may be used to apply them. Many of these marks, particularly the first two, will fade or rub off after the item has been used for a time. Others are more resilient and may survive for the life of the item.

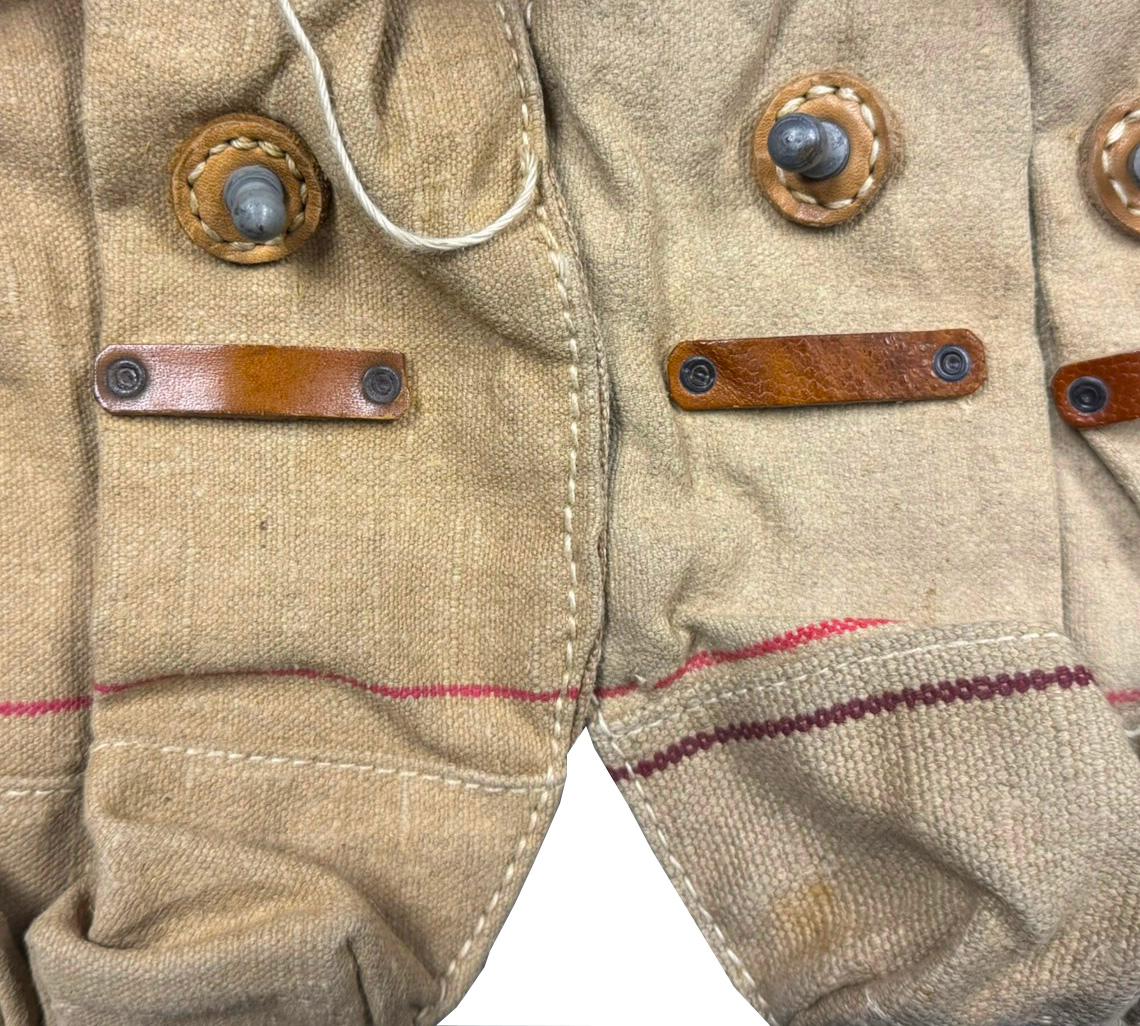
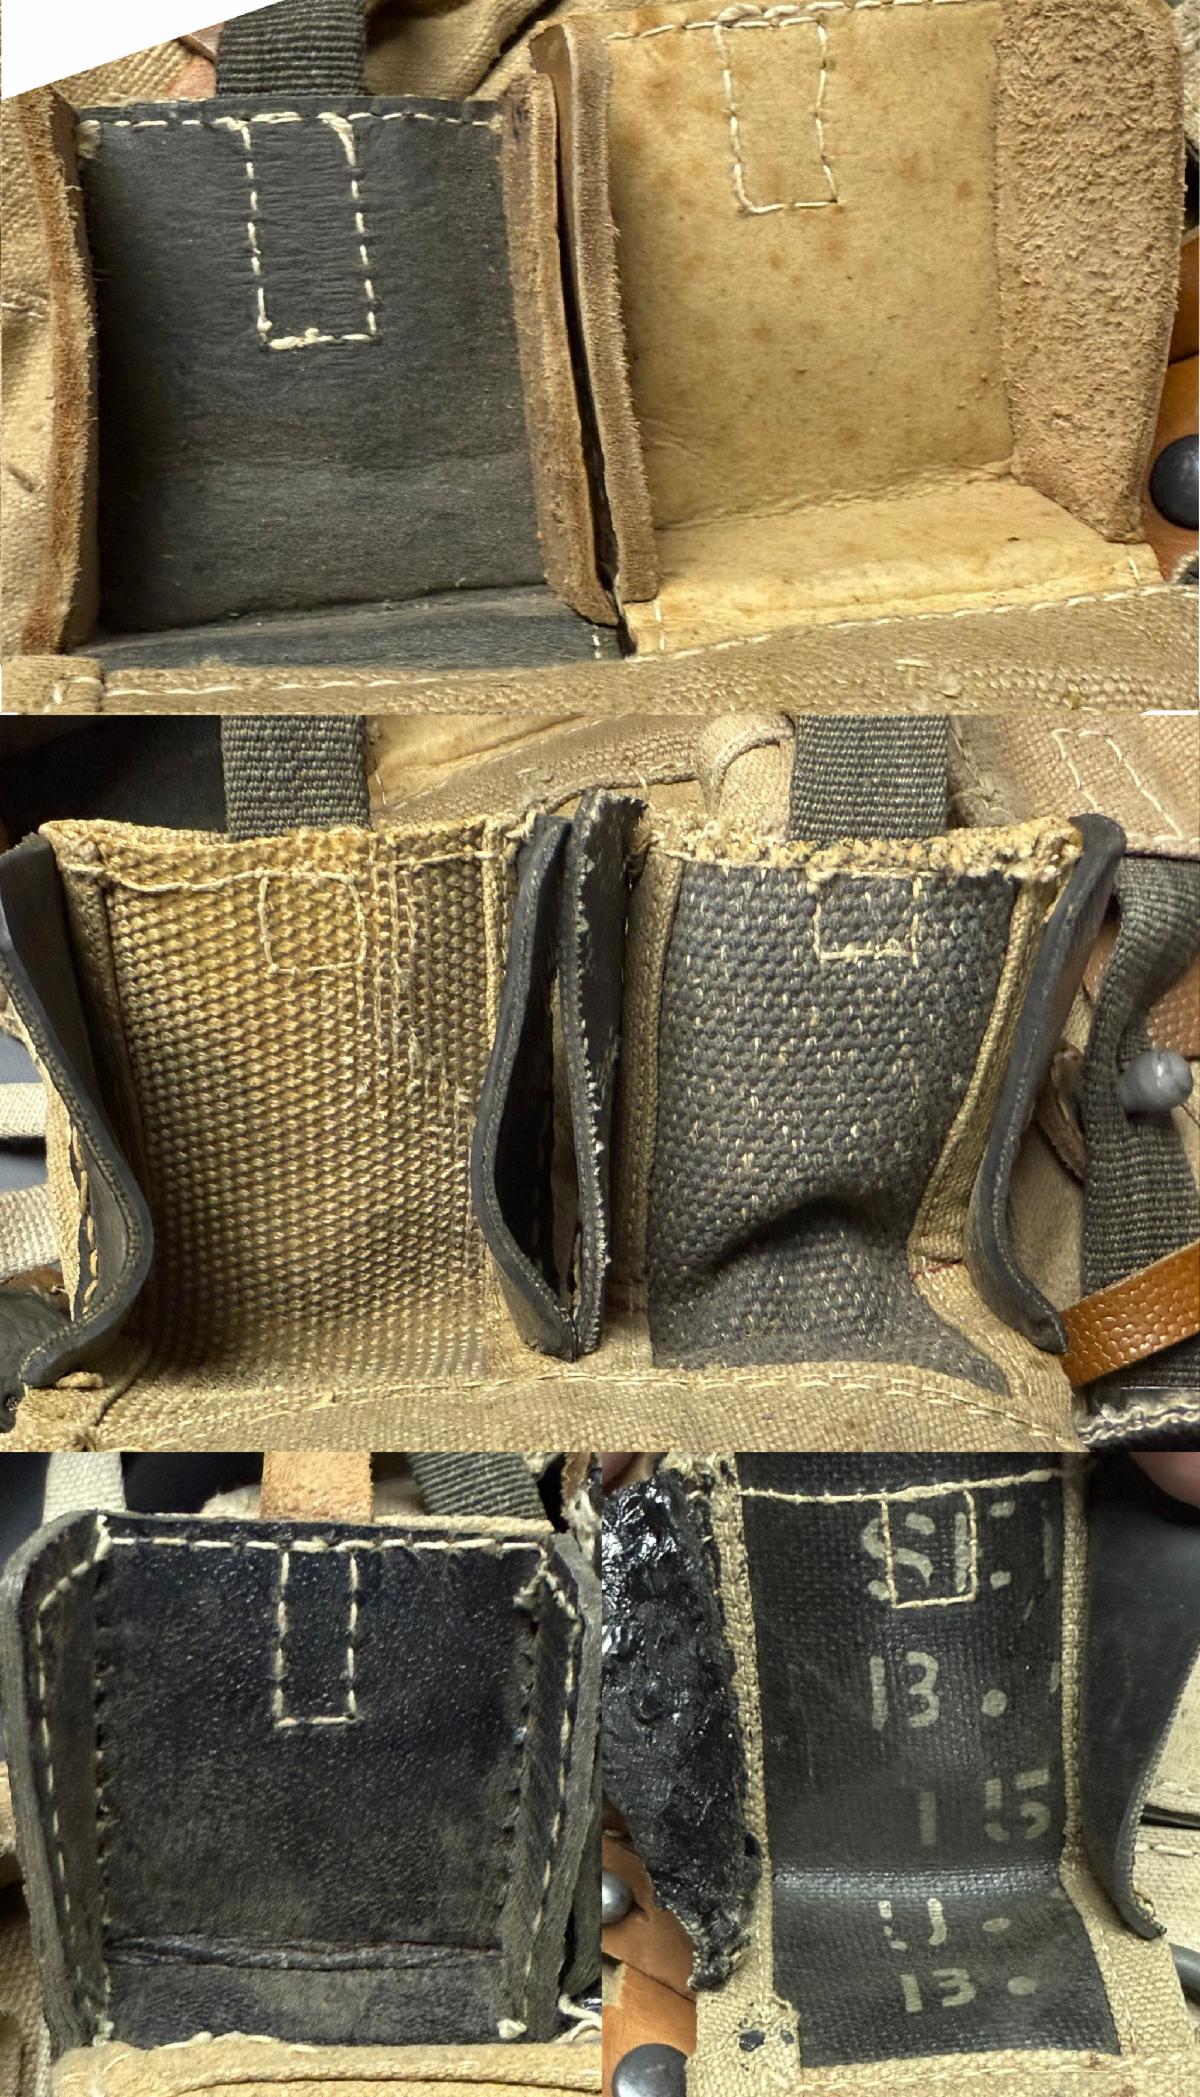
Blue and red pencil marks on original MP40 pouches.
These marked the sew lines to close the cells for each magazine.

Colored pencil marks: This is one of the most common means that WWII gear and clothing were marked for assembly. One can often find traces of them on German field gear, some uniforms, and occasionally on US uniforms. The Germans seemed to have an affinity for green, blue and pink colored pencils.

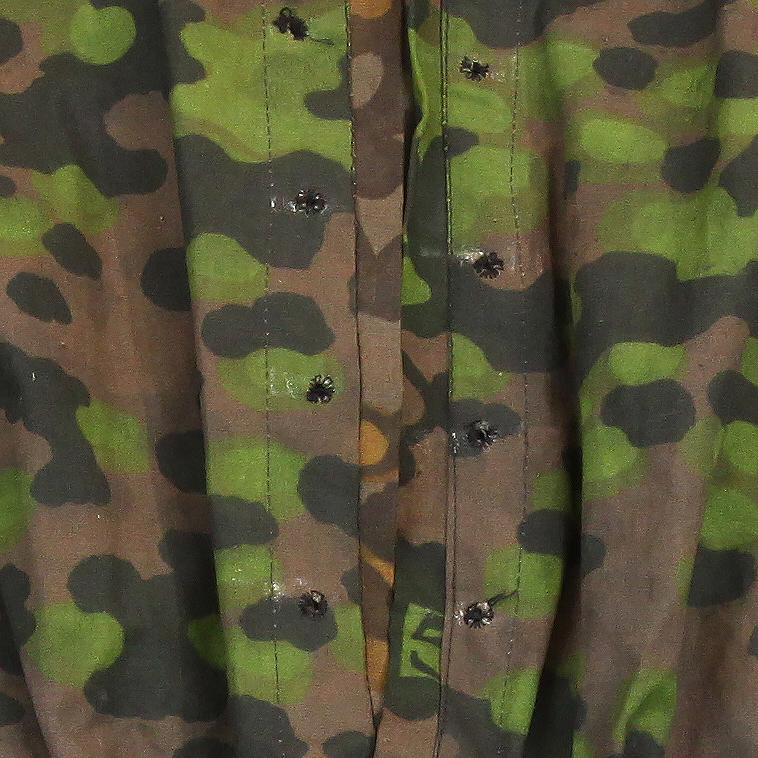
Original smock with chalk marks…how can they be wrong?

Chalk marks: At times the workers used chalk rather than colored pencils. This specific thing has caused us grief from outraged customers a number of times.

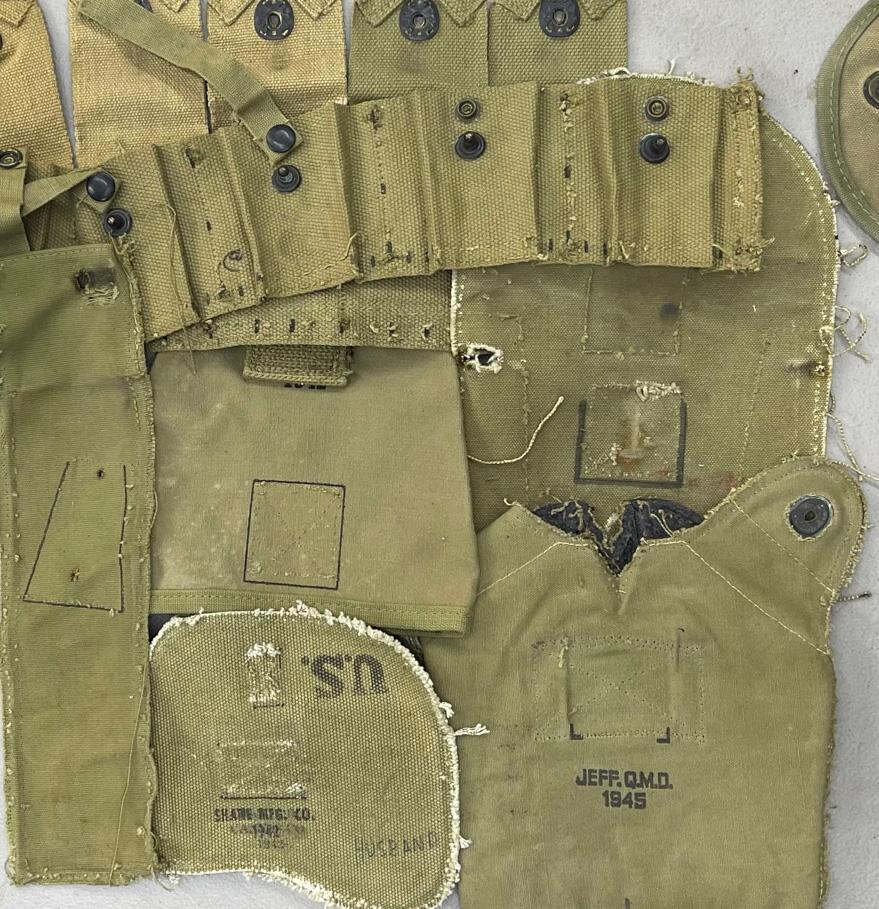
All those squares, U’s, tick marks, dots, dashes and other blemishes were applied at the factory in WWII to show the workers where to sew the parts- not offend the tender sensitivities of those keeping history alive 80 years later.

Stencil marks: US fieldgear is the most common place these are found. They were applied at the same time as the “US” and other markings as this is far faster and more efficient than laying a template over each piece and tracing the design with a pencil or chalk. Being printed with the same ink as the rest of the stencils, these tend to survive even on well-worn examples. We do this too and it’s one that creates the most complaints of “there’s black chit all over my pack”.

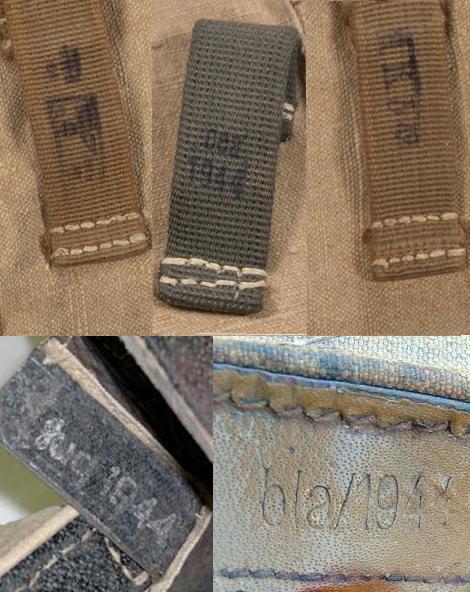
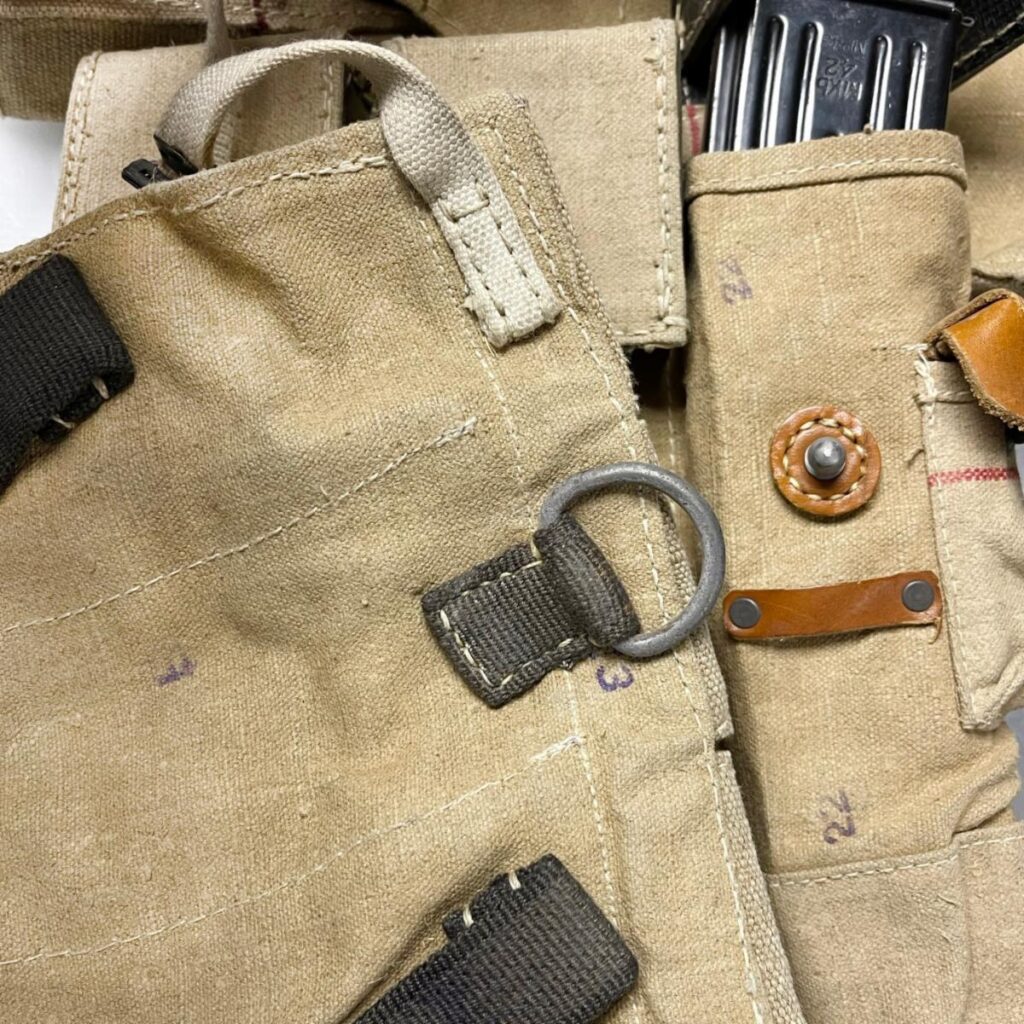
Various stamps on the parts of original MP44 pouches.

Number/ letter stamps: These are commonly found on German gear and uniforms. When present, they’re typically 1-3 digits or a letter plus numbers “R26”. Their exact purpose is unknown, but an educated guess is that they indicate the worker or group of workers who made the parts. Others may be inspector numbers.

On a few Waffen-SS items, the manufacturer was identified by number codes, such as “933” on some smocks. This will typically only be found once, such as under a pocket flap.

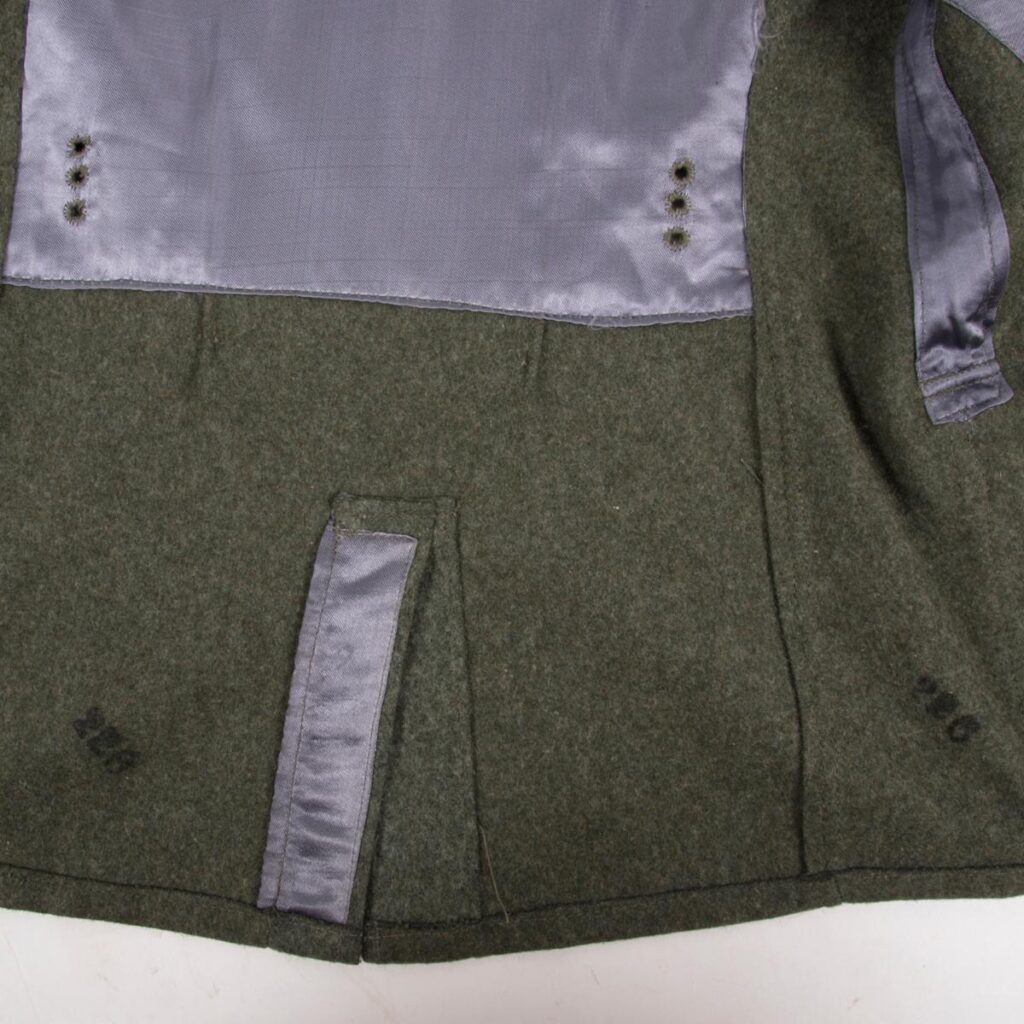
Shade marks (“226”) were stamped in black ink on all the wool parts of this original WSS M41 Feldbluse to indicate the layer of fabric they were cut from. The cloth wouldn’t have been stacked 200+ layers deep- but there were likely multiple cuts on the same table being done that day, so this might represent 2nd cut, layer 26 or something similar.

Shade marks: Some German wool uniforms are shade marked which is an alternative to shade tags. Garment fabric is stacked and cut many layers deep, and several rolls of fabric may be used to make the spread, making it likely that different shades will be in the same cut.

To avoid garments being assembled with mixed shades, all parts in each layer are stamped with the number of the layer. All the pieces on completed garments should then have all matching numbers which will indicate that they all came from the same layer of cloth in the cut, and should therefore match in shade and color.

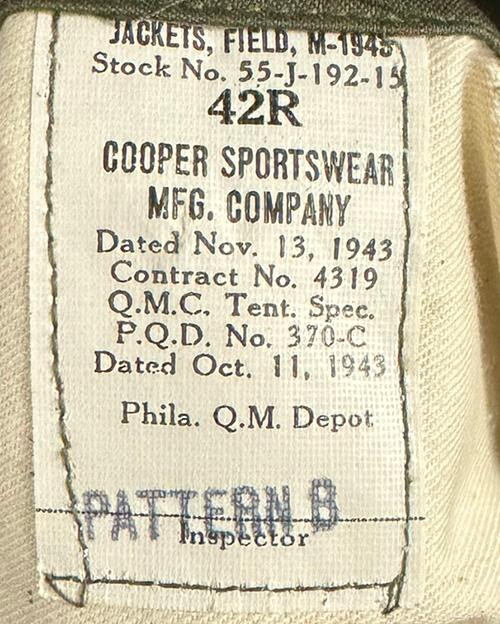
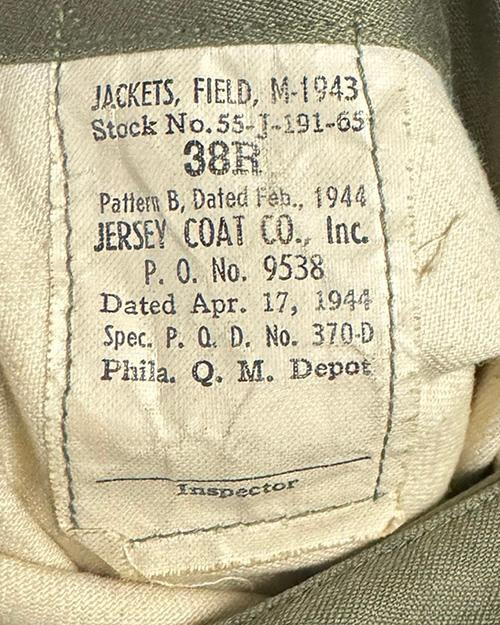
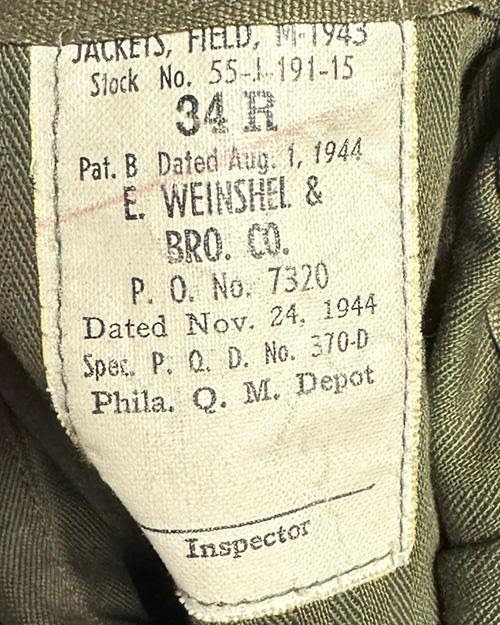
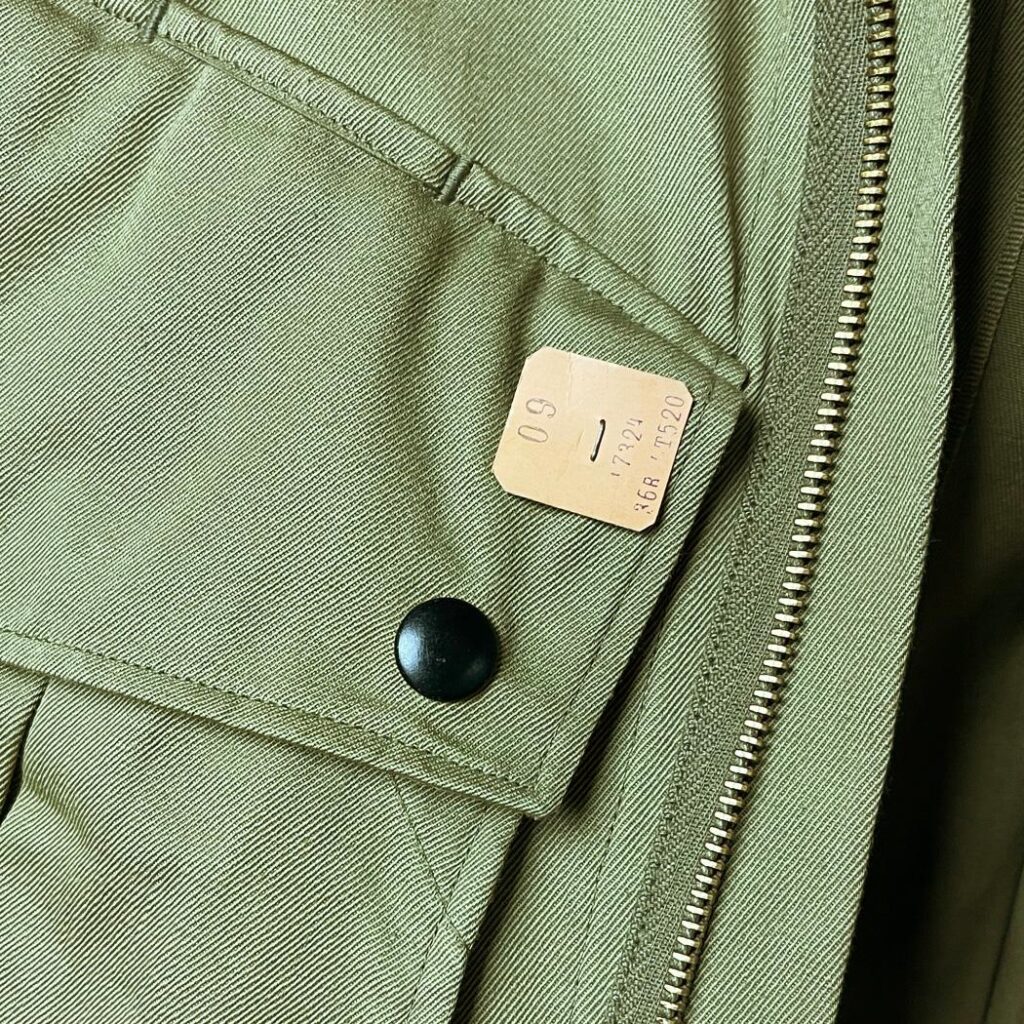
Shade tag on a original jump jacket. 09 is likely the layer, 36R the size, and the other two numbers could be any number of things. The info on the tags varies from factory to factory.

Shade Tags: Commonly called “cutter tags”, these serve the same purpose as the shade stamps above. But, in this case, a small paper tag is printed from some sort of gizmo (we’ve never found out what it was) and stapled (occasionally glued) to each part. These often have more information- such as the size of the item, the cut layer, batch number, and some others we are unsure of their meaning.

Typically found on US uniforms, they can be found on some gear. Years ago, I saw a German M44 tunic with them- they almost looked like tiny punch cards and were affixed with glue rather than staples.

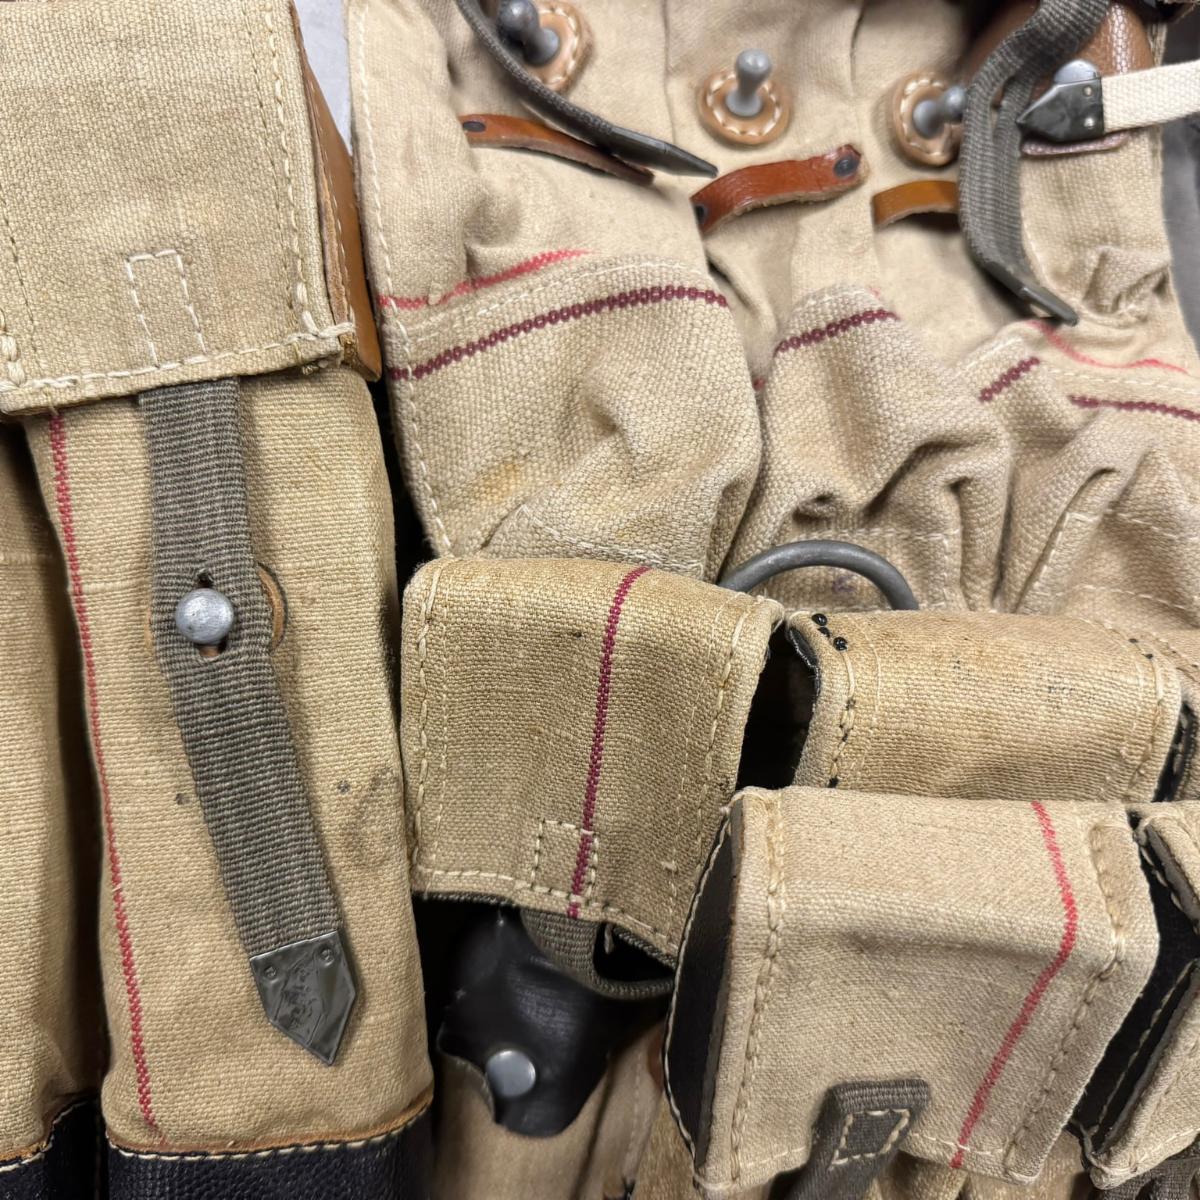
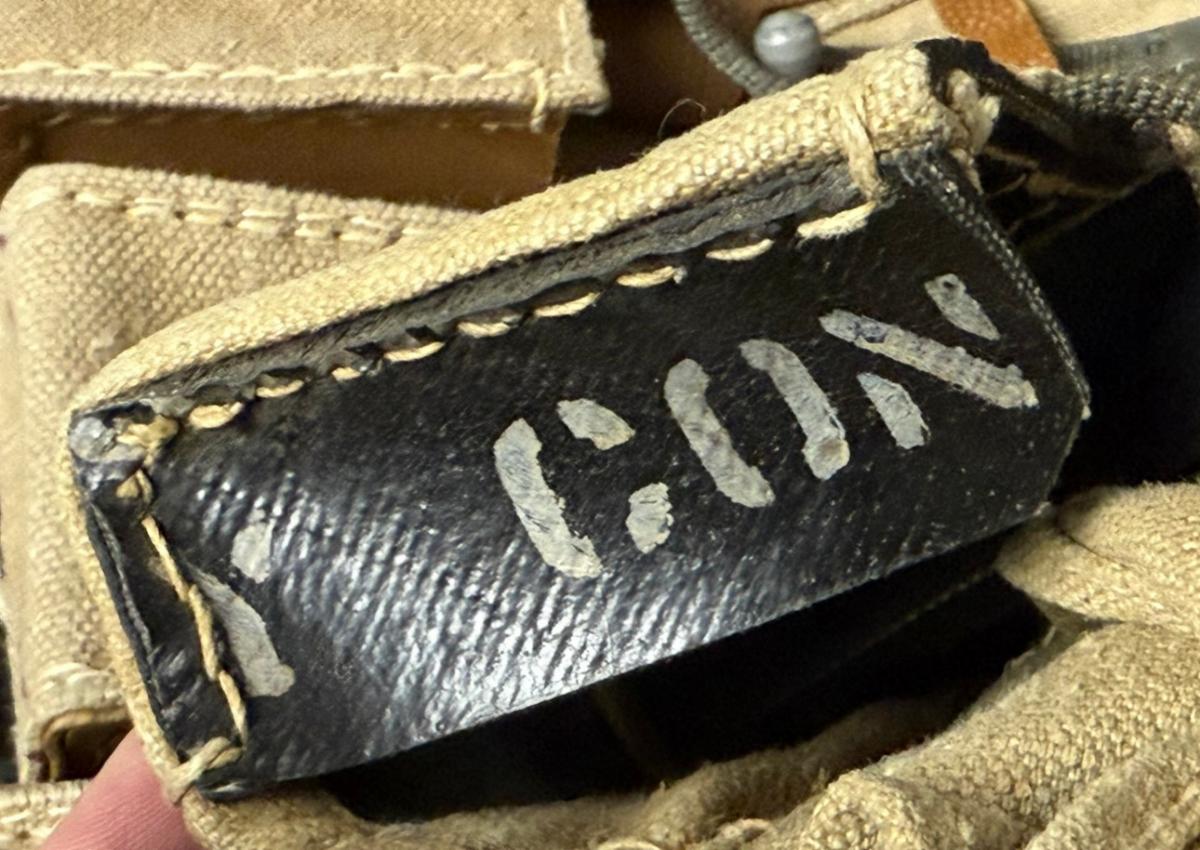
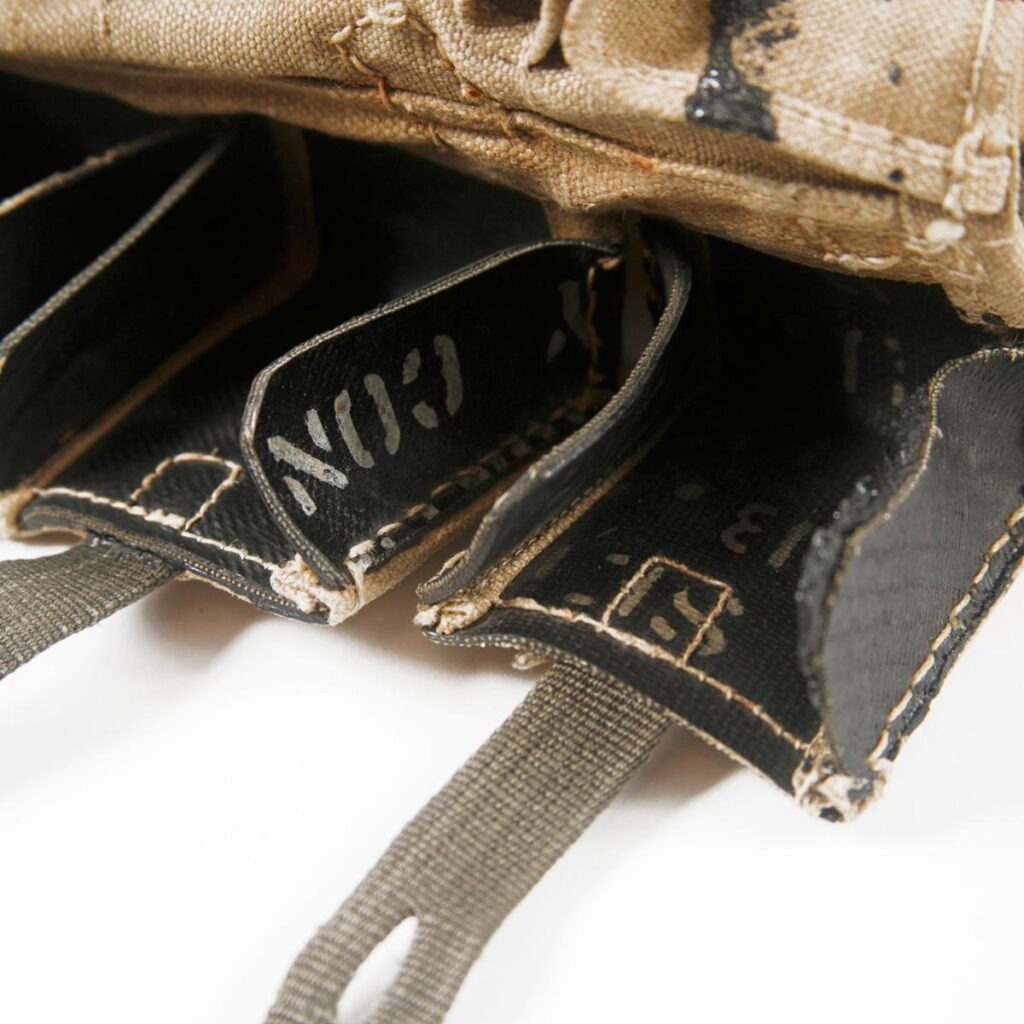
Inside flap of original MP44 pouches. We assume the “CON” is the first part of “Continental” (a major rubber and tire maker) as that’s what these flap sides are made from.

Manufacturer marks: One sometimes finds the name, logo, or address of the firm that made the material. These areas are typically on the inside of garments or gear and are considered a very cool plus by collectors.

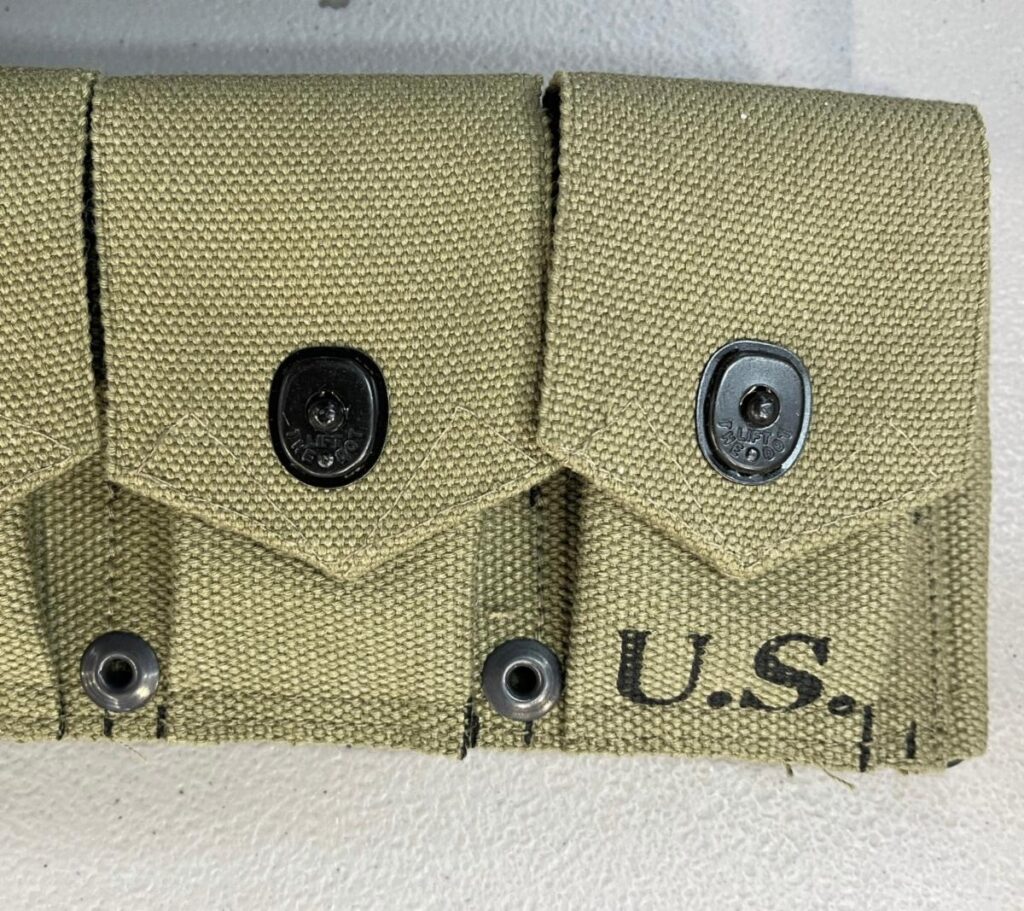
Guide marks on our cartridge belts.

Our reproductions: We do stencil the location points on our US gear as they make things so much simpler during production. We do not offer “mark free gear”. (A few have really gone ballistic over these.) Some of our German gear does have chalk or pencil marks, and we dooccasionally add some numbers to uniform parts or MP pouches just for giggles.

On a few items, such as Texled slings, I use the month and year (such as “223”) on a small stamp as my own inspection mark to ensure that all steps have been completed. This mimics those found on many original slings.

As for shade tags, I have looked around over the years to see if whatever contraption made them turns up. Wise me (the minority part of my brain) knows those would cause little but trouble due to the “huge holes” the staples would put in the uniforms…but it’d still be cool to do on some level.

The ATF Blog

Welcome to the At the Front Blog. Despite over 20 years of being on the internet, this is our first official “blog”. Personally, I rarely read anyone else’s blogs, and have procrastinated about setting this thing up for several years. So here we go…

The topics will generally be related to WWII uniforms & gear, WWII reenacting, plus a few random, unrelated things that strike me as worthy of writing about at a given moment. The primary goal will be to provide accurate information about the actual wartime uniforms & equipment, as well as the reproductions and what it sometimes takes to make them. To me, a “correct” product is one that is as close to the actual period item as possible.

As with many other hobbies, there are as many opinions as there are enthusiasts. When recreating items from the past, what people demand, or assume to be “correct” is often wrong. My standards are based on historical realities, not modern misconceptions or video game screen shots. Field jackets were not actually khaki, M1 bayonets do not fit on M1 Carbines, and shirts and trousers rarely match in color.

Just about everything we offer, we create ourselves or have made specifically for us. The process is, on the surface, quite simple. I obtain one or more original examples of “it” and set about having “it” duplicated. After nearly 40 years of owning, wearing, handling, and sometimes disassembling authentic items, I may not know it all, but I have a pretty good idea of what’s right and wrong when it comes to WWII stuff.

I call it as I see it and that’s that. No matter how much lipstick you smear on the pig, it’s still a pig and I refuse to refer to it as anything else no matter how many tender sensibilities it might rankle. Honesty may not be pretty but neither was WWII.

If you are involved in reenacting/ living history and intend to truly honor veterans and save history for our descendants, you owe it to the real soldiers that fought, froze, bled and died in the War to represent them as accurately possible. If this is just prancing around at a fruitcake convention dressed as a “Feel Marshal”, by all means, go with the polyester uniform and rubber boots. Or, if you just like vintage gear, just know I do my best to get it right- and enjoy the show.

-Rollin Curtis